Growing up in my grandmother’s kitchen, I learned that the most beloved comfort foods often come from the simplest ingredients. These Hungarian-style potato cheese sticks, or “krumplis sajtos rudacskák” as my grandmother called them, represent everything I love about traditional European cooking – they’re hearty, satisfying, and bring families together around the dinner table.
My journey with this recipe began during a particularly cold winter evening when I was craving something warm and cheesy. I remembered watching my grandmother’s weathered hands skillfully shape these golden treasures, and I knew I had to recreate that magic in my own kitchen. After numerous attempts and adjustments, I’ve perfected this recipe that pays homage to authentic Hungarian flavors while being accessible to home cooks everywhere.
These crispy, golden sticks aren’t just another appetizer – they’re a celebration of humble ingredients transformed into something extraordinary. The combination of fluffy mashed potatoes, melted cheese, and aromatic herbs creates a texture and flavor profile that’s both comforting and sophisticated. Whether you’re serving them as a side dish, appetizer, or even a light meal, these potato cheese sticks will quickly become a family favorite.
Understanding the Hungarian Tradition
Krumpli: The Hungarian word for potato, which forms the foundation of countless traditional dishes in Hungarian cuisine.
Sajt: Hungarian term for cheese, typically referring to the local varieties that melt beautifully and add richness to dishes.
Bundás: A cooking technique involving coating foods in breadcrumbs and frying until golden, commonly used in Hungarian kitchens.
Rántás: The base preparation method that involves creating a roux or preparing ingredients for coating and frying.
The beauty of Hungarian potato dishes lies in their ability to transform simple, affordable ingredients into something that feels luxurious and satisfying. My grandmother always said that the secret wasn’t in expensive ingredients, but in the love and patience you put into the preparation process.
Essential Ingredients Breakdown
Primary Components
| Ingredient | Quantity | Purpose | Substitution Options |
|---|---|---|---|
| Russet Potatoes | 2 lbs | Base structure, provides fluffiness | Yukon Gold, Idaho potatoes |
| Sharp Cheddar Cheese | 1 cup grated | Main flavor, melting properties | Gouda, Gruyère, Hungarian cheese |
| All-Purpose Flour | 1 cup | Binding agent, structure | Bread flour, gluten-free flour blend |
| Large Eggs | 2 whole | Binding, richness | Flax eggs for vegan option |
| Butter | 4 tablespoons | Richness, flavor enhancement | Margarine, olive oil |
| Breadcrumbs | 2 cups | Crispy coating | Panko, crushed crackers |
| Paprika | 2 teaspoons | Authentic Hungarian flavor | Smoked paprika, cayenne |
| Salt | 1 teaspoon | Flavor enhancement | Sea salt, kosher salt |
| Black Pepper | 1/2 teaspoon | Spice balance | White pepper |
| Fresh Chives | 2 tablespoons | Freshness, color | Green onions, parsley |
Optional Flavor Enhancers
| Ingredient | Quantity | Purpose | Notes |
|---|---|---|---|
| Garlic Powder | 1 teaspoon | Aromatic depth | Fresh garlic can be substituted |
| Onion Powder | 1 teaspoon | Savory complexity | Adds umami without texture |
| Sour Cream | 2 tablespoons | Tanginess, moisture | Greek yogurt works well |
| Caraway Seeds | 1/2 teaspoon | Traditional Hungarian flavor | Crush lightly before adding |
Step-by-Step Preparation Method
Phase 1: Potato Preparation
I always start by selecting the right potatoes – russets work best because of their high starch content, which creates that perfect fluffy interior. Wash and peel your potatoes, then cut them into evenly sized chunks. This ensures uniform cooking, which is crucial for achieving the right texture.
Place the potato chunks in a large pot and cover with cold, salted water. Starting with cold water helps the potatoes cook more evenly from the outside in. Bring to a boil over medium-high heat, then reduce to a steady simmer. Cook for 15-20 minutes until the potatoes are fork-tender but not falling apart.
Drain the potatoes thoroughly and let them sit for a few minutes to allow excess moisture to evaporate. This step is critical – too much moisture will make your mixture difficult to work with and affect the final texture.
Phase 2: Creating the Base Mixture
Mash the potatoes while they’re still warm using a potato masher or ricer. I prefer a ricer because it creates a smoother, more uniform texture without overworking the potatoes. Add the butter while the potatoes are hot so it melts completely and incorporates evenly.
Allow the mashed potatoes to cool for about 10 minutes before adding the eggs. If the potatoes are too hot, they’ll cook the eggs and create an unpleasant texture. Beat the eggs lightly before incorporating them into the potato mixture.
Gradually add the flour, stirring gently to combine. The mixture should come together into a soft, pliable dough that holds its shape but isn’t too stiff. If it feels too wet, add a bit more flour; if too dry, add a tablespoon of milk or cream.
Phase 3: Cheese Integration and Seasoning
Fold in the grated cheese, ensuring it’s evenly distributed throughout the mixture. The cheese will add richness and help bind the ingredients together. Add the paprika, salt, pepper, and any other seasonings you’re using.
The mixture should now have a beautiful golden color from the paprika and be flecked with cheese. Taste and adjust seasonings as needed – remember that the flavors will concentrate slightly during cooking.
Phase 4: Shaping and Coating
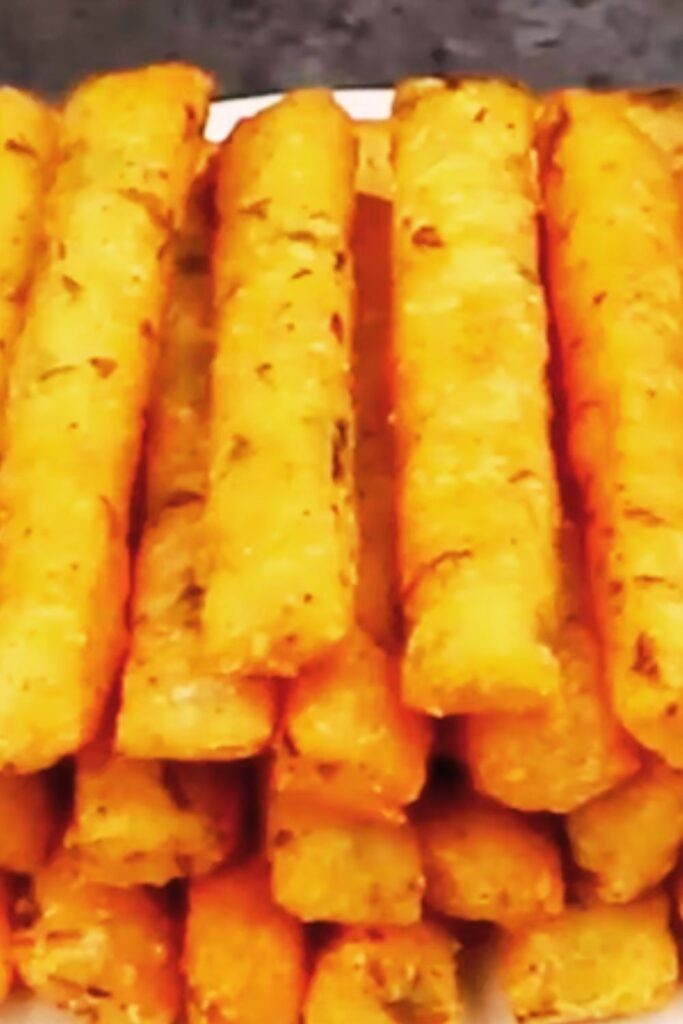
Using lightly floured hands, divide the mixture into portions and roll each into stick shapes about 3-4 inches long and 1 inch thick. The key is to work quickly but gently – overhandling will make the sticks tough.
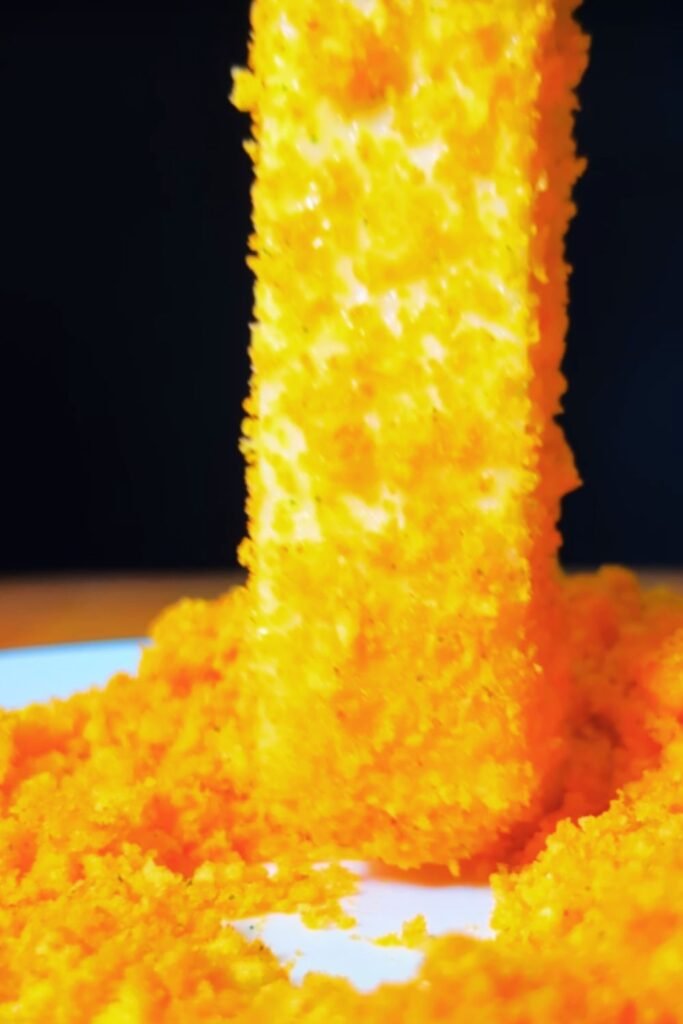
Set up your breading station with three shallow dishes: flour in the first, beaten eggs in the second, and breadcrumbs mixed with a pinch of paprika in the third. This assembly line approach makes the coating process much more efficient.
Roll each stick first in flour, then dip in the beaten eggs, and finally coat thoroughly with breadcrumbs. Place the coated sticks on a baking sheet lined with parchment paper.
Cooking Methods and Techniques
Traditional Frying Method
Heat oil to 350°F (175°C) in a deep, heavy-bottomed pot or deep fryer. The oil temperature is crucial – too hot and the outside will burn before the inside heats through; too cool and the sticks will absorb too much oil and become greasy.
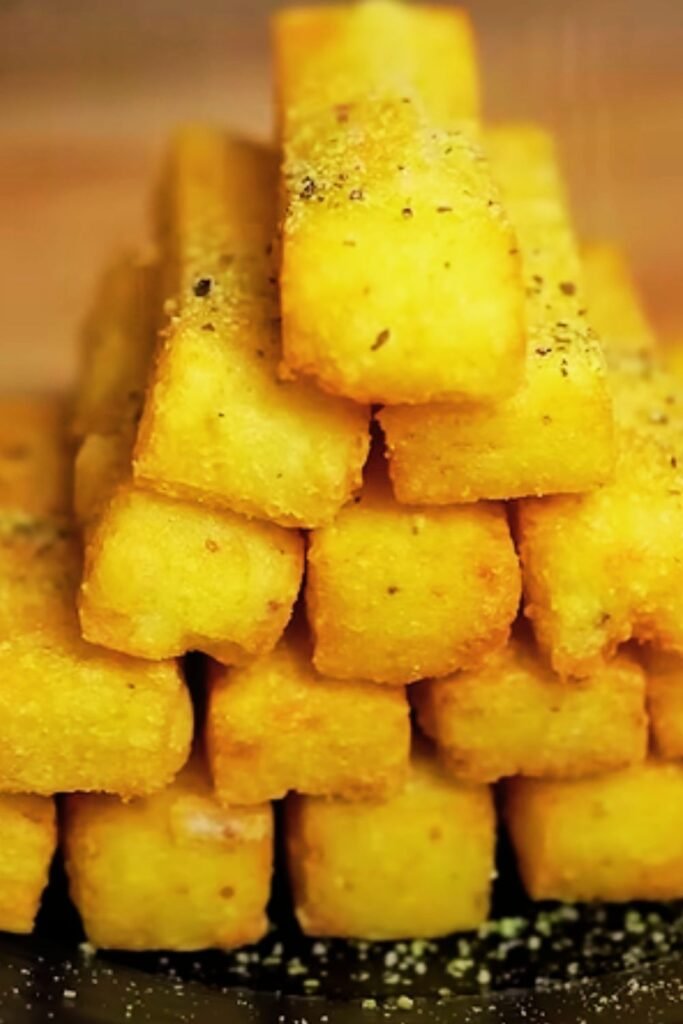
Fry the sticks in small batches, about 4-5 at a time, to avoid overcrowding. Cook for 3-4 minutes, turning once halfway through, until golden brown on all sides. The internal temperature should reach 165°F (74°C).
Remove with a slotted spoon and drain on paper towels. Serve immediately while hot and crispy.
Baking Alternative
For a healthier option, I often bake these sticks instead of frying. Preheat your oven to 425°F (220°C) and line a baking sheet with parchment paper. Lightly spray or brush the coated sticks with oil to promote browning.
Bake for 15-20 minutes, turning once halfway through, until golden brown and crispy. The baking method produces a slightly different texture but is equally delicious and much lighter.
Nutritional Information and Dietary Considerations
| Nutrient | Per Serving (3 sticks) | Daily Value % |
|---|---|---|
| Calories | 285 | 14% |
| Total Fat | 12g | 18% |
| Saturated Fat | 6g | 30% |
| Cholesterol | 75mg | 25% |
| Sodium | 420mg | 18% |
| Total Carbohydrates | 38g | 13% |
| Dietary Fiber | 3g | 12% |
| Sugars | 2g | – |
| Protein | 12g | 24% |
| Calcium | 180mg | 18% |
| Iron | 2.1mg | 12% |
| Potassium | 620mg | 18% |
Dietary Modifications
Gluten-Free: Replace all-purpose flour with a gluten-free flour blend and use gluten-free breadcrumbs.
Vegetarian: This recipe is naturally vegetarian-friendly.
Vegan: Substitute eggs with flax eggs, use vegan cheese, and replace butter with olive oil or vegan butter.
Lower Sodium: Reduce salt content and use low-sodium cheese options.
Storage and Reheating Guidelines
Short-Term Storage
Cooked potato cheese sticks can be stored in the refrigerator for up to 3 days in an airtight container. Layer them with parchment paper to prevent sticking.
Long-Term Storage
For longer storage, freeze the uncooked, breaded sticks on a baking sheet until solid, then transfer to freezer bags. They’ll keep for up to 3 months frozen.
Reheating Methods
| Method | Temperature | Time | Notes |
|---|---|---|---|
| Oven | 375°F (190°C) | 8-10 minutes | Best for maintaining crispiness |
| Air Fryer | 350°F (175°C) | 5-7 minutes | Excellent for reheating |
| Microwave | Medium power | 1-2 minutes | Quick but may lose crispiness |
| Stovetop | Medium heat | 3-4 minutes | Pan-fry with a little oil |
Serving Suggestions and Accompaniments
These potato cheese sticks are incredibly versatile and pair well with numerous accompaniments. I love serving them with a dollop of sour cream mixed with fresh herbs – the tanginess cuts through the richness beautifully.
Traditional Hungarian accompaniments include:
- Paprika-spiced sour cream
- Fresh cucumber salad with dill
- Roasted red pepper coulis
- Caramelized onion jam
- Hungarian-style coleslaw
For a more international approach, try serving them with:
- Marinara sauce for dipping
- Spicy aioli or garlic mayo
- Tzatziki sauce
- Salsa verde
- Ranch dressing with herbs
Troubleshooting Common Issues
Problem: Sticks Fall Apart During Cooking
Solution: The mixture may be too wet. Add more flour gradually until the mixture holds together better. Also, ensure the oil temperature is correct – too low and the coating won’t set quickly enough.
Problem: Bland Flavor
Solution: Taste the mixture before shaping and adjust seasonings. Don’t forget that potatoes need generous seasoning. Also, ensure you’re using sharp cheese for maximum flavor impact.
Problem: Soggy Coating
Solution: Make sure the potato mixture isn’t too wet before breading. Also, don’t skip the flour coating step – it helps the egg and breadcrumbs adhere properly.
Problem: Uneven Cooking
Solution: Ensure all sticks are similar in size and don’t overcrowd the pan. Maintain consistent oil temperature throughout cooking.
Variations and Creative Adaptations
Regional Variations
Slovakian Style: Add cottage cheese to the mixture for extra creaminess and a slightly tangy flavor.
Austrian Influence: Incorporate fresh herbs like parsley and dill, and serve with a side of apple compote.
Romanian Touch: Add a bit of smoked paprika and serve with a tomato-based sauce.
Flavor Variations
Herb Garden: Mix in fresh rosemary, thyme, and sage for an aromatic twist.
Spicy Version: Add cayenne pepper and jalapeños for heat lovers.
Mushroom Enhanced: Incorporate sautéed mushrooms for an earthy flavor.
Bacon Lovers: Add crispy bacon bits for a smoky, salty element.
Cultural Significance and History
In Hungarian cuisine, potato dishes like these cheese sticks represent the hearty, peasant-style cooking that has sustained families through generations. Potatoes were introduced to Hungary in the 18th century and quickly became a staple crop due to their versatility and ability to grow in various soil conditions.
The technique of coating and frying foods is deeply embedded in Central European cooking traditions. It’s a method that transforms simple ingredients into something special – a philosophy that resonates with Hungarian cooking principles of making the most of available ingredients.
My grandmother used to tell me stories of how dishes like these were prepared for special occasions and family gatherings. They represent more than just food; they’re a connection to heritage and tradition that I’m proud to share with you.
Questions and Answers
Q. Can I make these potato cheese sticks ahead of time?
Yes, you can prepare them up to the breading stage and refrigerate for up to 24 hours before cooking. You can also freeze them after breading for up to 3 months. Just cook them directly from frozen, adding a few extra minutes to the cooking time.
Q. What’s the best cheese to use for maximum flavor?
I recommend sharp cheddar for its excellent melting properties and robust flavor. However, Hungarian cheese like Trappista or other European varieties like Gruyère or aged Gouda work wonderfully too. Avoid pre-shredded cheese as it contains anti-caking agents that can affect melting.
Q. Why do my potato sticks fall apart when I try to shape them?
This usually happens when the potato mixture is too wet or hasn’t cooled enough. Make sure to drain the potatoes thoroughly after boiling and let the mashed potatoes cool before adding eggs. If the mixture is still too wet, gradually add more flour until it holds together.
Q. Can I bake these instead of frying for a healthier option?
Absolutely! Baking at 425°F (220°C) for 15-20 minutes works great. Brush or spray the breaded sticks with oil before baking to achieve a golden, crispy exterior. While the texture will be slightly different from frying, they’re still delicious and much lighter.
Q. How do I know when the oil is the right temperature for frying?
The ideal frying temperature is 350°F (175°C). If you don’t have a thermometer, test by dropping a small piece of bread into the oil – it should sizzle immediately and turn golden in about 30 seconds. Oil that’s too hot will burn the coating before the inside heats through.
Q. What can I serve with these potato cheese sticks?
These are incredibly versatile! Traditional accompaniments include sour cream with herbs, cucumber salad, or roasted red pepper sauce. For a more international flair, try marinara sauce, aioli, or tzatziki. They also work great as a side dish with roasted meats or grilled vegetables.
Q. How long do leftover potato cheese sticks stay fresh?
Cooked sticks will keep in the refrigerator for up to 3 days in an airtight container. For best results, reheat them in the oven at 375°F (190°C) for 8-10 minutes to restore crispiness. Avoid microwaving as it makes them soggy.
Q. Can I make these gluten-free?
Yes! Replace the all-purpose flour with a gluten-free flour blend and use gluten-free breadcrumbs. The texture might be slightly different, but they’ll still be delicious. Make sure all your other ingredients are also gluten-free certified.
Q. What’s the secret to getting the perfect crispy coating?
The key is in the three-step breading process: flour, egg, then breadcrumbs. Make sure each stick is thoroughly coated at each stage. Also, let the breaded sticks rest for 10-15 minutes before cooking to help the coating set properly.
Q. Can I use different types of potatoes?
While russet potatoes work best due to their high starch content and fluffy texture, you can use Yukon Gold potatoes as well. Avoid waxy potatoes like red potatoes, as they don’t mash as well and can make the mixture gummy.
Creating these Hungarian-style potato cheese sticks has become one of my favorite ways to bring comfort food to the table. They remind me that the best recipes often come from the simplest ingredients, transformed with love and technique into something truly special. Whether you’re making them for a family dinner, a party appetizer, or just because you’re craving something warm and cheesy, I hope this recipe brings as much joy to your kitchen as it has to mine.
The beauty of this dish lies not just in its delicious taste, but in its ability to bring people together. I encourage you to make this recipe your own – adjust the seasonings to your taste, try different cheeses, and don’t be afraid to experiment. After all, the best family recipes are the ones that evolve with each generation while maintaining their heart and soul.