There’s something absolutely magical about the aroma of garlic bread wafting through my kitchen. After years of experimenting with countless recipes and techniques, I’ve finally perfected what I consider to be the ultimate garlic bread recipe. This isn’t just any ordinary garlic bread – it’s the kind that makes your neighbors peek over the fence to see what smells so incredible.
I remember the first time I attempted garlic bread as a teenager. It was a disaster – burnt edges, raw center, and garlic so overpowering it could ward off vampires for miles. But that failure sparked my obsession with creating the perfect balance of crispy exterior, tender interior, and that divine garlic-herb flavor that makes your taste buds sing.
Today, I’m sharing with you my foolproof method that has become legendary among my friends and family. This recipe combines the best techniques I’ve learned from Italian grandmothers, professional bakers, and my own countless kitchen experiments.
Understanding the Foundation: What Makes Great Garlic Bread
Before diving into my recipe, let me share what I’ve learned about the essential elements that separate mediocre garlic bread from the extraordinary kind that people remember years later.
Bread Selection: The foundation of exceptional garlic bread starts with choosing the right loaf. I’ve tested everything from basic sandwich bread to artisanal sourdough, and the winner is consistently a good-quality French bread or Italian bread with a firm crust and airy interior.
Garlic Quality: Fresh garlic makes an enormous difference. I’ve compared fresh minced garlic with pre-minced jarred versions, garlic powder, and even roasted garlic, and each brings its own character to the final product.
Butter Balance: The ratio of butter to other ingredients is crucial. Too little, and you get dry bread with sparse flavor. Too much, and it becomes a greasy mess that drips everywhere.
Temperature Control: This is where most home cooks go wrong. The oven temperature and timing must be precise to achieve that perfect golden crust without overcooking the interior.
My Signature Garlic Bread Recipe
After perfecting this recipe through hundreds of batches, I can confidently say this produces the most flavorful, perfectly textured garlic bread you’ll ever taste.
Ingredients
| Ingredient | Amount | Quality Notes |
|---|---|---|
| French bread loaf | 1 large (16-18 inches) | Look for day-old bread with firm crust |
| Unsalted butter | 1/2 cup (1 stick) | European-style butter preferred |
| Fresh garlic cloves | 6-8 large cloves | Avoid pre-minced for best flavor |
| Fresh parsley | 1/4 cup, finely chopped | Flat-leaf parsley works best |
| Parmesan cheese | 1/3 cup, freshly grated | Avoid pre-grated for superior taste |
| Olive oil | 2 tablespoons | Extra virgin, high quality |
| Sea salt | 1/2 teaspoon | Fine sea salt or kosher salt |
| Black pepper | 1/4 teaspoon | Freshly ground preferred |
| Red pepper flakes | Pinch (optional) | Adds subtle heat |
Equipment Needed
- Large mixing bowl
- Garlic press or microplane grater
- Sharp serrated knife
- Large baking sheet
- Aluminum foil
- Pastry brush (optional but helpful)
Step-by-Step Instructions
Step 1: Prepare the Garlic Butter Mixture
I start by bringing my butter to room temperature – this is crucial for easy mixing and even distribution. In my large mixing bowl, I combine the softened butter with minced garlic. I prefer using a garlic press for consistency, but finely mincing with a knife works just as well.
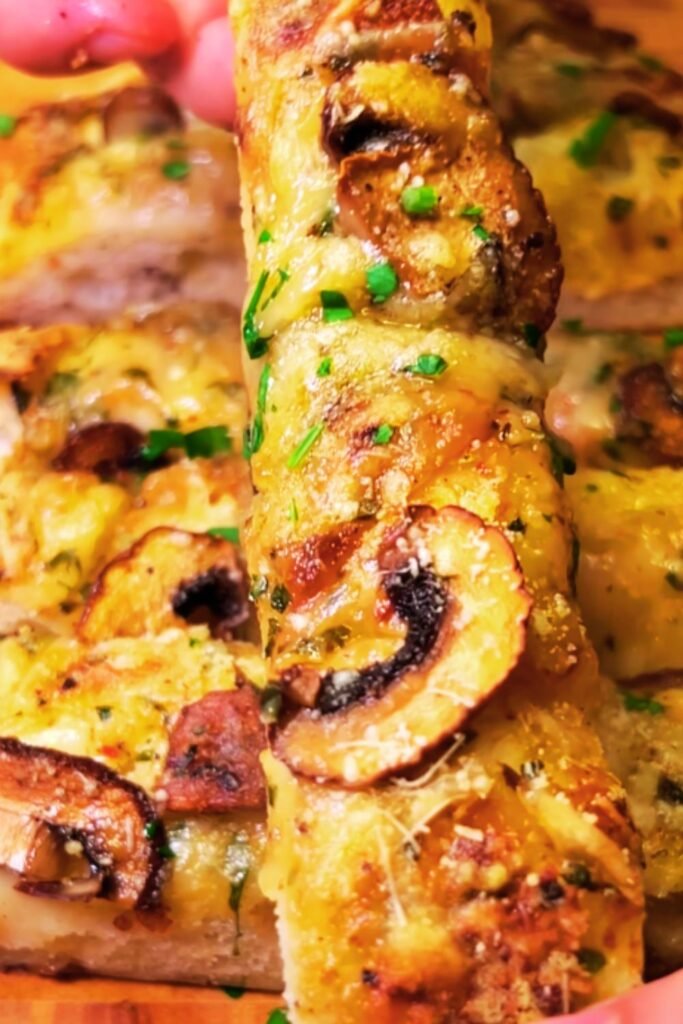
To the butter and garlic, I add the olive oil, which helps prevent the butter from burning and adds a subtle richness. The fresh parsley goes in next, followed by the grated Parmesan cheese, salt, pepper, and red pepper flakes if I’m feeling adventurous.
I mix everything thoroughly until it forms a smooth, fragrant paste. The mixture should be well-combined with no streaks of plain butter visible.
Step 2: Prepare the Bread
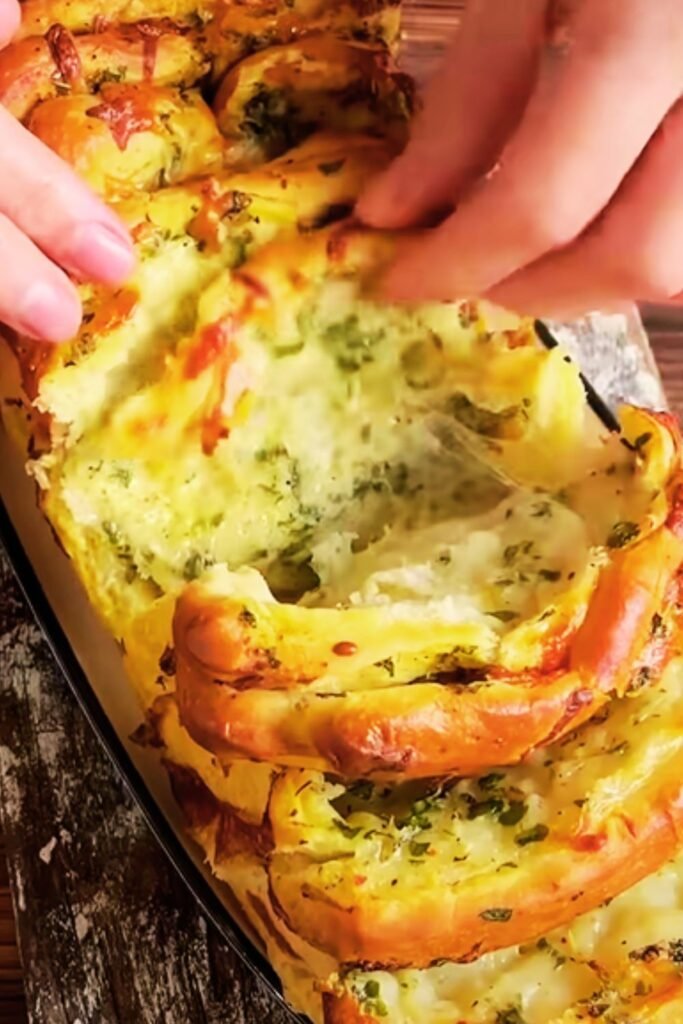
Using my sharpest serrated knife, I slice the French bread diagonally into 1-inch thick pieces, being careful not to cut completely through the bottom crust. This technique allows the garlic butter to penetrate while keeping the loaf intact for easier serving.
I’ve found that cutting at a slight diagonal rather than straight across creates more surface area for the garlic butter and looks more elegant when served.
Step 3: Apply the Garlic Butter
This is where patience pays off. I carefully spread the garlic butter mixture between each slice and over the top of the entire loaf. I use my fingers or a small spoon to ensure every crevice gets filled with that golden goodness.
Don’t be shy with the mixture – this is what creates those incredibly flavorful pockets that make each bite memorable. Any leftover mixture gets spread over the top and sides of the loaf.
Step 4: Wrap and Initial Bake
I wrap the prepared loaf tightly in aluminum foil and place it on a large baking sheet. The foil is essential for the first part of baking – it creates steam that keeps the interior soft while allowing the flavors to meld.
Into a preheated 375°F (190°C) oven it goes for 15 minutes. This initial covered baking ensures the butter melts completely and penetrates the bread without browning too quickly.
Step 5: The Final Browning
After 15 minutes, I remove the foil and return the bread to the oven for an additional 10-12 minutes. This is when the magic happens – the top becomes golden brown and slightly crispy while the interior remains tender and flavorful.
I watch carefully during this final stage, as the line between perfectly golden and overdone can be crossed quickly.
Advanced Techniques and Variations
Over the years, I’ve developed several variations of my basic recipe that cater to different tastes and occasions.
Herb-Crusted Garlic Bread
For special occasions, I create an herb crust by mixing breadcrumbs with additional herbs. I combine 1/4 cup of panko breadcrumbs with extra parsley, oregano, and thyme, then sprinkle this mixture over the butter-coated bread before the final browning phase.
Cheesy Garlic Bread Supreme
When I want to make it extra indulgent, I add a blend of cheeses. Along with the Parmesan, I incorporate 1/4 cup each of shredded mozzarella and sharp cheddar cheese. The mozzarella adds stretchiness, while the cheddar contributes sharp flavor complexity.
Roasted Garlic Version
For a mellower, sweeter garlic flavor, I sometimes use roasted garlic instead of raw. I roast whole garlic bulbs at 400°F (200°C) for 30-40 minutes until soft and caramelized, then squeeze out the cloves and mash them into the butter mixture.
Sourdough Garlic Bread
When I have access to excellent sourdough bread, I adjust my technique slightly. Sourdough’s tanginess pairs beautifully with garlic, but its denser texture requires a slightly longer initial baking time – about 18 minutes covered instead of 15.
Troubleshooting Common Problems
Through my years of making garlic bread, I’ve encountered and solved virtually every problem that can arise.
Problem: Burnt Edges, Raw Center
This happens when the oven temperature is too high or the bread is placed too close to the heating element. I always use the middle rack and stick to 375°F. If your oven runs hot, reduce to 350°F and extend the cooking time slightly.
Problem: Soggy Texture
Usually caused by too much butter or not enough initial browning time. I’ve learned that less is sometimes more with the butter mixture, and the final uncovered baking phase is crucial for texture.
Problem: Overpowering Garlic Flavor
Raw garlic can be harsh. If you find the flavor too strong, try blanching the minced garlic in boiling water for 30 seconds before adding it to the butter mixture. This mellows the bite while preserving the flavor.
Problem: Uneven Browning
This often results from uneven butter distribution or oven hot spots. I always rotate my baking sheet halfway through the final browning phase and ensure the butter mixture is spread evenly.
Nutritional Information and Dietary Considerations
| Nutrient | Per Serving (1/8 of loaf) | % Daily Value |
|---|---|---|
| Calories | 285 | 14% |
| Total Fat | 12g | 18% |
| Saturated Fat | 7g | 35% |
| Cholesterol | 28mg | 9% |
| Sodium | 420mg | 18% |
| Carbohydrates | 38g | 13% |
| Fiber | 2g | 8% |
| Protein | 8g | 16% |
| Vitamin A | 8% DV | – |
| Calcium | 12% DV | – |
Dietary Modifications
For those with dietary restrictions, I’ve successfully adapted this recipe several ways:
Vegan Version: I substitute the butter with high-quality vegan butter and replace the Parmesan with nutritional yeast. The flavor profile changes slightly but remains delicious.
Gluten-Free Option: Using a good gluten-free bread as the base works well, though the texture will be different. I reduce the baking time slightly as gluten-free breads tend to brown faster.
Dairy-Free Alternative: Olive oil can replace some of the butter, and dairy-free Parmesan alternatives are increasingly available and work well in this recipe.
Storage and Reheating Tips
Proper storage can extend the life of your garlic bread and maintain its quality for future enjoyment.
Short-Term Storage
Leftover garlic bread stays fresh at room temperature for up to 2 days when wrapped in aluminum foil. I avoid plastic wrap as it can make the crust soggy.
Freezing for Later
I often make double batches and freeze half for busy weeknights. The key is to freeze the bread after applying the garlic butter mixture but before baking. I wrap it tightly in plastic wrap, then aluminum foil, and it keeps for up to 3 months.
To bake from frozen, I add 5-10 minutes to the initial covered baking time, then proceed with the uncovered browning as usual.
Reheating Methods
Oven Method: My preferred reheating method involves wrapping leftover pieces in foil and warming at 350°F for 8-10 minutes.
Toaster Oven: Individual slices reheat beautifully in a toaster oven at 350°F for 3-4 minutes.
Avoid the Microwave: Microwaving makes garlic bread soggy and chewy – I never recommend this method.
Serving Suggestions and Pairings
Garlic bread’s versatility makes it an excellent accompaniment to numerous dishes. I’ve served it alongside everything from simple pasta dishes to elaborate dinner parties.
Classic Pairings
Italian Cuisine: Nothing beats garlic bread with spaghetti marinara, chicken parmesan, or a hearty minestrone soup. The bread’s rich flavor complements tomato-based sauces perfectly.
Salads: I love serving garlic bread alongside Caesar salad or any mixed green salad with vinaigrette. The bread’s richness balances the acidity of the dressing.
Soups: Whether it’s tomato basil soup, French onion soup, or a hearty vegetable soup, garlic bread makes an ideal dipper and adds substance to the meal.
Creative Serving Ideas
Appetizer Platter: I slice the bread into smaller pieces and arrange them on a platter with olives, cherry tomatoes, and fresh mozzarella for an Italian-inspired appetizer spread.
Sandwich Base: Leftover garlic bread makes an incredible foundation for sandwiches. I’ve made amazing paninis using garlic bread as the base.
Bruschetta Platform: The garlic bread serves as an excellent base for various bruschetta toppings – diced tomatoes with basil, ricotta with honey, or roasted vegetables.
Cost Analysis and Budget-Friendly Tips
| Item | Average Cost | Money-Saving Tips |
|---|---|---|
| French bread | $2.50 | Buy day-old bread at discount |
| Butter | $4.00 | Purchase in bulk when on sale |
| Fresh garlic | $1.50 | Buy whole bulbs, use for multiple recipes |
| Parsley | $1.00 | Grow your own herbs |
| Parmesan | $6.00 | Buy blocks and grate yourself |
| Total per loaf | $15.00 | Serves 8: $1.88 per serving |
Budget-Friendly Substitutions
When money is tight, I’ve found several ways to reduce costs without significantly impacting flavor:
- Use garlic powder instead of fresh garlic (though fresh is preferred)
- Substitute dried parsley for fresh (use 1 tablespoon instead of 1/4 cup fresh)
- Use less expensive margarine instead of butter
- Skip the Parmesan cheese or use a smaller amount
The Science Behind Perfect Garlic Bread
Understanding the science helps me consistently achieve perfect results. The Maillard reaction is responsible for the golden-brown color and complex flavors that develop during baking. This reaction occurs between amino acids and sugars when exposed to heat, typically starting around 280°F (140°C).
The butter serves multiple purposes beyond flavor. Its fat content helps conduct heat evenly, prevents the bread from drying out, and carries the fat-soluble compounds in garlic that contribute to its aroma and taste.
Garlic contains allicin, which forms when garlic cells are damaged (by chopping or pressing). This compound is responsible for garlic’s characteristic flavor and aroma, but it’s heat-sensitive and transforms during cooking into more mellow, sweet compounds.
Seasonal Variations and Ingredient Swaps
Throughout the year, I modify my garlic bread recipe to incorporate seasonal ingredients and take advantage of what’s fresh and available.
Spring Version
In spring, I add fresh chives and incorporate lemon zest into the butter mixture. The bright, fresh flavors complement the season’s lighter meals.
Summer Adaptation
During tomato season, I sometimes add finely diced sun-dried tomatoes to the butter mixture, creating a more complex flavor profile that pairs beautifully with grilled foods.
Fall Enhancement
In autumn, I might add a touch of rosemary or sage to the herb mixture, creating earthier flavors that complement heartier fall meals.
Winter Comfort
During cold months, I sometimes add a small amount of roasted garlic along with the fresh garlic, creating deeper, more comforting flavors.
Professional Tips for Perfect Results
After making thousands of loaves of garlic bread, I’ve developed several professional techniques that ensure consistent, restaurant-quality results:
Temperature Matters: I always let my butter reach true room temperature before mixing. Cold butter won’t incorporate properly, and overly warm butter can separate.
Garlic Prep: I mince my garlic and let it sit for 10 minutes before mixing. This allows the allicin to fully develop, maximizing flavor.
Even Distribution: I use a small offset spatula to ensure the garlic butter reaches every crevice between bread slices.
Timing is Everything: I never let prepared garlic bread sit too long before baking, as the bread can become soggy from the butter mixture.
Q&A Section
Q. How far in advance can I prepare garlic bread before baking?
I recommend preparing garlic bread no more than 2 hours before baking for optimal texture. The bread can become soggy if the butter mixture sits too long. However, you can prepare the garlic butter mixture up to 3 days in advance and store it refrigerated.
Q. Can I use store-bought garlic butter instead of making my own?
While you can use store-bought garlic butter, I strongly recommend making your own. Commercial versions often contain preservatives and artificial flavors that don’t compare to fresh ingredients. Plus, making your own allows you to control the garlic intensity and add personal touches like herbs or cheese.
Q. What’s the best way to prevent the garlic from burning?
The key is using the two-stage baking process I described – first covered with foil, then uncovered for browning. Also, make sure your oven temperature doesn’t exceed 375°F, and keep the bread on the middle rack away from direct heat sources.
Q. Why does my garlic bread sometimes turn out greasy?
Greasiness usually results from using too much butter or baking at too low a temperature. I stick to the exact measurements in my recipe and ensure my oven is properly preheated to 375°F. Also, make sure you’re using a good ratio of butter to other ingredients.
Q. Can I make garlic bread with sandwich bread?
While possible, sandwich bread doesn’t provide the ideal texture for garlic bread. The soft crust and fine crumb don’t hold up well to the butter mixture. If that’s all you have, slice it thicker and reduce the baking time to prevent it from becoming too crispy.
Q. How do I know when the garlic bread is perfectly done?
Look for a golden-brown color on top and slightly crispy edges. The bread should sound slightly hollow when tapped, and the butter should be completely melted and absorbed. The internal temperature should reach about 200°F (93°C).
Q. What’s the difference between using fresh versus dried herbs?
Fresh herbs provide brighter, more vibrant flavors and better color. Dried herbs are more concentrated, so if substituting, use about one-third the amount. I always prefer fresh parsley in this recipe because it adds color and a clean, fresh taste that complements the garlic perfectly.
Q. Can I add other cheeses besides Parmesan?
Absolutely! Mozzarella adds stretchiness, cheddar provides sharpness, and Romano offers a more intense flavor than Parmesan. I sometimes use a blend of Parmesan and mozzarella for the best of both worlds – flavor and texture.
Q. Why do some recipes call for mayonnaise in garlic bread?
Some recipes use mayonnaise as a base instead of butter because it spreads easily and creates a slightly different texture when baked. However, I prefer the pure flavor and richness that butter provides. Mayonnaise can work, but it changes the fundamental character of the bread.
Q. How can I make my garlic bread spicier?
I add red pepper flakes to the butter mixture for subtle heat, or you can incorporate a small amount of hot sauce or finely minced jalapeño. Start with small amounts – you can always add more, but you can’t take it away once it’s mixed in.
This garlic bread recipe has become my signature dish at family gatherings and dinner parties. The combination of perfectly balanced flavors, ideal texture, and foolproof technique makes it a winner every time. I hope it brings as much joy to your kitchen and dinner table as it has to mine. Remember, the key to exceptional garlic bread lies in using quality ingredients, proper technique, and most importantly, making it with love for the people you’re sharing it with.