There’s something magical about Jollof rice that transcends mere sustenance. I remember the first time I tasted authentic Jollof rice at my Nigerian friend’s home – the aroma alone transported me to a bustling Lagos kitchen, where generations of culinary wisdom had been passed down through loving hands. That moment sparked my obsession with mastering this iconic West African dish, and after countless experiments, burnt bottoms, and triumphant successes, I’m excited to share my perfected recipe with you.
Jollof rice isn’t just food; it’s a cultural phenomenon that unites and divides nations in the most delicious way possible. The friendly rivalry between Nigerian, Ghanaian, and Senegalese cooks over whose version reigns supreme has created a rich tapestry of variations, each with its own devoted following. Through my culinary journey, I’ve discovered that the secret lies not in choosing sides, but in understanding the fundamental principles that make great Jollof rice transcend borders.
Understanding Jollof Rice: More Than Just Colored Rice
Jollof Rice : A one-pot rice dish cooked in a flavorful tomato-based sauce, originating from the Senegambian region and now beloved across West Africa
Parboiled Rice : Partially pre-cooked rice that maintains its structure during the long cooking process, essential for authentic Jollof texture
Sofrito Base : The aromatic foundation of onions, garlic, ginger, and peppers that forms the flavor backbone of Jollof rice
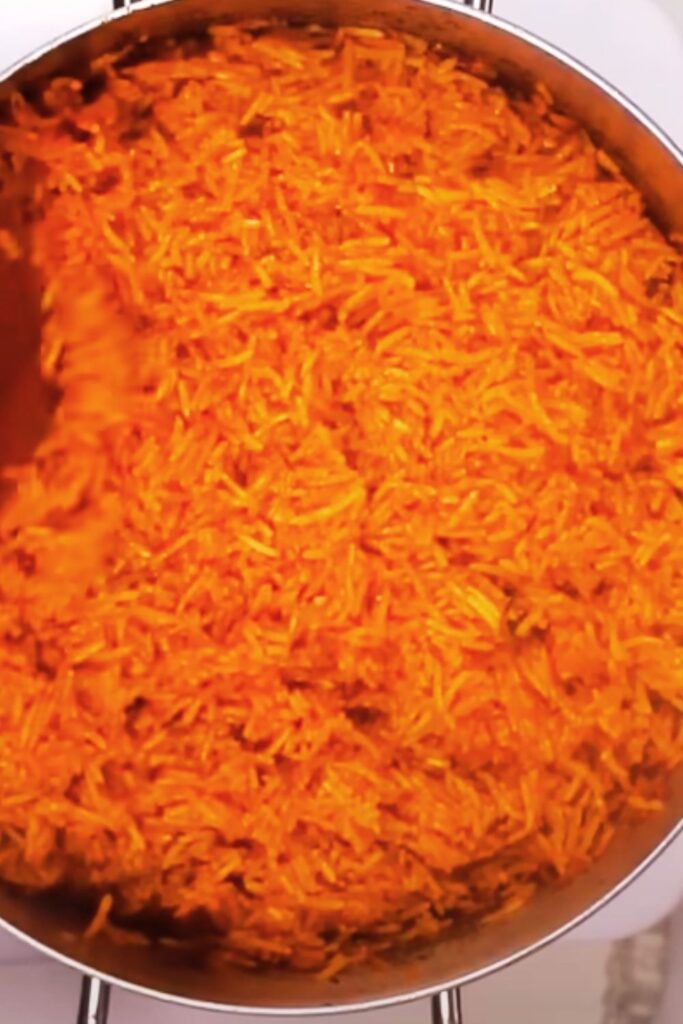
Party Jollof : The coveted slightly burnt bottom layer (called ‘konkonte’ in Ghana or ‘eba’ in Nigeria) that adds smoky depth to the dish
The beauty of homemade Jollof rice lies in its deceptive simplicity. While the ingredient list might seem straightforward, the technique requires patience, intuition, and respect for the process. I’ve learned that rushing Jollof rice is like trying to hurry a sunset – you’ll miss the magic that happens when time and heat work their alchemy.
Essential Ingredients for Authentic Jollof Rice
My years of experimentation have taught me that ingredient quality directly impacts the final result. Here’s what you’ll need for my signature recipe:
Core Ingredients
| Ingredient | Quantity | Purpose | Quality Tips |
|---|---|---|---|
| Parboiled rice | 3 cups | Main starch | Choose long-grain parboiled rice; avoid regular jasmine or basmati |
| Fresh tomatoes | 6 large | Primary flavor base | Use Roma tomatoes for best consistency and flavor |
| Red bell peppers | 4 medium | Sweetness and color | Bright red peppers add natural sweetness |
| Scotch bonnet peppers | 2-3 | Heat and authentic flavor | Adjust quantity based on heat preference |
| Large onions | 2 | Aromatic foundation | Yellow onions provide the best flavor balance |
| Tomato paste | 3 tablespoons | Depth and color | Use high-quality concentrated paste |
| Vegetable oil | 1/2 cup | Cooking medium | Palm oil traditional, but vegetable oil works well |
| Chicken stock | 4-5 cups | Liquid base | Homemade preferred, low-sodium if store-bought |
Protein Options
| Protein | Preparation | Cooking Notes |
|---|---|---|
| Chicken pieces | Cut into serving sizes, seasoned | Brown separately before adding to rice |
| Beef chunks | Cut into 1-inch cubes | Requires longer cooking time, add early |
| Fish fillets | Firm white fish, cut into portions | Add in final 15 minutes to prevent breaking |
| Shrimp | Peeled and deveined | Add in last 5 minutes to prevent overcooking |
Seasoning Arsenal
| Spice/Seasoning | Amount | Flavor Profile |
|---|---|---|
| Bay leaves | 3-4 leaves | Earthy, subtle complexity |
| Thyme (dried) | 2 teaspoons | Herbaceous warmth |
| Curry powder | 2 tablespoons | Golden color, mild spice |
| Garlic powder | 1 tablespoon | Concentrated garlic flavor |
| Ginger powder | 1 teaspoon | Warm, slight heat |
| Seasoning cubes | 2-3 cubes | Umami depth (Maggi or Knorr) |
| Salt | To taste | Flavor enhancement |
| Black pepper | 1 teaspoon | Gentle heat |
My Step-by-Step Jollof Rice Method
Phase 1: Creating the Flavor Foundation
The secret to exceptional Jollof rice begins long before the rice touches the pot. I start by creating what I call the “flavor trinity” – a blend of tomatoes, peppers, and onions that forms the soul of the dish.
First, I wash and roughly chop my tomatoes, red bell peppers, scotch bonnet peppers, and one of the onions. Into the blender they go with just enough water to facilitate blending – about 1/4 cup usually does the trick. I blend until smooth, creating a vibrant red puree that will become the backbone of my Jollof.
Next comes the crucial step that many home cooks skip: cooking down the puree. I pour this mixture into a large, heavy-bottomed pot and cook it over medium-high heat for 15-20 minutes, stirring occasionally. The goal is to cook out the raw vegetable flavor and concentrate the taste. You’ll know it’s ready when the mixture has darkened significantly and reduced by about half.
Phase 2: Building Layers of Flavor
While the puree cooks down, I dice my remaining onion finely and prepare my protein. If I’m using chicken, I season it generously with salt, pepper, curry powder, and a crumbled seasoning cube, then set it aside to marinate.
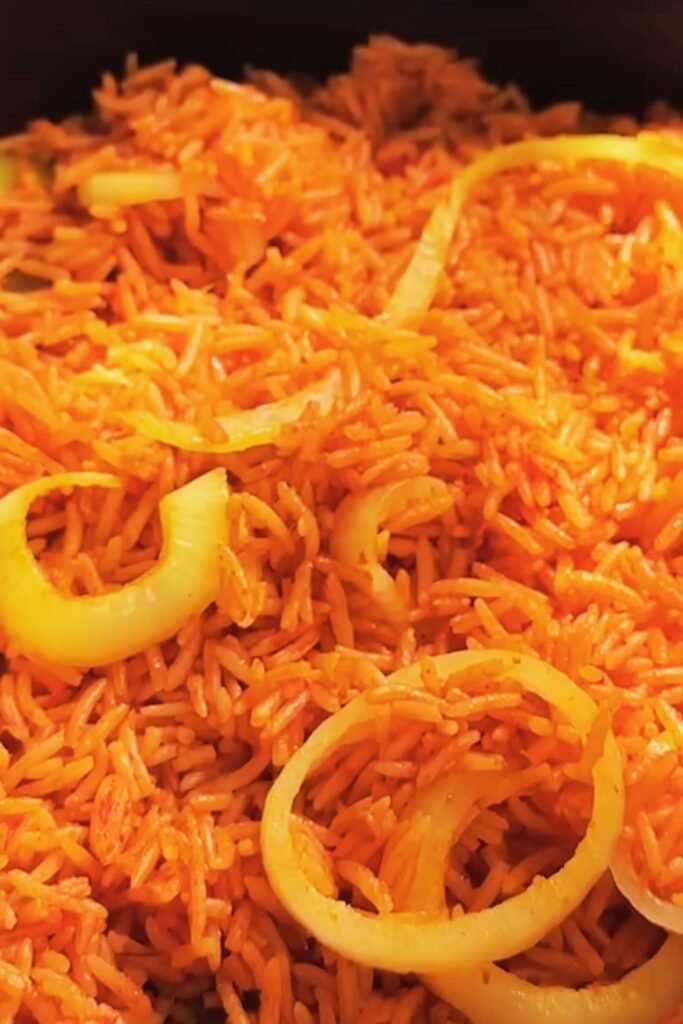
Once my tomato base has reduced properly, I add the tomato paste and continue cooking for another 5 minutes. The paste adds depth and helps achieve that characteristic Jollof color. Then I add my diced onions and cook until they’re translucent and fragrant.
Phase 3: The Rice Integration
Here’s where patience becomes crucial. I add my seasoned chicken pieces to the pot and brown them lightly in the tomato mixture. This step infuses the meat with flavor while adding richness to the sauce.
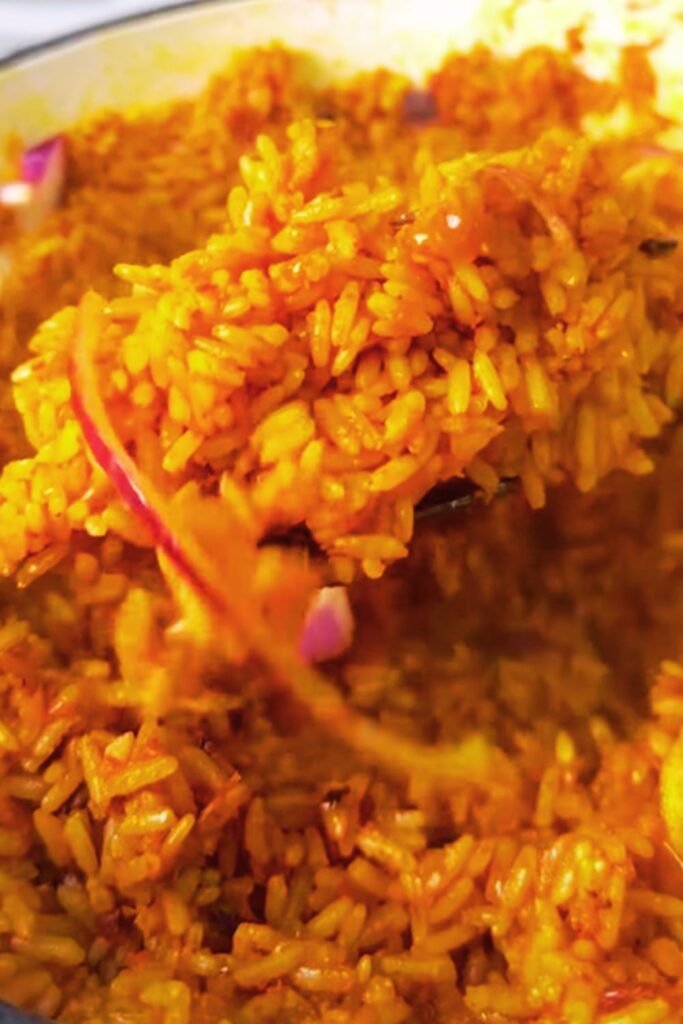
Now comes the moment of truth – adding the rice. I rinse my parboiled rice until the water runs clear, then add it to the pot. The key is to stir gently but thoroughly, ensuring every grain gets coated with that beautiful red sauce.
| Cooking Stage | Time | Visual Cues | Action Required |
|---|---|---|---|
| Initial simmer | 5 minutes | Rice absorbs surface liquid | Gentle stirring, taste for seasoning |
| Active cooking | 15 minutes | Liquid level drops, rice swells | Minimal stirring, monitor heat |
| Steam phase | 10 minutes | Little visible liquid | Cover tightly, reduce heat |
| Final rest | 5 minutes | Off heat | No peeking, let steam finish cooking |
I add my hot chicken stock gradually, just enough to cover the rice by about an inch. Too much liquid creates mushy rice; too little leads to uneven cooking. I bring everything to a rolling boil, then reduce the heat to medium-low and let the magic happen.
Phase 4: The Waiting Game
This is where I test every cook’s patience. The rice needs time to absorb the liquid and flavors properly. I resist the urge to stir constantly – a gentle stir every 10 minutes is sufficient. As the liquid reduces, I can hear the gentle sizzling that tells me the bottom is beginning to caramelize.
When most of the visible liquid has been absorbed, I add my bay leaves and thyme, then cover the pot tightly and reduce the heat to low. This final steaming phase is crucial for achieving perfectly cooked grains.
Advanced Techniques for Perfect Jollof
Through trial and error, I’ve developed several techniques that elevate homemade Jollof from good to extraordinary:
The Double-Cooking Method
For special occasions, I employ a technique I learned from a Ghanaian chef friend. After the initial cooking, I transfer portions of the rice to a separate pan and finish cooking them individually. This allows for better heat control and prevents the bottom layer from burning while ensuring even cooking throughout.
Stock Selection Strategy
The liquid you choose dramatically impacts the final flavor. My preference hierarchy:
- Homemade chicken stock: Rich, full-bodied flavor that complements the tomato base
- Quality store-bought stock: Convenient option, choose low-sodium varieties
- Water with extra seasoning cubes: Budget-friendly, requires careful seasoning adjustment
Heat Management Philosophy
Jollof rice cooking follows three distinct heat phases:
- High heat: Initial boiling and sauce integration (5-7 minutes)
- Medium heat: Active cooking and liquid absorption (15-20 minutes)
- Low heat: Final steaming and caramelization (10-15 minutes)
The Art of Seasoning Balance
Achieving the perfect seasoning balance takes practice. I taste and adjust at three critical points:
- After adding the rice and stock (adjust salt and spice)
- Midway through cooking (add herbs and aromatics)
- Just before final steaming (final seasoning tweaks)
Nutritional Profile and Dietary Considerations
| Nutrient | Per Serving (1 cup) | Daily Value % |
|---|---|---|
| Calories | 285 | 14% |
| Carbohydrates | 52g | 17% |
| Protein | 8g | 16% |
| Fat | 6g | 9% |
| Fiber | 2g | 8% |
| Sodium | 680mg | 30% |
| Vitamin C | 45mg | 50% |
| Iron | 2.1mg | 12% |
Dietary Adaptations I’ve Successfully Tested
Vegetarian Version: Replace chicken stock with vegetable broth and add extra vegetables like carrots, green beans, and bell peppers
Vegan Adaptation: Use vegetable oil instead of any animal fats and replace seasoning cubes with salt and additional spices
Lower Sodium Option: Use low-sodium stock and reduce seasoning cubes, compensating with fresh herbs and spices
Gluten-Free Consideration: Naturally gluten-free when using certified gluten-free seasoning cubes
Troubleshooting Common Jollof Rice Challenges
Problem: Mushy, Overcooked Rice
Cause: Too much liquid or overcooking My Solution: Use less stock initially, add more only if needed. Choose parboiled rice and avoid excessive stirring.
Problem: Burnt Bottom Without Proper Cooking
Cause: Heat too high or insufficient liquid My Solution: Monitor heat carefully and ensure adequate liquid coverage throughout cooking.
Problem: Bland Flavor
Cause: Under-seasoning or not cooking the tomato base long enough My Solution: Cook tomato puree thoroughly until darkened, taste and adjust seasoning multiple times during cooking.
Problem: Uneven Cooking
Cause: Inadequate stirring or poor heat distribution My Solution: Use heavy-bottomed pot, stir gently but regularly during active cooking phase.
Storage and Reheating Excellence
Proper storage extends the life of your Jollof rice masterpiece:
Refrigeration Guidelines
- Cool completely before refrigerating
- Store in airtight containers for up to 4 days
- Portion into meal-sized containers for easy reheating
Freezing Technique
- Freeze in freezer-safe containers for up to 3 months
- Add a splash of stock when reheating from frozen
- Thaw overnight in refrigerator for best results
Reheating Methods
| Method | Time | Texture Result | Best For |
|---|---|---|---|
| Microwave | 2-3 minutes | Quick, slightly softer | Single servings |
| Stovetop | 5-7 minutes | Maintains texture well | Multiple servings |
| Oven | 15-20 minutes at 350°F | Most authentic texture | Large portions |
Serving Suggestions and Accompaniments
Jollof rice shines as both a standalone dish and as part of a larger West African feast. My favorite serving combinations include:
Traditional Pairings
- Fried plantains: The sweetness complements the savory rice perfectly
- Coleslaw: Fresh, crunchy contrast to the rich rice
- Grilled chicken: Classic protein pairing
- Nigerian pepper soup: Light, spicy starter
Modern Fusion Ideas
- Avocado slices: Creamy texture and healthy fats
- Grilled vegetables: Mediterranean twist with African flavors
- Fresh cucumber salad: Cooling complement to spicy rice
- Steamed broccoli: Nutritious green addition
Beverage Recommendations
- Zobo (Hibiscus drink): Traditional Nigerian beverage
- Fresh fruit juices: Mango, pineapple, or orange
- Coconut water: Refreshing and tropical
- Ginger beer: Spicy complement to rich flavors
Cultural Significance and Regional Variations
Understanding the cultural context enriches the cooking experience. Jollof rice represents more than sustenance – it’s a symbol of celebration, community, and cultural pride across West Africa.
Nigerian Style Characteristics
- Smoky flavor: Achieved through controlled bottom burning
- Protein variety: Often includes multiple meats
- Spice level: Generally moderate with scotch bonnet heat
- Color: Deep red from tomato and pepper base
Ghanaian Approach
- Jasmine rice alternative: Some regions use jasmine rice
- Vegetable additions: More likely to include mixed vegetables
- Seasoning: Distinctive use of ginger and local spices
- Presentation: Often garnished with boiled eggs
Senegalese Origins
- Thieboudienne influence: Original one-pot fish and rice dish
- Vegetable emphasis: Heavy use of root vegetables
- Cooking method: Often cooked in traditional clay pots
- Flavor profile: More subtle, less tomato-heavy
Questions and Answers About Jollof Rice
Q: Why does my Jollof rice turn out too wet or mushy?
The most common culprit is using too much liquid or the wrong type of rice. I always use parboiled long-grain rice because it holds its structure better during the long cooking process. Start with less stock than you think you need – you can always add more, but you can’t take it away. The rice should absorb the liquid gradually, not swim in it.
Q: How do I achieve the perfect “party rice” burnt bottom without ruining the entire pot?
This is an art that requires patience and attention. Once most of the liquid has been absorbed and you hear gentle sizzling, increase the heat to medium for just 2-3 minutes, then immediately reduce to low and continue steaming. The key is listening to your pot – when the sizzling becomes more pronounced, you’re getting that coveted caramelization.
Q: Can I make Jollof rice without parboiled rice?
While parboiled rice is traditional and gives the best results, I’ve successfully made Jollof with jasmine rice. You’ll need to reduce the cooking time and use less liquid. The texture will be different – softer and less distinct grains – but still delicious.
Q: My Jollof rice doesn’t have that deep red color I see in restaurants. What am I doing wrong?
Color comes primarily from properly cooked tomato paste and puree. Many home cooks don’t cook their tomato base long enough. I cook mine until it’s significantly darker and reduced by half. Also, using quality tomato paste and adding a small amount of paprika can enhance the color naturally.
Q: How spicy should authentic Jollof rice be?
Authentic Jollof has a gentle heat that builds rather than overwhelming. The scotch bonnet peppers provide authentic flavor beyond just heat. If you’re sensitive to spice, start with one pepper and remove the seeds. You can always add more heat, but you can’t take it away.
Q: Is it normal for Jollof rice to take so long to cook?
Absolutely! Good Jollof rice can’t be rushed. From start to finish, expect about 45 minutes to an hour of active cooking time. The slow cooking process allows the flavors to meld and the rice to absorb all that delicious sauce properly.
Q: Can I prepare any components of Jollof rice ahead of time?
Yes! I often prepare my tomato-pepper puree a day ahead and store it in the refrigerator. This actually improves the flavor as it allows the ingredients to marry. You can also season your protein in advance. However, the rice itself is best cooked fresh and served immediately.
Q: What’s the difference between Jollof rice and other tomato rice dishes?
Jollof rice is distinguished by its specific technique, spice profile, and cultural preparation methods. Unlike Spanish paella or Middle Eastern rice dishes, Jollof uses a tomato-pepper base that’s cooked down extensively, specific West African seasonings, and a particular cooking method that creates its characteristic texture and flavor.
The journey to perfect Jollof rice is deeply personal and endlessly rewarding. Each time I make this dish, I’m reminded of the warm hospitality and rich cultural traditions it represents. Whether you’re cooking for a special celebration or simply wanting to explore West African cuisine, remember that the best Jollof rice comes from patience, quality ingredients, and respect for the process.
My kitchen has become a laboratory for Jollof experimentation, and I encourage you to make this recipe your own. Adjust seasonings to your taste, experiment with different proteins, and don’t be discouraged if your first attempt isn’t perfect. Like any masterpiece, great Jollof rice takes practice, but the journey is absolutely delicious.