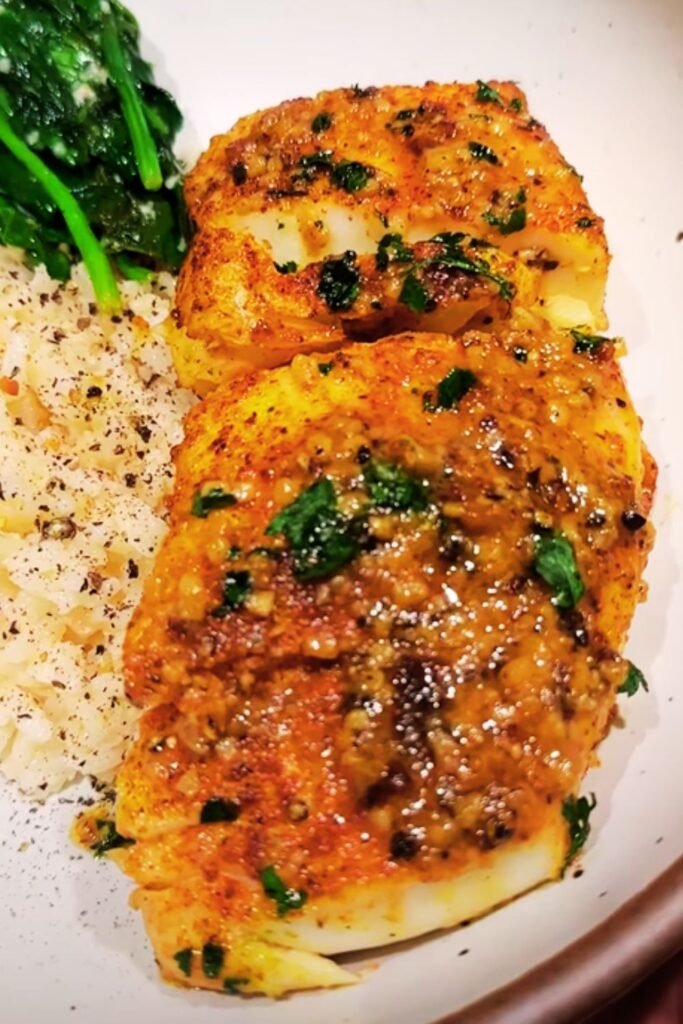
There’s something magical about the combination of tender, flaky halibut with the bold flavors of garlic and parmesan cheese. I’ve been perfecting this Garlic Parmesan Baked Halibut recipe for years, and I can confidently say it’s become one of my most requested dishes at dinner parties. The beauty of this recipe lies not just in its incredible taste, but in its simplicity – you can create a restaurant-quality meal in your own kitchen with minimal effort and maximum flavor impact.
When I first attempted this dish, I was intimidated by cooking halibut. It seemed like such an expensive, delicate fish that I worried about ruining. However, I’ve learned that halibut is actually quite forgiving when baked properly, and the garlic parmesan coating creates a protective layer that keeps the fish moist while adding incredible flavor. This recipe has become my go-to for impressing guests while keeping my stress levels low.
Understanding Halibut: The Star of Our Show
Halibut is a flatfish that’s prized for its mild, sweet flavor and firm, meaty texture. It’s considered one of the premium white fish varieties, and for good reason.
Fresh vs. Frozen Halibut refers to the state in which you purchase your fish. Fresh halibut should have clear eyes, bright red gills, and firm flesh that springs back when pressed.
Sustainable Fishing means choosing halibut that’s been caught using methods that don’t harm the environment or deplete fish populations.
Fillet Thickness determines cooking time and texture. Thicker fillets (1-1.5 inches) work best for this recipe as they won’t overcook easily.
Essential Ingredients Breakdown
| Ingredient | Quantity | Purpose | Substitutions |
|---|---|---|---|
| Halibut fillets | 4 pieces (6 oz each) | Main protein | Cod, sea bass, or mahi-mahi |
| Fresh garlic | 6 cloves, minced | Aromatic base | Garlic powder (2 tsp) |
| Parmesan cheese | 1 cup, grated | Flavor and crust | Pecorino Romano or aged cheddar |
| Panko breadcrumbs | 1/2 cup | Texture | Regular breadcrumbs or crushed crackers |
| Olive oil | 3 tablespoons | Moisture and richness | Melted butter or avocado oil |
| Fresh parsley | 1/4 cup, chopped | Freshness and color | Fresh dill or chives |
| Lemon juice | 2 tablespoons | Brightness | Lime juice or white wine vinegar |
| Salt | 1 teaspoon | Seasoning | Sea salt or kosher salt |
| Black pepper | 1/2 teaspoon | Spice | White pepper |
| Paprika | 1/2 teaspoon | Color and mild heat | Smoked paprika or cayenne |
Nutritional Profile and Health Benefits
| Nutrient | Per Serving | Daily Value % |
|---|---|---|
| Calories | 385 | 19% |
| Protein | 42g | 84% |
| Total Fat | 18g | 28% |
| Saturated Fat | 6g | 30% |
| Carbohydrates | 8g | 3% |
| Fiber | 1g | 4% |
| Sodium | 580mg | 24% |
| Calcium | 285mg | 28% |
| Iron | 2.1mg | 12% |
| Omega-3 fatty acids | 1.2g | – |
Halibut is an excellent source of high-quality protein and provides essential omega-3 fatty acids that support heart and brain health. The addition of parmesan cheese contributes calcium for bone health, while garlic offers antioxidants and potential cardiovascular benefits.

Equipment and Tools You’ll Need
Having the right equipment makes this recipe much easier to execute perfectly. Here’s what I recommend having on hand:
Large rimmed baking sheet – Essential for even cooking and preventing spills Parchment paper or aluminum foil – Prevents sticking and makes cleanup easier
Small mixing bowl – For combining the garlic parmesan mixture Measuring cups and spoons – Accuracy is key for the perfect coating Sharp knife – For mincing garlic and chopping parsley Cutting board – Preferably one designated for fish preparation Meat thermometer – To ensure perfect doneness every time Pastry brush – For evenly applying oil and coating
Step-by-Step Preparation Method
Phase 1: Preparation and Setup
I always start by preheating my oven to 425°F (220°C). This temperature is crucial for achieving that perfect balance of a golden crust and perfectly cooked interior. While the oven heats, I line my baking sheet with parchment paper, which I’ve found prevents sticking better than just greasing the pan.
Next, I pat the halibut fillets completely dry with paper towels. This step is absolutely critical – any surface moisture will prevent the coating from adhering properly and can make the fish steam rather than bake. I then season each fillet lightly with salt and pepper on both sides.
Phase 2: Creating the Garlic Parmesan Mixture
In a small bowl, I combine the minced garlic, grated parmesan cheese, panko breadcrumbs, chopped parsley, and paprika. The key here is using freshly grated parmesan rather than the pre-grated variety – it melts better and has superior flavor. I then drizzle in the olive oil and lemon juice, mixing everything until it forms a cohesive mixture that holds together when pressed.
Phase 3: Coating and Baking Process
I place the seasoned halibut fillets on the prepared baking sheet, leaving space between each piece for even heat circulation. Using my hands or a spoon, I generously press the garlic parmesan mixture onto the top of each fillet, creating an even layer that covers the entire surface.
The baking process takes approximately 12-15 minutes, depending on the thickness of your fillets. I use the general rule of 10 minutes per inch of thickness, but I always check with a meat thermometer to ensure the internal temperature reaches 145°F (63°C).
Timing and Temperature Guidelines
| Fillet Thickness | Baking Time | Internal Temperature |
|---|---|---|
| 3/4 inch | 10-12 minutes | 145°F (63°C) |
| 1 inch | 12-15 minutes | 145°F (63°C) |
| 1.25 inches | 15-18 minutes | 145°F (63°C) |
| 1.5 inches | 18-20 minutes | 145°F (63°C) |
Visual Cues for Perfect Doneness
Learning to recognize when your halibut is perfectly cooked is a skill that will serve you well beyond this recipe. The fish should flake easily when tested with a fork at the thickest part, and the flesh should be opaque throughout with no translucent areas. The parmesan crust should be golden brown and slightly crispy.
I’ve found that slightly undercooking is better than overcooking with halibut, as it will continue to cook slightly from residual heat even after removing from the oven. If you’re unsure, remember that you can always return it to the oven for a few more minutes, but you can’t undo overcooked fish.
Flavor Variations and Customizations
Over the years, I’ve experimented with numerous variations of this basic recipe, each bringing something unique to the table:
Mediterranean Style: I add sun-dried tomatoes, fresh basil, and a pinch of oregano to the coating mixture. This version pairs beautifully with roasted vegetables and rice pilaf.
Spicy Kick: For those who enjoy heat, I incorporate red pepper flakes and a dash of hot sauce into the mixture. The cooling effect of the fish balances the spice perfectly.
Herb Garden: I sometimes substitute the parsley with a mixture of fresh dill, chives, and tarragon for a more complex herbal profile.
Lemon Zest Enhancement: Adding the zest of one lemon to the coating mixture brightens the entire dish and complements the fish’s natural flavors.
Serving Suggestions and Pairings
This Garlic Parmesan Baked Halibut pairs wonderfully with a variety of side dishes. My personal favorites include:
Roasted asparagus with lemon – The earthiness of the asparagus complements the rich fish perfectly Garlic mashed potatoes – Creates a cohesive garlic theme throughout the meal Wild rice pilaf – Adds texture and absorbs the delicious juices from the fish Steamed broccoli with almonds – Provides color and nutritional balance Caesar salad – The parmesan connection makes this a natural pairing Herb-roasted fingerling potatoes – Offers a rustic, satisfying accompaniment
Storage and Reheating Instructions
| Storage Method | Duration | Reheating Instructions |
|---|---|---|
| Refrigerator | 2-3 days | 350°F oven for 8-10 minutes |
| Freezer | 1-2 months | Thaw overnight, then reheat |
| Room temperature | 2 hours maximum | Not recommended |
Leftover halibut should be stored in an airtight container in the refrigerator. I don’t recommend freezing cooked halibut as it can become tough and lose its delicate texture. When reheating, I prefer using the oven rather than the microwave to preserve the crispy coating.
Troubleshooting Common Issues
Throughout my years of making this dish, I’ve encountered and solved several common problems:
Dry, overcooked fish usually results from cooking at too high a temperature or for too long. The solution is using a meat thermometer and removing the fish as soon as it reaches 145°F.
Coating falls off during baking typically happens when the fish wasn’t dried properly or the coating was too wet. Ensure fillets are completely dry and the coating mixture holds together.
Uneven browning can occur if the oven has hot spots or if the fillets are different thicknesses. Rotate the pan halfway through cooking and try to select fillets of similar size.
Fishy taste usually indicates the halibut wasn’t fresh. Always buy from reputable sources and use within 1-2 days of purchase.
Shopping Tips for Best Results
When selecting halibut, I always look for fillets that are firm, white, and have a mild ocean scent – never fishy or ammonia-like. The flesh should be translucent and spring back when pressed gently. I prefer purchasing from fish markets where I can see the whole fish or ask when it was delivered.
For the parmesan cheese, I strongly recommend buying a block and grating it yourself. Pre-grated cheese contains anti-caking agents that can affect melting and flavor. Fresh garlic is essential – pre-minced garlic in jars lacks the punch that makes this dish special.
Wine and Beverage Pairings
While I won’t suggest alcoholic beverages, there are excellent non-alcoholic options that complement this dish beautifully:
Sparkling water with lemon cleanses the palate between bites Fresh herb-infused water with basil or mint adds sophistication Unsweetened iced tea with lemon provides a refreshing contrast Fresh fruit juices like white grape or apple juice offer natural sweetness
Making It Ahead and Meal Prep
This recipe works wonderfully for meal prep. I often prepare the coating mixture up to two days in advance and store it in the refrigerator. The halibut can be seasoned and ready to coat up to 4 hours before baking, though I don’t recommend applying the coating until just before cooking to maintain the best texture.
For busy weeknights, I sometimes prepare individual portions and freeze them before baking. This allows me to cook exactly what I need without waste.
Nutritional Considerations and Dietary Modifications
This recipe is naturally gluten-free if you substitute the panko breadcrumbs with gluten-free alternatives like crushed nuts or gluten-free breadcrumbs. For those watching sodium intake, you can reduce the salt and use a low-sodium parmesan cheese.
The dish is also keto-friendly and fits well into low-carb meal plans. For those following a dairy-free diet, nutritional yeast can substitute for parmesan cheese, though the flavor profile will be different.
Environmental and Sustainability Notes
When purchasing halibut, I always look for fish that’s been sustainably caught. Pacific halibut is generally considered a more sustainable choice than Atlantic halibut. Supporting fisheries that use responsible practices helps ensure this delicious fish will be available for future generations.
Questions and Answers
Q: Can I use frozen halibut for this recipe? A: Yes, but make sure to thaw it completely and pat it very dry before seasoning. Frozen halibut may release more moisture during cooking, so I recommend placing it on a wire rack over the baking sheet to allow air circulation.
Q: What’s the best way to tell if my halibut is fresh? A: Fresh halibut should have clear, bright flesh that’s firm to the touch. It should smell like the ocean, not fishy. The flesh should be translucent and spring back when pressed gently.
Q: Can I make this recipe without breadcrumbs? A: Absolutely! You can substitute crushed nuts like almonds or pecans, or simply omit them for a coating that’s just garlic, parmesan, and herbs. The result will be less crispy but still delicious.
Q: How do I prevent the coating from burning? A: If your coating is browning too quickly, tent the fish with foil for the remaining cooking time. This allows the fish to finish cooking while protecting the top from over-browning.
Q: Can I prepare this dish for a large crowd? A: Yes, this recipe scales up easily. Just make sure not to overcrowd your baking sheet – use multiple sheets if necessary and rotate them halfway through cooking for even results.
Q: What should I do if my halibut falls apart while baking? A: This usually indicates the fish was overcooked or wasn’t fresh. Handle the fish gently when turning or serving, and consider using a thin spatula to support the fillet when transferring to plates.
Q: Is it normal for some oil to pool around the fish? A: A small amount of oil pooling is normal, especially if your coating had a generous amount of olive oil. You can dab it away with paper towels before serving if desired.
Q: Can I use this coating on other types of fish? A: Definitely! This coating works wonderfully on cod, sea bass, mahi-mahi, or any firm white fish. Adjust cooking times based on the thickness and type of fish you’re using.
Q: How can I make the coating extra crispy? A: For maximum crispiness, use panko breadcrumbs and make sure your oven is fully preheated. You can also broil for the last 1-2 minutes of cooking, watching carefully to prevent burning.
Q: What’s the best way to serve this for a dinner party? A: I like to prepare all the components ahead of time and assemble just before baking. This allows me to spend time with guests while the fish cooks. Serve immediately after baking for the best texture and temperature.
This Garlic Parmesan Baked Halibut has become more than just a recipe in my kitchen – it’s become a reliable way to create memorable meals that bring people together. The combination of simple preparation, elegant presentation, and incredible flavor makes it perfect for both weeknight dinners and special occasions. I hope you’ll find as much joy in preparing and sharing this dish as I have over the years.