I discovered this incredible crispy feta eggs recipe during one of my Mediterranean cooking adventures, and let me tell you – it’s become my absolute go-to for breakfast, lunch, or even a quick dinner. The combination of golden, crispy feta cheese with perfectly runny eggs creates a harmony of flavors that will make your taste buds dance with joy.
This dish originated from the beautiful Greek islands, where locals have been combining feta cheese with eggs for centuries. What makes this version special is the technique of getting the feta perfectly crispy on the outside while keeping it creamy on the inside, paired with eggs that have that perfect balance of set whites and gloriously runny yolks.
What Makes This Recipe Special
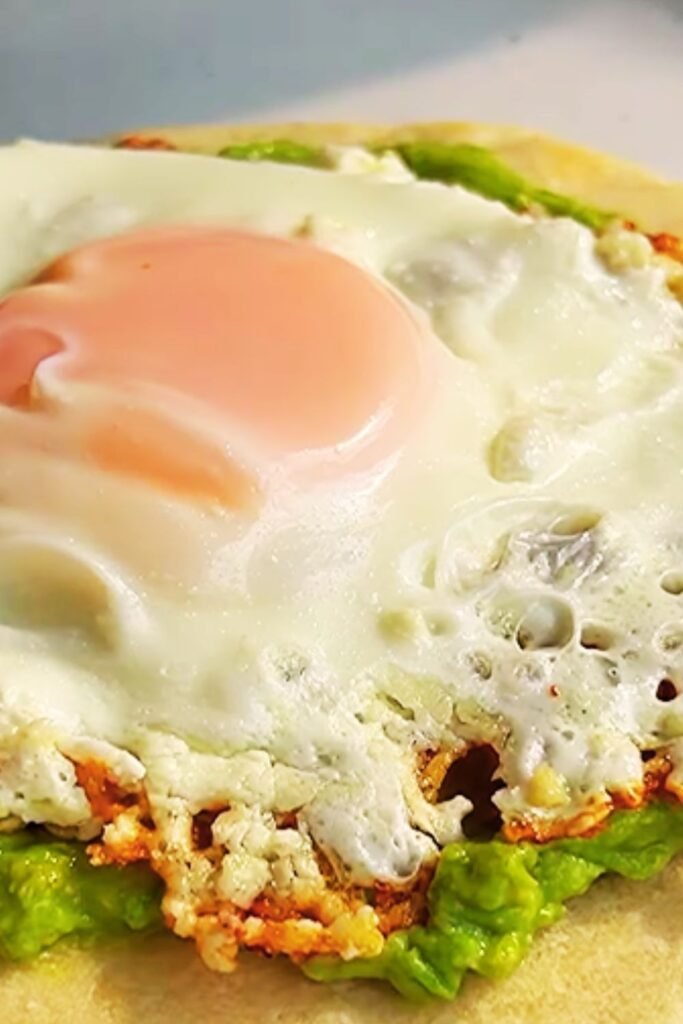
The magic happens when the feta cheese hits the hot oil – it creates this incredible golden crust that contrasts beautifully with the creamy interior. When you break into the eggs, the yolk creates a natural sauce that mingles with the crispy feta, creating an absolutely divine combination that’s both rustic and elegant.
I’ve served this dish to countless friends and family members, and without fail, everyone asks for the recipe. It’s one of those dishes that looks incredibly sophisticated but is surprisingly simple to make. The best part? You probably already have most of the ingredients in your kitchen right now.
Essential Ingredients Breakdown
Let me walk you through each ingredient and why it’s crucial for achieving that perfect crispy feta eggs experience:
Feta Cheese Selection
- Quality matters: I always recommend using block feta rather than pre-crumbled varieties. The block feta holds its shape better and creates those beautiful crispy edges we’re after.
- Brine consideration: Pat the feta completely dry before cooking. Any residual moisture will prevent that gorgeous golden crust from forming.
- Thickness: Cut your feta into slices about ½ inch thick – this gives you the perfect ratio of crispy exterior to creamy interior.
Egg Quality
- Freshness: Fresh eggs create the most beautiful runny yolks and hold together better during cooking.
- Size: Large eggs work best for this recipe, providing the perfect proportion to the feta.
- Temperature: Room temperature eggs cook more evenly than cold eggs straight from the refrigerator.
Oil Selection
- Extra virgin olive oil: This is non-negotiable for me. The fruity, peppery notes complement the feta beautifully.
- High smoke point: While olive oil works wonderfully, you can also use avocado oil if you prefer a more neutral flavor.

Complete Recipe Instructions
Preparation Phase
Step 1: Prepare Your Feta Remove the feta from its brine and pat it completely dry with paper towels. This step is crucial – any moisture will cause the oil to splatter and prevent proper crisping. Cut the feta into slices approximately ½ inch thick. I usually get about 4-6 slices from a standard block, which is perfect for serving 2-3 people.
Step 2: Gather Your Tools You’ll need a well-seasoned cast iron skillet or a non-stick pan. Cast iron is my preference because it distributes heat evenly and creates the most beautiful crispy results. Have a spatula ready, preferably one with a thin edge for easy flipping.
Step 3: Crack Your Eggs Crack each egg into a small bowl first. This prevents any mishaps and allows you to add them to the pan more precisely. Room temperature eggs work best, so take them out about 30 minutes before cooking.
Cooking Process
Step 4: Heat the Oil Pour enough olive oil into your skillet to coat the bottom generously – about 2-3 tablespoons. Heat over medium-high heat until the oil shimmers but doesn’t smoke. You’ll know it’s ready when a small piece of feta sizzles immediately upon contact.
Step 5: Crisp the Feta Carefully place the feta slices in the hot oil. Don’t overcrowd the pan – work in batches if necessary. Let them cook undisturbed for 2-3 minutes until the bottom develops a gorgeous golden crust. The edges should be bubbling and turning golden brown.
Step 6: Flip and Continue Using your spatula, carefully flip each piece of feta. Cook for another 1-2 minutes until the second side is golden and crispy. The feta should have a beautiful golden-brown crust all around while remaining creamy in the center.
Step 7: Add the Eggs Create small wells between the feta pieces and crack your eggs directly into these spaces. If your pan is crowded, you can remove some feta pieces temporarily and add them back later. Season the eggs with a pinch of salt and pepper.
Step 8: Perfect the Eggs Cover the pan with a lid and cook for 2-3 minutes for runny yolks, or 4-5 minutes for more set yolks. The whites should be completely set while the yolks remain gloriously runny.
Nutritional Information Table
| Nutrient | Per Serving (2 eggs + 2 oz feta) | % Daily Value |
|---|---|---|
| Calories | 285 | 14% |
| Total Fat | 23g | 30% |
| Saturated Fat | 11g | 55% |
| Cholesterol | 395mg | 132% |
| Sodium | 580mg | 25% |
| Total Carbohydrates | 2g | 1% |
| Dietary Fiber | 0g | 0% |
| Sugars | 1g | – |
| Protein | 18g | 36% |
| Calcium | 280mg | 28% |
| Iron | 2.1mg | 12% |
| Vitamin A | 485IU | 10% |
| Vitamin B12 | 1.2mcg | 50% |
Cooking Technique Variations
The Traditional Method This is my go-to approach, where I cook the feta first until perfectly crispy, then add the eggs to the same pan. The residual oil and flavors from the feta create an incredible base for the eggs.
The Simultaneous Method For those who prefer everything to finish at the same time, you can add the eggs to the pan when the feta is about halfway done crisping. This creates a slightly different texture but is equally delicious.
The Oven Finish Start on the stovetop to get that initial crispy crust on the feta, then transfer the entire pan to a 375°F oven for 5-7 minutes. This method gives you more control over the egg doneness and is perfect for serving a crowd.
Flavor Enhancement Tips
Herb Combinations
- Fresh oregano: Sprinkle over the finished dish for that authentic Greek flavor
- Fresh dill: Adds a bright, fresh note that complements the rich feta
- Chopped parsley: Provides color and a fresh finish
- Fresh thyme: Earthy and aromatic, perfect with the olive oil
Spice Additions
- Red pepper flakes: Add a gentle heat that doesn’t overpower
- Smoked paprika: Creates a subtle smoky depth
- Za’atar: This Middle Eastern spice blend adds complexity and pairs beautifully with feta
Acid Components
- Lemon zest: Brightens the entire dish
- Balsamic reduction: Drizzle over the finished eggs for sweetness and acidity
- Fresh tomatoes: Cherry tomatoes added during the last few minutes of cooking
Common Mistakes and Solutions
Problem: Feta Won’t Crisp
- Solution: Ensure the feta is completely dry before cooking
- Solution: Use enough oil and make sure it’s hot enough
- Solution: Don’t move the feta too early – let it develop that crust
Problem: Eggs Overcook
- Solution: Add eggs when feta is nearly done
- Solution: Use lower heat once eggs are added
- Solution: Cover the pan to cook eggs more gently
Problem: Oil Splattering
- Solution: Pat feta completely dry
- Solution: Use medium-high heat instead of high heat
- Solution: Stand back when adding feta to hot oil
Equipment Recommendations Table
| Equipment | Best Choice | Why I Recommend It | Alternative |
|---|---|---|---|
| Pan | Cast Iron Skillet | Even heat distribution, creates best crust | Non-stick pan |
| Spatula | Thin-edged turner | Easy flipping without breaking | Regular spatula |
| Lid | Glass lid | Monitor cooking progress | Any tight-fitting lid |
| Knife | Sharp chef’s knife | Clean feta cuts | Paring knife |
| Cutting Board | Wooden board | Gentle on knife edge | Plastic board |

Serving Suggestions and Pairings
Bread Companions Crusty sourdough bread is my absolute favorite pairing. The tangy sourdough complements the rich feta and eggs perfectly. I love to drizzle the bread with a bit of olive oil and toast it until golden. Pita bread is another excellent choice, especially when warmed and slightly charred.
Salad Pairings A simple arugula salad dressed with lemon vinaigrette cuts through the richness beautifully. The peppery arugula and bright lemon create a perfect balance. I also enjoy serving this with a cucumber and tomato salad dressed with olive oil and red wine vinegar.
Breakfast Extensions Transform this into a heartier breakfast by adding roasted potatoes or hash browns on the side. The crispy potatoes complement the crispy feta texture while adding substance to the meal.
Mediterranean Mezze Serve as part of a larger mezze spread with olives, hummus, and fresh vegetables. This creates a beautiful, varied meal that’s perfect for entertaining or lazy weekend brunches.
Storage and Reheating Guidelines
Immediate Storage If you have leftovers (which is rare in my house!), store them in the refrigerator for up to 2 days. However, I must warn you that reheated eggs never quite match the original texture.
Reheating Methods
- Stovetop: Gently reheat in a skillet over low heat
- Oven: Warm at 300°F for 5-7 minutes
- Microwave: Use 30-second intervals on medium power
Make-Ahead Tips While this dish is best served immediately, you can prep the feta slices ahead of time. Pat them dry and store covered in the refrigerator for up to 24 hours before cooking.
Seasonal Variations
Spring Version Add fresh peas and mint for a bright, spring-inspired twist. The sweetness of the peas balances the salty feta beautifully.
Summer Adaptation Incorporate cherry tomatoes and fresh basil. The tomatoes add juiciness and acidity that cuts through the rich cheese and eggs.
Fall Modification Roasted red peppers and fresh thyme create a warming, autumn-appropriate version that’s incredibly satisfying.
Winter Comfort Add spinach and sun-dried tomatoes for a heartier, more substantial meal that’s perfect for cold mornings.
Dietary Modifications
Vegetarian Considerations This recipe is naturally vegetarian, making it perfect for those following a meat-free diet. The combination of eggs and feta provides excellent protein content.
Gluten-Free Options The basic recipe is naturally gluten-free. Just ensure your serving accompaniments are also gluten-free if that’s a concern.
Lower Sodium Version Choose a lower-sodium feta cheese or rinse the feta before cooking to reduce the overall sodium content.
Questions and Answers
Q: Can I use a different type of cheese instead of feta? I’ve experimented with various cheeses, and while feta creates the most authentic and delicious results, halloumi works wonderfully too. It crisps up beautifully and has a similar texture. Goat cheese can work but won’t crisp the same way – it’s more of a creamy, melted result.
Q: How do I know when the feta is perfectly crispy? The feta should develop a golden-brown crust that makes a slight crackling sound when you tap it with your spatula. The edges will be bubbling and golden, and you’ll see the beautiful contrast between the crispy exterior and creamy interior when you cut into it.
Q: Can I make this recipe for a larger group? Absolutely! I regularly make this for groups of 6-8 people. Use a larger skillet or work in batches. You can also transfer everything to a large baking dish and finish in the oven at 375°F for 8-10 minutes.
Q: What’s the best way to achieve perfectly runny yolks? The key is controlling the heat and timing. Once you add the eggs, reduce the heat to medium-low and cover the pan. For runny yolks, cook for 2-3 minutes maximum. The whites should be set but the yolks still jiggly.
Q: Can I prepare any components ahead of time? You can pat the feta dry and slice it up to 24 hours ahead. Store it covered in the refrigerator. However, the cooking process should be done fresh for the best results.
Q: Why does my feta sometimes fall apart during cooking? This usually happens when the feta is too wet or the oil isn’t hot enough. Make sure to pat the feta completely dry and ensure your oil is properly heated before adding the cheese.
Q: Can I use egg whites only for a lighter version? While you can use egg whites, you’ll miss out on the rich, creamy yolks that make this dish so special. The yolks create a natural sauce that binds everything together beautifully.
Q: What’s the best type of olive oil to use? I prefer extra virgin olive oil for its flavor, but make sure it’s a mild variety if you’re sensitive to strong olive oil taste. The oil becomes part of the dish’s flavor profile, so quality matters.
Q: How can I prevent the oil from splattering? Pat the feta completely dry before cooking, use medium-high heat rather than high heat, and stand back when adding the feta to the hot oil. A splatter screen can also be helpful.
Q: Can I add vegetables to this dish? Definitely! Cherry tomatoes, spinach, and bell peppers work wonderfully. Add harder vegetables like peppers early in the cooking process, and delicate ones like spinach just before the eggs are done.
This crispy feta eggs recipe has become a staple in my kitchen, and I’m confident it will become one of your favorites too. The combination of textures and flavors creates a meal that’s both satisfying and elegant, perfect for any time of day. The beauty of this dish lies in its simplicity – with just a few quality ingredients and the right technique, you can create something truly spectacular that will impress everyone at your table.