There’s something magical about the combination of buttery crust, tangy lemon filling, and crumbly topping that makes lemon crumb bars irresistible. These delightful treats have been a staple in my baking repertoire for years, and I’m excited to share my perfected recipe with you today. Whether you’re hosting a summer gathering, need a special dessert for a family dinner, or simply crave something sweet with a refreshing twist, these lemon bars deliver every time.
The Charm of Lemon Desserts
I’ve always been drawn to lemon desserts. There’s something about that bright, zesty flavor that cuts through sweetness and leaves you feeling refreshed rather than overwhelmed. Lemon crumb bars strike the perfect balance—buttery, sweet, tangy, and satisfyingly textured with that contrast between smooth filling and crumbly topping.
My journey with this recipe started years ago when I was looking for something special to bring to a neighborhood potluck. I wanted a dessert that would transport easily, could be eaten without utensils, and would appeal to a wide range of tastes. After many iterations and adjustments, these lemon crumb bars have become my signature dessert, requested at every gathering and celebration.
What Makes These Lemon Bars Special
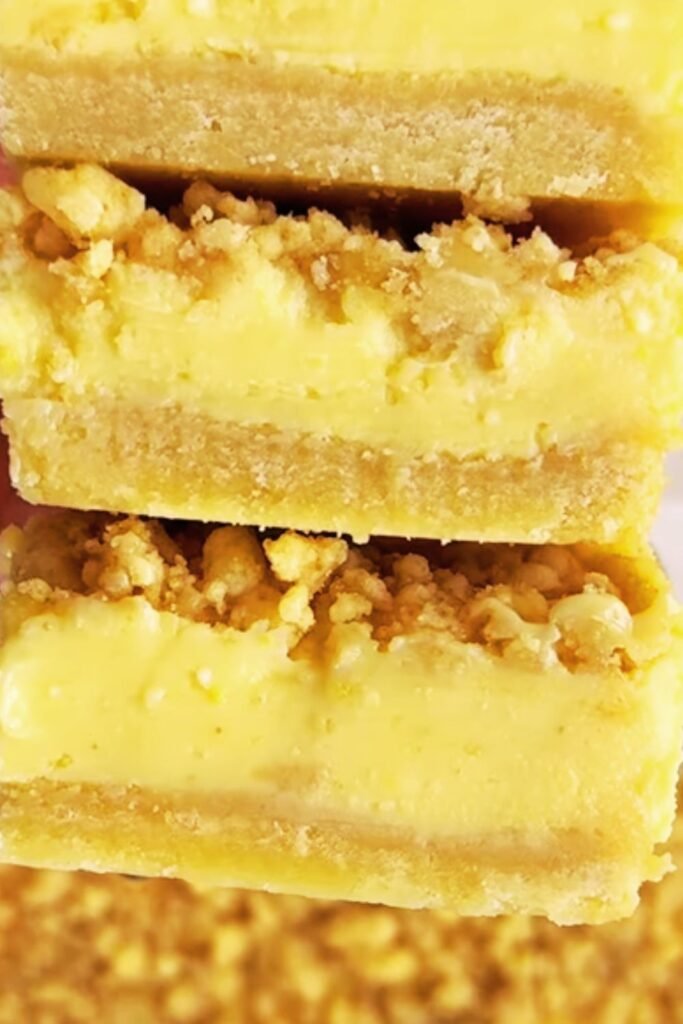
What sets these lemon crumb bars apart from others is the perfect ratio of crust to filling to crumb topping. Many recipes go too heavy on the crust, leaving you with a dry mouthful and barely any lemon flavor. Others flood the bars with so much filling that they become soggy and impossible to eat neatly.
My version features:
- A buttery shortbread crust that’s substantial enough to hold the filling but not overwhelming
- A luscious lemon filling that’s set perfectly—not runny, not rubbery
- A generous layer of crumb topping that adds wonderful texture and visual appeal
- A balanced flavor profile that lets the natural tartness of lemons shine through
Ingredients You’ll Need
For the Crust and Crumb Topping:
- 3 cups all-purpose flour
- 1 cup granulated sugar
- 1 teaspoon baking powder
- ¼ teaspoon salt
- Zest of one lemon (about 1 tablespoon)
- 1 cup cold unsalted butter (2 sticks), cut into small cubes
- 1 large egg, lightly beaten
- ½ teaspoon vanilla extract
For the Lemon Filling:
- 4 large eggs
- 2 cups granulated sugar
- ⅓ cup all-purpose flour
- 2 tablespoons lemon zest (from about 2-3 lemons)
- ⅔ cup freshly squeezed lemon juice (from about 3-4 lemons)
- ¼ teaspoon salt
- Optional: 2-3 drops yellow food coloring for a more vibrant color
For the Finishing Touch:
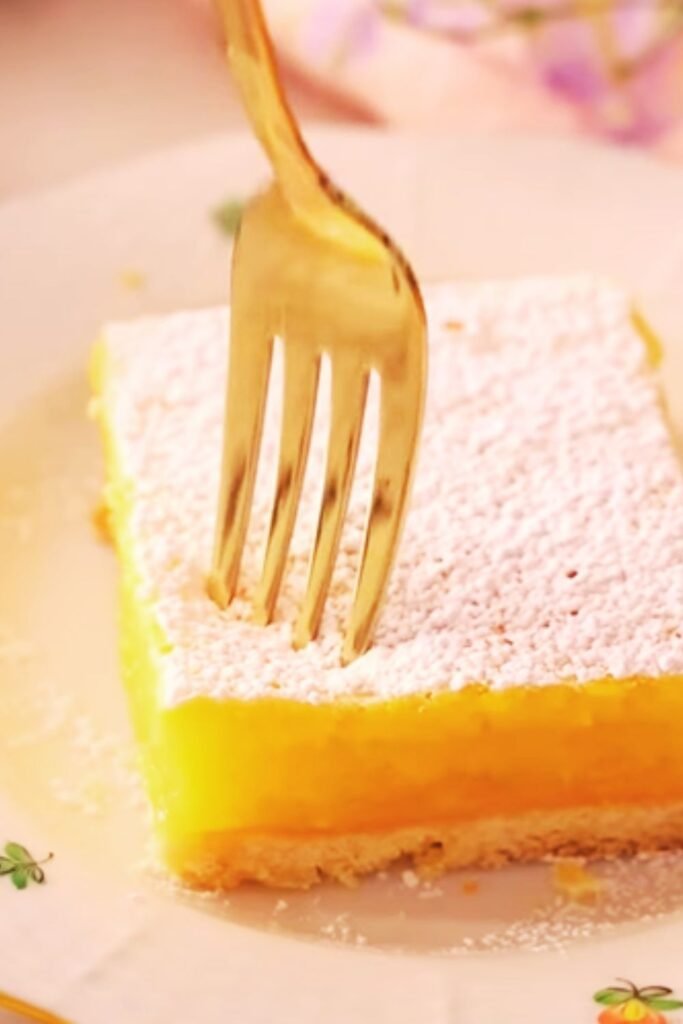
- 2 tablespoons powdered sugar for dusting
Essential Equipment
- 9×13 inch baking pan
- Parchment paper
- Mixing bowls (large and medium)
- Citrus zester or microplane
- Citrus juicer
- Pastry cutter or food processor
- Measuring cups and spoons
- Whisk
- Wire cooling rack
- Sifter for powdered sugar
Preparation Method
Step 1: Prepare Your Workspace and Pan
I always start by preheating my oven to 350°F (175°C) and preparing my baking pan. For these bars, I line a 9×13 inch pan with parchment paper, leaving some overhang on the sides to easily lift the bars out after baking. This simple step makes serving and cleanup so much easier!
Step 2: Create the Crust and Crumb Mixture
In a large bowl, I whisk together the flour, sugar, baking powder, salt, and lemon zest for the crust. Using a pastry cutter or food processor, I cut in the cold butter until the mixture resembles coarse crumbs. Then I stir in the beaten egg and vanilla until the mixture is evenly moistened and crumbly.
A key tip I’ve learned: keep approximately 2 cups of this mixture separate for the crumb topping. The exact measurement isn’t critical—you just want enough for a generous covering.
Step 3: Press and Pre-Bake the Crust
I firmly press the remaining crust mixture into the bottom of the prepared pan, creating an even layer. For the best texture, I pre-bake this crust for about 15 minutes until it’s just beginning to turn golden around the edges. While it’s baking, I prepare the lemon filling.
Step 4: Prepare the Lemon Filling
For the filling, I whisk together eggs and sugar until well combined, then add flour, lemon zest, lemon juice, and salt. I whisk until the mixture is smooth and all ingredients are fully incorporated. If I want a more vibrant yellow color (especially during winter when lemons might not be as bright), I add a few drops of yellow food coloring.
Step 5: Assemble and Bake
Once the crust has pre-baked, I remove it from the oven (keeping the oven on), pour the lemon filling over the hot crust, and sprinkle the reserved crumb mixture evenly over the top. The crumb topping should be distributed in small clumps for the best texture.
Back into the oven it goes for 25-30 minutes, until the filling is set (it shouldn’t jiggle when gently shaken) and the crumb topping is golden brown.
Step 6: Cool Completely
This is perhaps the hardest part of the recipe—waiting! The bars need to cool completely in the pan. I usually let them cool at room temperature for an hour, then refrigerate for at least 2 hours or overnight. This cooling time allows the filling to set properly, making the bars easier to cut and enhancing their flavor.
Step 7: Cut and Serve
Once cooled, I use the parchment paper overhang to lift the entire slab out of the pan onto a cutting board. With a sharp knife (wiped clean between cuts), I cut the bars into squares or rectangles. Just before serving, I dust the tops with powdered sugar for a beautiful finishing touch.
Detailed Nutritional Information
For those who like to keep track of nutritional content, here’s a breakdown per serving (assuming 24 bars from one batch):
| Nutrient | Amount per Serving |
|---|---|
| Calories | 225 |
| Total Fat | 9g |
| Saturated Fat | 5g |
| Cholesterol | 65mg |
| Sodium | 75mg |
| Total Carbohydrates | 34g |
| Dietary Fiber | 0.5g |
| Sugars | 23g |
| Protein | 3g |
| Vitamin C | 5% DV |
| Calcium | 2% DV |
| Iron | 6% DV |
Storage and Make-Ahead Tips
One of the things I love about these lemon crumb bars is how well they keep. Here’s how I store them:
Room Temperature
These bars can be stored in an airtight container at room temperature for up to 2 days. Place parchment paper between layers to prevent sticking.
Refrigerator
For longer storage, I refrigerate the bars in an airtight container for up to 5 days. The chilled bars actually have an even firmer texture that many people (including me!) prefer.
Freezer
These bars freeze beautifully! I wrap them individually in plastic wrap, then place them in a freezer-safe container or bag. They’ll keep for up to 3 months. To thaw, I place them in the refrigerator overnight, or let them sit at room temperature for about 1-2 hours.
Make-Ahead Options
You can prepare components in advance to make assembly quicker when you’re ready to bake:
- The crust mixture can be made up to 2 days ahead and stored in the refrigerator.
- The lemon filling can be prepared up to 1 day ahead and stored in a sealed container in the refrigerator (whisk well before using).
Troubleshooting Common Issues
Problem: Runny Filling
Solution: The most common cause is underbaking. Make sure the filling is set before removing from the oven—it shouldn’t jiggle when gently shaken. Also, be sure to cool the bars completely before cutting.
Problem: Tough or Hard Crust
Solution: Overworking the dough or using too much flour can lead to a tough crust. Handle the dough minimally and measure your flour accurately, preferably using a kitchen scale.
Problem: Crumb Topping Sinking into Filling
Solution: Make sure your crumb mixture is cold when you sprinkle it on top. If necessary, refrigerate the reserved crumb mixture while the crust pre-bakes.
Problem: Bars Too Sweet or Not Lemony Enough
Solution: Feel free to adjust the sugar in the filling down to 1¾ cups if you prefer a tangier flavor. You can also increase the lemon zest for more pronounced lemon flavor without affecting the texture.
Variations to Try
I love experimenting with this basic recipe. Here are some of my favorite variations:
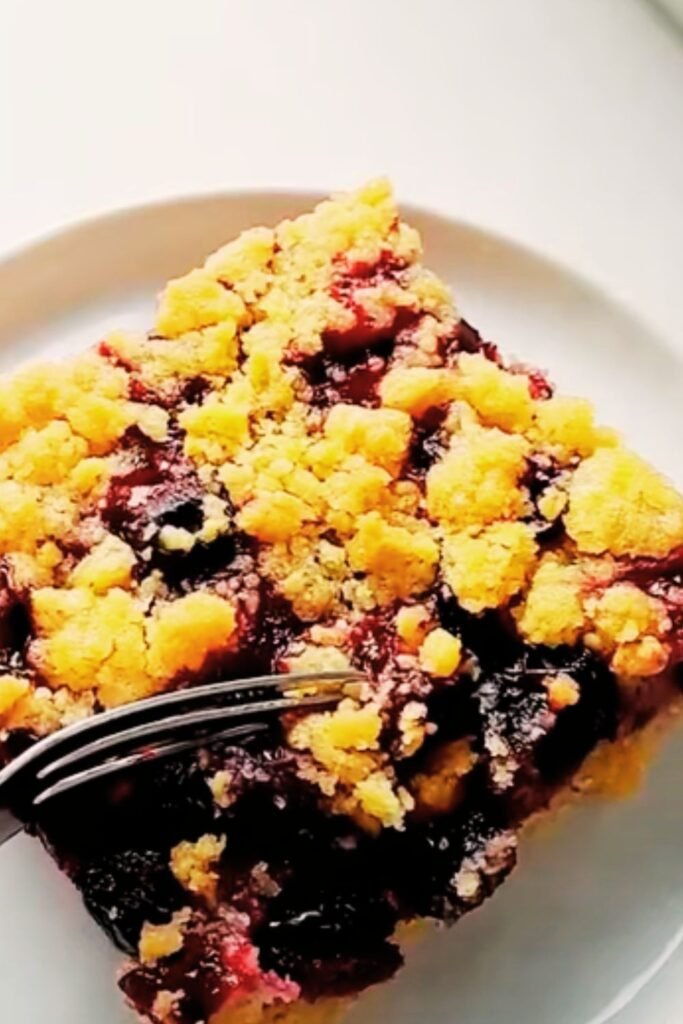
Berry Lemon Bars
Add 1 cup of fresh blueberries or raspberries to the lemon filling for beautiful color and complementary flavor.
Coconut Lemon Bars
Mix ½ cup of toasted coconut into the crumb topping for a tropical twist.
Meyer Lemon Version
When Meyer lemons are in season, substitute them for regular lemons. You’ll need less sugar (reduce by about ¼ cup) as Meyer lemons are naturally sweeter.
Lemon-Lime Bars
Replace half the lemon juice with lime juice for a different citrus profile.
Gluten-Free Option
Substitute a quality cup-for-cup gluten-free flour blend. I’ve had great success with Bob’s Red Mill 1-to-1 Baking Flour or King Arthur Measure for Measure Flour.
Serving Suggestions
These versatile bars can be served in numerous ways:
- As an afternoon treat with tea or coffee
- For dessert with a dollop of whipped cream
- As part of a dessert buffet at celebrations
- Packed in lunch boxes or picnic baskets
- As a sweet finish to a brunch menu
For special occasions, I like to create a dessert platter with these lemon bars alongside fresh berries and small scoops of vanilla ice cream.
Seasonal Adaptations
While lemons are available year-round, the quality and price can vary with the seasons. Here’s how I adapt this recipe throughout the year:
Winter
Winter is peak citrus season, making it the perfect time to make these bars with fresh, juicy lemons. During the holidays, I sometimes add a hint of ginger to the crumb mixture for a festive twist.
Spring
In spring, I often garnish these bars with fresh edible flowers like pansies or violets for beautiful presentation at Easter or Mother’s Day gatherings.
Summer
During hot summer months, I serve these bars well-chilled, sometimes with a small scoop of lemon sorbet for a refreshing dessert after outdoor meals.
Fall
In autumn, I might add warming spices like cinnamon or cardamom to the crumb mixture, pairing the bars with seasonal fruits like poached pears.
Why Homemade Is Better Than Store-Bought
There’s simply no comparison between these homemade lemon crumb bars and store-bought versions. When you make them yourself:
- You control the quality of ingredients, avoiding preservatives and artificial flavors
- The lemon flavor comes from real lemons, not artificial flavorings
- You can adjust the sweetness and tartness to your preference
- The texture is superior—crisp crust, smooth filling, tender crumb topping
- The bars are always fresh, not sitting on a shelf for days
- The aroma of fresh lemon and buttery crust fills your home
Cost Breakdown
Making these bars at home is also cost-effective. Here’s an approximate breakdown based on average U.S. grocery prices:
| Ingredient | Approximate Cost |
|---|---|
| All-purpose flour | $0.75 |
| Granulated sugar | $1.20 |
| Baking powder | $0.05 |
| Salt | $0.02 |
| Lemons (5-6) | $3.50 |
| Butter | $3.00 |
| Eggs (5) | $1.25 |
| Vanilla extract | $0.30 |
| Powdered sugar | $0.10 |
| Total | $10.17 |
This recipe makes 24 bars, bringing the cost to approximately $0.42 per bar—significantly less than what you’d pay for a quality lemon bar at a bakery (typically $2-4 each).
Health Considerations
While these lemon bars are definitely a treat, they do have some nutritional benefits:
- Lemons provide vitamin C and antioxidants
- The bars contain eggs, which offer protein and essential nutrients
- When made at home, you avoid artificial preservatives and colors
- The portion size is controlled, allowing you to enjoy a sweet treat mindfully
For those with dietary restrictions, here are some adaptations:
Lower Sugar Option
Reduce the sugar in the filling to 1½ cups. The bars will be tangier but still delightfully sweet.
Dairy-Free Alternative
Substitute plant-based butter for the dairy butter. Earth Balance sticks work particularly well in this recipe.
Egg-Free Version
For the crust, use 3 tablespoons of cold water instead of the egg. For the filling, combine 2 tablespoons of cornstarch with ¼ cup of cold water, then add to the sugar and lemon juice mixture. You’ll need to cook this filling on the stovetop until thickened before adding to the crust.
Frequently Asked Questions
Q: Can I use bottled lemon juice instead of fresh? While technically possible, I strongly recommend against it. Fresh lemon juice provides a brighter, more authentic flavor that is crucial to the success of these bars. Plus, you need fresh lemons for the zest anyway, which carries much of the lemon flavor.
Q: My bars cracked on top. What went wrong? Cracks usually occur from overbaking or cooling too quickly. Try reducing your baking time slightly or cooling the bars more gradually by leaving them in the turned-off oven with the door ajar for about 10 minutes before bringing to room temperature.
Q: How do I get clean cuts when slicing the bars? Chill the bars thoroughly first. Then use a sharp knife dipped in hot water and wiped clean between each cut. For extra-neat presentation, you can freeze the bars for 15-20 minutes before cutting.
Q: Can I double this recipe? Yes! Double all ingredients and bake in two 9×13 inch pans, or use a larger half-sheet pan (approximately 18×13 inches) and increase the baking time by about 5-7 minutes.
Q: Why did my filling separate from the crust? This usually happens when the pre-baked crust has cooled too much before adding the filling. Make sure to pour the filling onto the hot crust straight from the oven.
Q: Can I make these bars with other citrus fruits? Absolutely! Try oranges, blood oranges, or grapefruit. You’ll need to adjust the sugar depending on the natural sweetness of the fruit.
The Joy of Sharing
There’s something special about the way food connects people, and these lemon bars have been at the center of many wonderful moments in my life. I’ve brought them to backyard barbecues, holiday gatherings, office potlucks, and housewarming parties. Without fail, someone always asks for the recipe.
What I love most is how these bars bring comfort and joy to people of all ages. Children love the sweet-tart flavor, adults appreciate the perfect balance of textures, and even my grandmother—who claims to “not like desserts”—always accepts a lemon bar when offered.
I hope this recipe brings as much joy to your kitchen and gatherings as it has to mine. There’s something magical about transforming simple ingredients—flour, sugar, butter, and lemons—into something so delicious that it creates memories around your table.
A Final Note
Baking is both science and art, and recipes often evolve as we make them our own. Feel free to adjust this recipe to suit your taste—perhaps a little more lemon zest if you love intensity, or a sprinkle of lavender in the crust for a floral note. The best recipes are living documents that change and grow with us.
I’d love to hear how these lemon crumb bars turn out for you. Maybe they’ll become your signature dessert too!