There’s something magical about the aroma of apple pie baking in the oven that instantly transports me back to my grandmother’s kitchen. The sweet scent of cinnamon-spiced apples and buttery pastry wafting through the house is enough to make anyone’s mouth water. But what if I told you that you could enjoy all those beloved apple pie flavors in a single, poppable bite? Enter: Apple Pie Bombs – the delightful, portable dessert that delivers an explosion of apple pie goodness without all the fuss of making a traditional pie.
As someone who’s experimented with countless apple desserts over the years, I can confidently say these little gems are a game-changer for family gatherings, holiday celebrations, or simply satisfying that weeknight sweet tooth. They combine the convenience of finger food with the comforting flavors we all crave, resulting in a treat that appeals to both kids and adults alike.
In this article, I’ll walk you through everything you need to know about creating these irresistible treats. From selecting the perfect apples to mastering that gloriously sticky glaze, I’ve got all the tips and tricks to ensure your apple pie bombs are absolutely bombastic. So preheat that oven and prepare for a dessert revolution!
What Are Apple Pie Bombs?
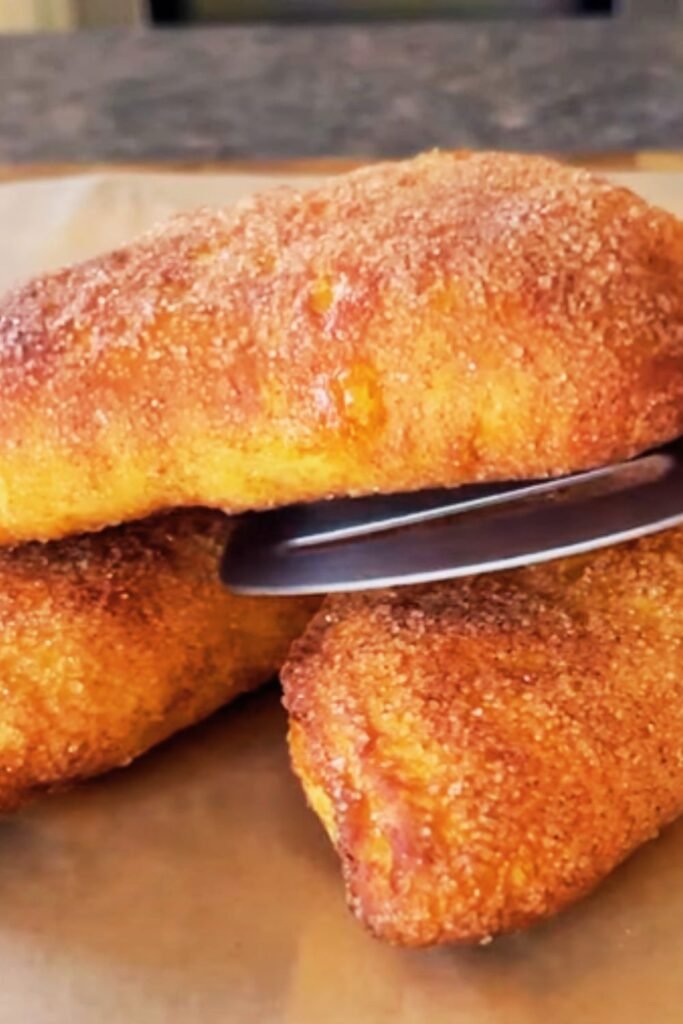
Before we dive into the recipe, let’s clarify what exactly these little flavor explosions are. Apple pie bombs are essentially bite-sized versions of apple pie, where sweet apple filling is wrapped in dough, baked until golden, and then coated with a delicious cinnamon-sugar glaze. The “bomb” reference comes from both their round shape and the explosion of flavor that happens when you bite into one.
Unlike traditional apple pie that requires making and rolling out pie crust, these bombs typically use pre-made dough (though you can certainly make your own if you’re feeling ambitious). They’re quicker to prepare than a full pie and offer individual portions that are perfect for serving at gatherings or packing in lunches.
Why You’ll Love This Recipe
- Quick and easy: Much faster than making a traditional apple pie
- Portable: Perfect for parties, potlucks, and lunchboxes
- Customizable: Easy to adjust spices and add-ins to suit your taste
- Kid-friendly: Both to make and to eat
- Impressive presentation: Looks like you spent hours in the kitchen
- Freezer-friendly: Make ahead and bake when needed
- Less mess: No plates or forks required for serving
Ingredients You’ll Need
For the Apple Filling:
- 4 medium apples (preferably a mix of Granny Smith and Honeycrisp)
- 2 tablespoons unsalted butter
- 1/3 cup brown sugar, packed
- 1 tablespoon ground cinnamon
- 1/4 teaspoon ground nutmeg
- 1/8 teaspoon ground cloves
- 2 teaspoons cornstarch
- 1 tablespoon fresh lemon juice
- 1 teaspoon vanilla extract
- Pinch of salt
For the Bombs:
- 2 cans (16.3 oz each) refrigerated biscuit dough (I prefer the flaky layers type)
- 1/4 cup granulated sugar mixed with 1 teaspoon cinnamon (for coating)
For the Glaze:
- 1 cup powdered sugar
- 1-2 tablespoons milk or cream
- 1/2 teaspoon vanilla extract
- 1/4 teaspoon cinnamon
Optional Add-ins for the Filling:
- 1/3 cup chopped walnuts or pecans
- 1/4 cup raisins or dried cranberries
- 2 tablespoons caramel sauce
Essential Equipment
Before we begin, let’s make sure you have everything you need for success:
- Sharp knife and cutting board
- Medium saucepan
- Wooden spoon or silicone spatula
- Measuring cups and spoons
- Baking sheet
- Parchment paper or silicone baking mat
- Small bowl for glaze
- Cooling rack
- Small ice cream scoop or tablespoon (for portioning filling)
Step-by-Step Instructions
Preparing the Apple Filling
- Prep the apples: Peel, core, and dice the apples into small 1/4-inch cubes. Smaller pieces will make it easier to fill the bombs.
- Cook the filling: In a medium saucepan over medium heat, melt the butter. Add the diced apples, brown sugar, cinnamon, nutmeg, cloves, and salt. Stir to combine.
- Thicken the mixture: Cook for about 5-7 minutes, stirring occasionally, until the apples begin to soften. Mix the cornstarch with 1 tablespoon of water to create a slurry, then add to the apple mixture along with the lemon juice. Continue cooking for another 2-3 minutes until the mixture thickens.
- Finish the filling: Remove from heat and stir in the vanilla extract. If using any optional add-ins like nuts or dried fruit, fold them in now. Allow the filling to cool completely before assembling the bombs (this is crucial – hot filling will make the dough hard to work with).
Assembling and Baking the Bombs
- Preheat: Set your oven to 350°F (175°C) and line a baking sheet with parchment paper or a silicone baking mat.
- Prepare the dough: Open the cans of biscuit dough and separate the individual biscuits. Flatten each biscuit with your palm or a rolling pin into approximately 3-inch circles.
- Fill the bombs: Place about 1-1.5 tablespoons of the cooled apple filling in the center of each flattened biscuit. Be careful not to overfill, or they’ll burst during baking.
- Seal the bombs: Gently fold the edges of each biscuit up and around the filling, pinching the seams firmly to seal completely. Roll between your palms to form a ball shape.
- Arrange for baking: Place the sealed bombs, seam-side down, on the prepared baking sheet, leaving about 2 inches between each one.
- Bake to perfection: Bake for 15-18 minutes or until the bombs are golden brown. The exact time may vary depending on your oven, so keep an eye on them after the 15-minute mark.
- Apply cinnamon-sugar coating: While the bombs are still warm (but not too hot to handle), roll them in the cinnamon-sugar mixture to coat.
- Cool slightly: Allow the bombs to cool on a wire rack for about 10 minutes before glazing.
Making and Applying the Glaze
- Mix the glaze: In a small bowl, whisk together the powdered sugar, milk or cream (start with 1 tablespoon and add more if needed), vanilla extract, and cinnamon until smooth. The glaze should be thick enough to coat the back of a spoon but still drizzle easily.
- Glaze the bombs: Drizzle the glaze over the slightly cooled bombs, or dip the tops for more coverage. Let the glaze set for about 5-10 minutes before serving.

The Science Behind Perfect Apple Pie Bombs
Understanding a few key principles will help you achieve apple pie bomb perfection:
Apple Selection
Not all apples are created equal when it comes to baking. Here’s a breakdown of how different varieties perform:
| Apple Variety | Flavor Profile | Texture After Cooking | Best Uses |
|---|---|---|---|
| Granny Smith | Tart, bright | Holds shape well | Perfect for baking, adds tartness |
| Honeycrisp | Sweet-tart balance | Maintains structure | Excellent flavor, good texture retention |
| Braeburn | Sweet with citrus notes | Holds shape | Good all-purpose baking apple |
| Pink Lady | Sweet-tart | Holds shape well | Maintains texture, balanced flavor |
| Golden Delicious | Sweet, mellow | Softens more | Good for softer filling |
| Fuji | Very sweet | Maintains texture | Sweet filling with good structure |
| Jonagold | Sweet-tart | Medium softening | Good flavor balance |
I recommend using a mix of apples – perhaps 2 Granny Smith and 2 Honeycrisp – to achieve the perfect balance of tartness, sweetness, and texture.
Dough Considerations
While I’ve recommended refrigerated biscuit dough for convenience, here’s how different dough options compare:
| Dough Type | Pros | Cons | Best For |
|---|---|---|---|
| Refrigerated Biscuit | Quick, consistent, flaky | Less flavor depth than homemade | Weeknight desserts, beginners |
| Refrigerated Crescent Roll | Very flaky, buttery | Thinner, may leak more | More delicate bombs with layered texture |
| Homemade Pie Dough | Superior flavor, customizable | Time-consuming, requires skill | Special occasions, experienced bakers |
| Puff Pastry | Extremely flaky and buttery | More expensive, trickier to seal | Elegant presentation, crispy texture |
| Pizza Dough | Chewier texture | Less traditional flavor | Heartier dessert bombs |
Temperature Matters
Temperature plays a crucial role at several stages:
- Cold dough: Keep your biscuit dough refrigerated until ready to use. Warm dough becomes sticky and difficult to handle.
- Cooled filling: Always cool your filling completely before assembling the bombs. Hot filling will partially cook the dough, making it impossible to seal properly.
- Warm bombs for coating: The cinnamon-sugar coating adheres best to warm bombs, but not so hot that they fall apart when handled.
- Slightly cooled for glazing: Let the bombs cool just enough so the glaze doesn’t completely melt off but still warm enough that it can settle and set nicely.
Troubleshooting Common Issues
Even with the best instructions, things can sometimes go awry. Here’s how to handle common problems:
Leaking Filling
- Cause: Overfilling, inadequate sealing, or too-thin dough
- Solution: Use less filling, be more thorough with sealing, or double-wrap problem areas
Doughy Centers
- Cause: Bombs too large, oven temperature too high, not enough baking time
- Solution: Make smaller bombs, reduce oven temperature by 25°F and bake longer, or increase baking time by 2-3 minutes
Tough or Dry Bombs
- Cause: Overworking the dough or overbaking
- Solution: Handle dough minimally and watch baking time carefully
Filling Too Runny
- Cause: Not enough cornstarch, filling not cooked long enough
- Solution: Add an additional 1/2 teaspoon cornstarch mixed with water and cook filling longer
Too Sweet or Not Sweet Enough
- Cause: Personal preference varies widely with sweetness
- Solution: Adjust sugar in filling (reduce by up to half or increase by up to 50%) and use the glaze as an additional sweetness control
Make-Ahead and Storage Tips
These apple pie bombs are perfect for making ahead and serving later. Here’s how to store them at various stages:
Filling:
- Refrigerator: Store cooled filling in an airtight container for up to 3 days.
- Freezer: Freeze for up to 3 months. Thaw overnight in the refrigerator before using.
Assembled (Unbaked) Bombs:
- Refrigerator: Cover with plastic wrap and refrigerate for up to 24 hours.
- Freezer: Place on a baking sheet until frozen solid, then transfer to a freezer bag. Freeze for up to 1 month. Add 3-5 minutes to baking time when cooking from frozen.
Baked Bombs:
- Room temperature: Best enjoyed same day but can be kept in an airtight container for up to 2 days.
- Refrigerator: Store in an airtight container for up to 5 days. Warm slightly before serving.
- Freezer: Freeze unglazed bombs for up to 2 months. Thaw and warm in a 300°F oven for 10 minutes, then glaze.
Serving Suggestions

Take your apple pie bombs to the next level with these delicious serving ideas:
- Classic à la mode: Serve warm with a scoop of vanilla ice cream
- Caramel drizzle: Add an extra drizzle of caramel sauce over the glaze
- Whipped cream cloud: Top with a dollop of freshly whipped cream and a sprinkle of cinnamon
- Coffee companion: Serve alongside a hot cup of coffee or espresso
- Apple cider pairing: Enjoy with warm or cold apple cider for an apple flavor explosion
- Breakfast treat: Serve with Greek yogurt for a slightly more breakfast-appropriate option
- Dessert board: Create a dessert board with apple pie bombs, fresh apple slices, cheese pieces, and honey
- Festive presentation: For holidays, arrange in a circle wreath shape and place a bowl of caramel dip in the center
Variations to Try
Once you’ve mastered the basic apple pie bombs, try these delicious variations:
Apple Pie Bomb Sundae
Transform these into an epic dessert by placing a warm bomb in a bowl, topping with vanilla ice cream, caramel sauce, and a sprinkle of crushed graham crackers.
Apple-Cranberry Pie Bombs
Add 1/4 cup dried cranberries to the apple filling for a tart-sweet twist that’s perfect for fall and winter holidays.
Maple-Apple Pie Bombs
Replace the vanilla in both the filling and glaze with maple extract, and brush with maple syrup instead of using the cinnamon-sugar coating.
Chai-Spiced Apple Pie Bombs
Add 1/4 teaspoon each of cardamom and ginger, plus a pinch of black pepper to the apple filling for a chai-inspired flavor profile.
Stuffed Apple Pie Bombs
Place a small cube of cream cheese or cheddar cheese in the center of the filling before sealing for a delicious surprise.
Apple-Pecan Pie Bombs
Add 1/3 cup chopped pecans to the filling and sprinkle more on top of the glaze for extra crunch and nutty flavor.
Mini Apple Pie Bomb Bites
Use mini biscuits to create bite-sized bombs that are perfect for parties and gatherings. Reduce baking time by about 3-4 minutes.
Health and Dietary Adaptations
Need to accommodate different dietary needs? Here are some adaptations:
Gluten-Free Option
- Use gluten-free refrigerated biscuit dough (available at many grocery stores)
- Or make a simple gluten-free dough using a 1:1 gluten-free flour blend
Lower Sugar Version
- Reduce brown sugar in the filling to 2-3 tablespoons
- Use unsweetened applesauce to replace half the sugar
- Skip the cinnamon-sugar coating and use a light dusting of cinnamon only
- Make a smaller amount of glaze or skip it entirely
Vegan Adaptation
- Use plant-based crescent roll or biscuit dough
- Replace butter with coconut oil or vegan butter
- Make a simple glaze with powdered sugar and plant-based milk
Healthier Twist
- Use whole wheat biscuit dough if available
- Add 2 tablespoons of ground flaxseed to the filling for omega-3s
- Incorporate diced walnuts for healthy fats
- Use coconut sugar instead of brown sugar
The History of Apple Desserts
Apple desserts hold a special place in culinary traditions around the world. While apple pie bombs are a relatively modern creation, they’re part of a long history of apple-based treats:
The apple pie itself dates back to at least 1381, with recipes appearing in English cookbooks. Early versions were quite different from what we enjoy today, often containing figs, raisins, pears, and saffron alongside apples.
Apple dumplings, which are perhaps the closest historical relative to our apple pie bombs, became popular in America during colonial times. These consisted of whole cored apples wrapped in pastry and baked – essentially a larger version of our bombs.
The concept of “hand pies” or portable desserts has existed across many cultures for centuries, from British pasties to Latin American empanadas. Our modern apple pie bombs combine these traditions with the convenience of ready-made ingredients for a treat that honors historical flavors while fitting into our busy contemporary lives.
Why These Are Perfect for Any Occasion
I’ve brought these apple pie bombs to countless gatherings, and they’re always a hit. Here’s why they work so well for different occasions:
- Family dinners: Easy to make with kids helping
- Holiday gatherings: Festive flavor without the fuss of cutting and serving pie
- Potlucks: Individual portions that don’t require utensils
- Bake sales: Easy to package individually and sell
- After-school snacks: Satisfying treat that can be made ahead
- Casual entertaining: Impressive but low-stress dessert option
- Food gifts: Package in a decorative box for a homemade gift
Q&A Section
Can I make these with other fruits? Yes! While apples create the classic flavor, you can adapt this recipe for other fruits. Pears work wonderfully with similar spicing. Peaches, cherries, or berries can also work, but you may need to adjust the cornstarch amount as these fruits tend to release more liquid.
My bombs keep bursting open while baking. What am I doing wrong? This usually happens for one of three reasons: the filling is too hot when you assemble the bombs, you’re overfilling them, or you haven’t sealed them properly. Make sure your filling is completely cool, use no more than 1.5 tablespoons per bomb, and really pinch those seams closed. You can also try chilling the assembled bombs for 15 minutes before baking.
Can I use homemade biscuit dough instead of store-bought? Absolutely! Homemade dough often tastes better, though it requires more time and effort. Look for a recipe that produces a flaky, butter-rich dough for best results. Just be sure the dough isn’t too wet or sticky, which can make sealing difficult.
How do I know when the bombs are done baking? They should be golden brown on the outside. If you’re uncertain, you can carefully lift one with a spatula and check the bottom – it should also be golden, not pale or doughy.
My glaze is too thick/thin. How do I fix it? For glaze that’s too thick, add more liquid (milk or cream) a few drops at a time until you reach your desired consistency. If it’s too thin, add more powdered sugar, 1 tablespoon at a time. The perfect glaze should coat the back of a spoon but still drizzle off when lifted.
Can I make these in an air fryer? Yes! Preheat your air fryer to 330°F, spray the basket with cooking spray, and cook in batches for about 8-10 minutes until golden. You may need to slightly flatten the bombs so they don’t roll around.
Do I have to use the cinnamon-sugar coating? Not at all. While it adds a nice texture contrast and extra flavor, you can skip it and just use the glaze, or skip both for a less sweet option.
Final Thoughts
Apple pie bombs bring together everything I love about dessert – they’re fun to make, delicious to eat, and bring smiles to everyone who tries them. The combination of tender, spiced apples wrapped in flaky, golden dough and topped with sweet glaze is simply irresistible.
What I appreciate most about this recipe is its versatility. You can dress these up for a special occasion or keep them simple for an everyday treat. They’re perfect for getting kids involved in the kitchen, and they’re a wonderful way to enjoy the flavors of apple pie without committing to making a whole pie.
So the next time you’re craving something sweet or need a crowd-pleasing dessert that doesn’t require hours in the kitchen, I hope you’ll give these apple pie bombs a try. I’m confident they’ll earn a permanent spot in your recipe collection, just as they have in mine.
Happy baking!