Have you ever wondered what happens when the creamy richness of cheesecake meets the fun, handheld shape of a taco? I’ve discovered the answer, and it’s absolutely magical! These Blueberry Cheesecake Tacos have become my family’s favorite dessert for special occasions, casual gatherings, and even those nights when we just need something sweet and delicious.
I first stumbled upon this idea during a summer cookout where I wanted to surprise my guests with something unexpected. The combination of the crispy, cinnamon-sugar coated taco shells filled with velvety cheesecake filling and topped with juicy blueberry sauce creates a flavor explosion that keeps everyone coming back for more.
What Makes These Dessert Tacos Special
These Blueberry Cheesecake Tacos aren’t just your average dessert. They’re a conversation starter, a showstopper, and most importantly, absolutely delicious! Here’s why I think you’ll fall in love with them:
- Perfect Balance: The contrast between the crunchy taco shell and the smooth cheesecake filling creates a delightful textural experience.
- Customizable: While my recipe features blueberries, you can easily swap them for strawberries, raspberries, or even a mix of your favorite fruits.
- Make-Ahead Friendly: Most components can be prepared ahead of time, making these perfect for entertaining.
- Visually Stunning: The vibrant purple-blue of the blueberry sauce against the white cheesecake filling makes these dessert tacos as beautiful as they are delicious.
So let’s get started on creating this unforgettable dessert that combines the best of two worlds!
Ingredients You’ll Need
For the Taco Shells:
- 8 small flour tortillas (6-inch size)
- 4 tablespoons unsalted butter, melted
- 1/2 cup granulated sugar
- 2 teaspoons ground cinnamon
For the Cheesecake Filling:
- 16 ounces cream cheese, softened
- 1/2 cup granulated sugar
- 1 teaspoon vanilla extract
- 1 tablespoon fresh lemon juice
- 1/4 cup sour cream
- 2 tablespoons heavy cream
For the Blueberry Sauce:
- 3 cups fresh blueberries (can substitute frozen if necessary)
- 1/3 cup granulated sugar
- 2 tablespoons fresh lemon juice
- 1 tablespoon cornstarch
- 2 tablespoons water
- 1/2 teaspoon vanilla extract
For Garnish:
- 1 cup fresh blueberries
- Mint leaves
- Powdered sugar for dusting
- Lemon zest
Essential Equipment
Before we begin, make sure you have these tools on hand:
- Muffin tin (for shaping the taco shells)
- Electric mixer (stand or handheld)
- Medium saucepan
- Pastry bag or zip-top bag for filling the tacos
- Baking sheet
- Aluminum foil
- Cooking spray
Step-by-Step Instructions
Step 1: Prepare the Taco Shells
- Preheat your oven to 375°F (190°C).
- In a small bowl, mix together the sugar and cinnamon.
- Brush both sides of each tortilla lightly with melted butter.
- Sprinkle the cinnamon-sugar mixture generously over both sides of each tortilla.
- Turn a muffin tin upside down and spray lightly with cooking spray.
- Drape each tortilla over the spaces between the muffin cups to create a taco shape. You may need to use aluminum foil balls to help prop them up and maintain the shape.
- Bake for 8-10 minutes until the tortillas are crisp and golden brown.
- Remove from the oven and let cool completely while still draped over the muffin tin.
- Once cooled, carefully remove and set aside.
I’ve learned that the key to perfectly shaped taco shells is patience during the cooling process. If you try to remove them too soon, they might not hold their shape properly.
Step 2: Make the Cheesecake Filling
- In a large mixing bowl, beat the softened cream cheese until smooth and fluffy (about 2-3 minutes).
- Add the sugar and continue beating until well incorporated.
- Mix in the vanilla extract and lemon juice.
- Fold in the sour cream until just combined.
- Gradually add the heavy cream and beat on medium-high speed until the mixture is light and fluffy (about 1-2 minutes).
- Transfer the filling to a pastry bag or a zip-top bag with a corner cut off.
- Refrigerate for at least 30 minutes to allow the filling to firm up slightly.
I find that letting the cream cheese come to room temperature naturally (about 1-2 hours on the counter) results in a much smoother filling than trying to soften it in the microwave.
Step 3: Prepare the Blueberry Sauce
- In a medium saucepan, combine 2 1/2 cups of blueberries, sugar, and lemon juice.
- Cook over medium heat, stirring occasionally, until the blueberries begin to burst and release their juices (about 5-7 minutes).
- In a small bowl, whisk together the cornstarch and water to create a slurry.
- Slowly pour the cornstarch mixture into the simmering blueberries, stirring constantly.
- Continue cooking for another 2-3 minutes until the sauce thickens noticeably.
- Remove from heat and stir in the vanilla extract and the remaining 1/2 cup of fresh blueberries.
- Allow the sauce to cool completely before using.
The secret to a perfect blueberry sauce is adding some fresh berries at the end. This gives you both the gorgeous purple color from the cooked berries and the pleasant texture of whole berries in each bite.
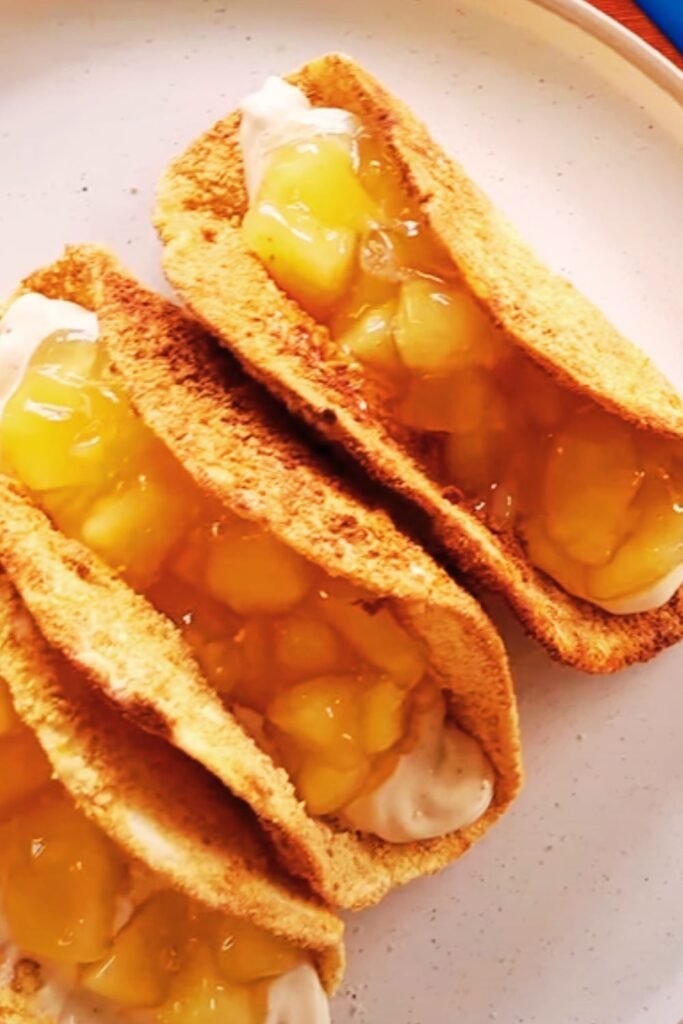
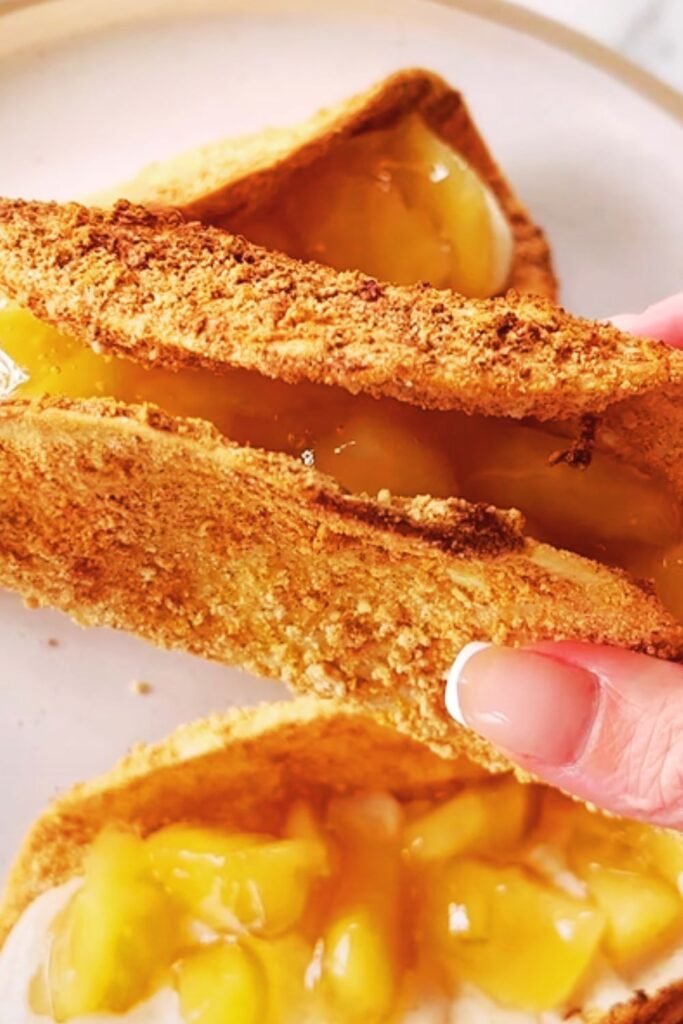
Step 4: Assemble the Cheesecake Tacos
- Once all components are cooled, begin assembly by piping a generous amount of cheesecake filling into each taco shell, filling about 2/3 of the way.
- Spoon the blueberry sauce over the cheesecake filling.
- Top with additional fresh blueberries.
- Garnish with a light dusting of powdered sugar, a small mint leaf, and a little lemon zest if desired.
I like to assemble these just before serving to keep the shells crispy, but if you need to prepare them in advance, you can store the filled tacos in the refrigerator for up to 2 hours before the shells begin to soften.
Nutritional Information
I believe in making informed choices about what we eat, even when indulging in desserts! Here’s a breakdown of what you can expect from each Blueberry Cheesecake Taco:
| Nutrient | Amount per Taco |
|---|---|
| Calories | 320 |
| Total Fat | 18g |
| Saturated Fat | 11g |
| Cholesterol | 55mg |
| Sodium | 210mg |
| Total Carbohydrates | 36g |
| Dietary Fiber | 2g |
| Sugars | 22g |
| Protein | 5g |
| Calcium | 8% DV |
| Iron | 6% DV |
| Vitamin C | 15% DV |
*Values are approximate and may vary based on specific ingredients used.
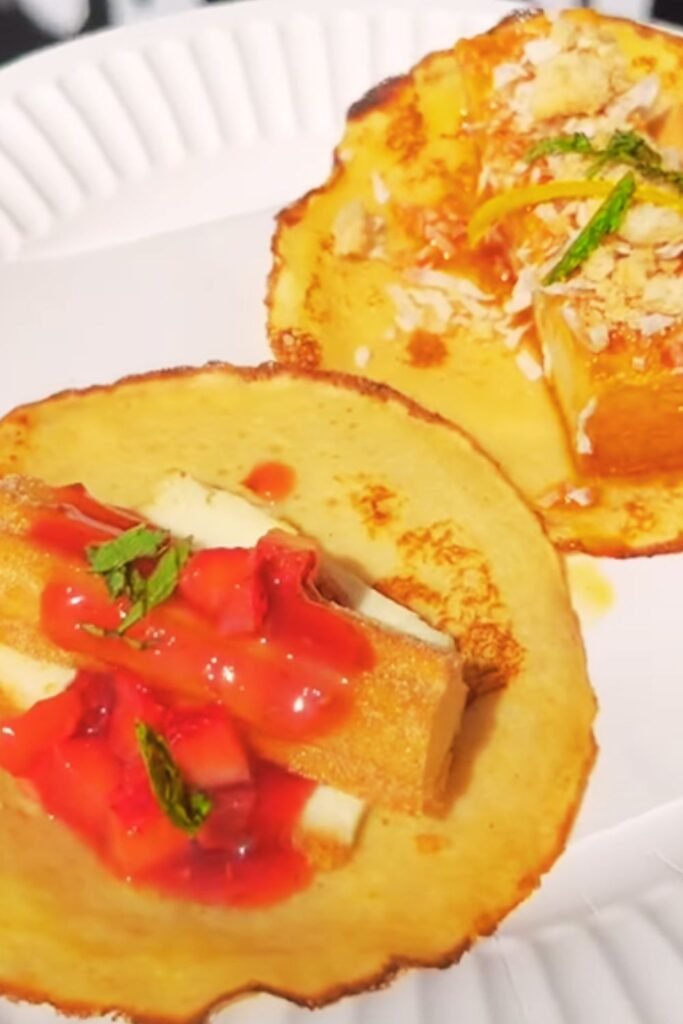
Recipe Variations
One thing I love about these dessert tacos is how versatile they are! Here are some of my favorite ways to change them up:
Different Fruit Options
- Strawberry Cheesecake Tacos: Replace blueberries with fresh strawberries for a beautiful red variation.
- Mixed Berry Explosion: Use a combination of blueberries, raspberries, and blackberries for a mixed berry sauce.
- Tropical Twist: Try mango and pineapple for an exotic flavor profile.
Shell Alternatives
- Chocolate Shells: Add 1 tablespoon of cocoa powder to your cinnamon-sugar mixture for chocolate-flavored shells.
- Churro-Style Shells: Double the cinnamon in your coating mixture and brush with honey after baking for authentic churro flavor.
- Cookie Shells: For an even sweeter option, use pre-made cookie dough rolled thin and shaped into taco forms.
Filling Variations
- Chocolate Cheesecake: Add 1/4 cup cocoa powder to your cheesecake filling.
- Lemon Cheesecake: Increase the lemon juice to 2 tablespoons and add 1 tablespoon of lemon zest.
- White Chocolate: Fold in 1/2 cup of melted and cooled white chocolate chips.
Special Diet Adaptations
I believe everyone should be able to enjoy these delicious treats! Here are modifications for different dietary needs:
Gluten-Free Version
- Use gluten-free corn tortillas instead of flour tortillas.
- Check that your vanilla extract and other flavorings are gluten-free certified.
Dairy-Free Alternative
- Replace cream cheese with dairy-free cream cheese alternative.
- Use coconut cream instead of heavy cream and sour cream.
- Substitute plant-based butter for the shell coating.
Reduced Sugar Option
- Use a sugar substitute like monk fruit or stevia in both the filling and the sauce.
- Choose low-sugar tortillas for the shells.
Storage and Make-Ahead Tips
These Blueberry Cheesecake Tacos are best enjoyed fresh, but I know sometimes we need to plan ahead. Here’s how to make that work:
Component Storage:
- Taco Shells: Once baked and cooled, store in an airtight container at room temperature for up to 3 days.
- Cheesecake Filling: Can be made up to 2 days ahead and stored in an airtight container in the refrigerator.
- Blueberry Sauce: Keeps well in the refrigerator for up to 5 days in a sealed container.
Assembled Tacos:
- Best eaten within 1-2 hours of assembly, as the shells will gradually soften from the moisture in the filling.
- If you need to transport them, pack the components separately and assemble on site.
Serving Suggestions
These Blueberry Cheesecake Tacos make an impressive dessert on their own, but here are some ways I like to elevate the presentation:
- Arrange on a platter with additional fresh berries scattered around.
- Serve with a small scoop of vanilla ice cream on the side.
- Create a dessert bar with all the components separated so guests can assemble their own tacos.
- For a elegant presentation, drizzle plates with extra blueberry sauce before placing the tacos on top.
- Add a small shot glass of sparkling water with a lemon twist as a palate cleanser.
Common Problems and Solutions
Even experienced bakers sometimes run into issues. Here are solutions to common problems you might face:
Soggy Taco Shells
Problem: The taco shells become soft too quickly after filling. Solution: Make sure both the filling and sauce are thoroughly chilled before assembly. Also, consider adding a thin layer of melted white chocolate inside the shells and letting it harden before filling – this creates a moisture barrier.
Runny Cheesecake Filling
Problem: The filling isn’t holding its shape. Solution: Make sure you’re using full-fat cream cheese, and that you’ve chilled the filling adequately. If it’s still too soft, try adding 1-2 tablespoons of softened gelatin to the mixture.
Blueberry Sauce Too Thin
Problem: The sauce isn’t thick enough to stay on the tacos. Solution: Cook the sauce a bit longer or add an additional 1/2 teaspoon of cornstarch mixed with 1 tablespoon of water.
Taco Shells Breaking
Problem: The shells crack when shaped. Solution: Make sure your tortillas are fresh and at room temperature before starting. If they seem dry, wrap them in slightly damp paper towels and microwave for 10-15 seconds to make them more pliable.
Why This Recipe Works
I’ve made these Blueberry Cheesecake Tacos dozens of times, and I’ve discovered a few reasons why they’re consistently successful:
- The Contrast Effect: The combination of temperatures (cool filling with room temperature shells) and textures (crunchy and creamy) creates a multi-sensory experience.
- Balanced Flavors: The tangy cheesecake filling counteracts the sweetness of the blueberry sauce and cinnamon-sugar shells.
- Visual Appeal: Humans eat with their eyes first, and these colorful, neatly assembled dessert tacos are definitely Instagram-worthy!
- Familiar Yet Novel: They combine two beloved foods (tacos and cheesecake) in an unexpected way that intrigues and delights guests.
Frequently Asked Questions
Q: Can I make these Blueberry Cheesecake Tacos ahead of time for a party? A: I recommend preparing all components ahead of time but assembling them no more than 2 hours before serving to prevent the shells from becoming soggy.
Q: What’s the best way to shape the taco shells if I don’t have a muffin tin? A: You can drape the tortillas over the spine of a thick cookbook wrapped in aluminum foil, or create a makeshift rack by folding aluminum foil into rod shapes and placing them 2 inches apart on a baking sheet.
Q: Can I use frozen blueberries for the sauce? A: Absolutely! Frozen blueberries work wonderfully for the sauce. No need to thaw them first – just add them directly to the saucepan and you may need to cook them for 1-2 minutes longer.
Q: My cheesecake filling is lumpy. What went wrong? A: The most common cause is cream cheese that wasn’t soft enough before beating. Always let it come to room temperature naturally for the smoothest results.
Q: How do I prevent my taco shells from burning? A: Keep a close eye on them as they bake. Every oven is different, and they can go from perfectly golden to burnt quickly. Start checking at the 6-minute mark and remove them once they’re golden brown.
Q: Can these be made without refined sugar? A: Yes! You can substitute honey or maple syrup in the blueberry sauce (use about 1/4 cup instead of 1/3 cup sugar) and use a natural sweetener like coconut sugar for the shells and filling.
Q: Are there any shortcuts I can take with this recipe? A: If you’re short on time, you can use store-bought cheesecake filling and blueberry pie filling. You’ll sacrifice some flavor and texture, but it will significantly cut down on preparation time.
Final Tips for Success
After making these Blueberry Cheesecake Tacos countless times, I’ve collected some insider tips that will help you achieve dessert perfection:
- Temperature Matters: Make sure your cream cheese is truly at room temperature for the smoothest filling. Cold cream cheese will result in lumps no matter how long you beat it.
- Taste As You Go: Especially with the blueberry sauce, taste and adjust sweetness according to the natural sweetness of your berries.
- Even Coating: When applying the cinnamon-sugar mixture to your tortillas, use a sifter or fine mesh strainer to get an even coating.
- Watch Your Bake: Every oven is different, so keep a close eye on your taco shells as they bake – they can go from perfect to burnt in less than a minute.
- Cooling Patience: Allow all components to cool completely before assembly. Warm sauce will melt your cheesecake filling, resulting in a messy dessert.
- Fresh Is Best: While you can prepare components ahead of time, these dessert tacos are at their absolute best when assembled just before serving.
- Presentation Counts: Take time to arrange your toppings thoughtfully – a few strategically placed blueberries and a small mint leaf can make your dessert look restaurant-quality.
These Blueberry Cheesecake Tacos have become my signature dessert for gatherings with friends and family. There’s something magical about the combination of crispy cinnamon shells, creamy cheesecake filling, and juicy blueberry topping that keeps everyone talking about them long after the last crumb has been devoured.
I hope you enjoy making and sharing these dessert tacos as much as I do. They’re more than just a sweet treat—they’re a delightful experience that brings joy to any occasion.
Q&A Section
Q: How long do these Blueberry Cheesecake Tacos take to make from start to finish? A: From start to finish, including cooling times, you should plan for about 2 hours. The actual hands-on time is only about 45 minutes, but there’s cooling time required for the shells, filling, and sauce.
Q: Can I make a larger batch for a big party? A: Absolutely! This recipe scales up beautifully. Just maintain the same proportions and you can easily double or triple the recipe. For very large gatherings, I recommend setting up a “build your own” station with the components separated.
Q: What’s the best type of tortilla to use for the shells? A: I recommend using “soft taco size” flour tortillas that are about 6 inches in diameter. The super thin flour tortillas work best because they crisp up beautifully. Avoid thick or “homestyle” tortillas as they can remain chewy in the center.
Q: My family doesn’t like blueberries. What’s another fruit that works well? A: Strawberries are an excellent alternative and work perfectly with the same recipe (just substitute equal amounts). Other great options include raspberries, blackberries, or even peaches in the summer months.
Q: How can I make these look extra special for a celebration? A: For special occasions, try adding edible gold or silver leaf to the tops, or create a caramelized sugar decoration by melting sugar and drizzling it in decorative patterns onto parchment paper. Once hardened, these can be inserted into the filled tacos for a professional touch.
Q: What’s the best way to transport these to a potluck? A: Transport all components separately in well-sealed containers with the taco shells in a single layer to prevent breaking. Bring a pastry bag loaded with the filling (kept cold in a cooler), the sauce in a separate container, and fresh berries for topping. Assemble just before serving.
Q: Can children help make this recipe? A: Absolutely! Kids can help with several steps, including mixing the cinnamon-sugar coating, brushing the tortillas (with supervision), and certainly with the assembly process. Just be careful with the oven steps and the stovetop cooking of the blueberry sauce.
Q: Do you have any recommendations for making these for someone who is watching their calorie intake? A: You can make a lighter version by using reduced-fat cream cheese, Greek yogurt instead of sour cream, and reducing the sugar in both the filling and sauce by about 25%. Using smaller tortillas will also create mini dessert tacos with fewer calories per serving.
Q: What’s the origin of dessert tacos? A: Dessert tacos are part of the broader trend of dessert versions of typically savory foods. They gained popularity in the 2010s as part of the creative fusion dessert movement, though sweet versions of tacos have existed in various forms in Mexican cuisine for generations, such as the classic choco taco ice cream treat.
Q: If I want to prep these for a dinner party, what’s the last thing I should do before guests arrive? A: The best approach is to have your shells ready, filling in a piping bag in the refrigerator, and sauce prepared and cooled. About 30 minutes before serving dessert, you can pre-fill the shells with the cheesecake mixture and refrigerate them. Then, just before serving, top with the blueberry sauce and garnishes for the freshest presentation.