When I first discovered the magic of combining cream cheese with puff pastry, my entire approach to baking transformed. This isn’t just another pastry recipe – it’s a gateway to creating restaurant-quality treats that will have your family and friends begging for the secret. The marriage of tangy cream cheese with buttery, flaky pastry creates a texture and flavor profile that’s simply irresistible.
I’ve spent countless hours perfecting this technique, and I’m excited to share everything I’ve learned about creating these delectable pastries. Whether you’re a novice baker or someone with years of experience, this comprehensive guide will help you master the art of cream cheese puff pastry.
Understanding the Foundation: What Makes Cream Cheese Puff Pastry Special
Cream cheese puff pastry represents the beautiful union of two culinary classics. The puff pastry provides those signature layers of buttery, crispy perfection, while the cream cheese adds richness, tanginess, and a luxurious mouthfeel that elevates the entire experience.
Puff Pastry Basics: Traditional puff pastry relies on a lamination process where butter is folded into dough multiple times, creating hundreds of delicate layers. When baked, steam from the butter creates the characteristic “puff” that gives this pastry its name.
Cream Cheese Enhancement: The addition of cream cheese serves multiple purposes. It adds moisture, richness, and a subtle tang that balances the buttery pastry. More importantly, it creates a filling that’s stable enough to hold its shape during baking while remaining creamy and delicious.
Texture Contrast: The magic happens in the contrast between the crispy, flaky exterior and the smooth, creamy interior. This textural interplay is what makes cream cheese puff pastry so addictive and memorable.
Essential Ingredients and Their Roles
| Ingredient | Purpose | Quality Tips | Substitutions |
|---|---|---|---|
| Puff Pastry | Provides flaky layers and structure | Use all-butter varieties for best flavor | Phyllo dough (different texture) |
| Cream Cheese | Adds richness and tangy flavor | Full-fat, room temperature | Ricotta mixed with heavy cream |
| Eggs | Binding and golden color | Fresh, large eggs | Egg wash alternative: milk + butter |
| Sugar | Balances acidity, adds sweetness | Fine granulated sugar | Powdered sugar (adjust quantity) |
| Vanilla Extract | Enhances overall flavor | Pure vanilla, not imitation | Almond extract (use half amount) |
| Salt | Enhances all flavors | Fine sea salt or table salt | Kosher salt (adjust quantity) |
| Butter | Additional richness and flavor | Unsalted, European-style preferred | Margarine (lower quality result) |
Step-by-Step Preparation Guide

Preparing Your Workspace
Before diving into the actual preparation, I always ensure my workspace is properly set up. This isn’t just about organization – it’s about creating conditions that will help you succeed.
I start by clearing a large, flat surface for rolling and cutting the pastry. I keep my rolling pin, sharp knife, and measuring tools within easy reach. Most importantly, I make sure my oven is preheated to the correct temperature, usually around 400°F (200°C), though this can vary depending on your specific recipe variation.
Creating the Perfect Cream Cheese Filling
The filling is where the magic truly begins. I’ve learned that the key to perfect cream cheese filling lies in achieving the right consistency and flavor balance.
I start by bringing my cream cheese to room temperature – this usually takes about 30 minutes at room temperature. Cold cream cheese will create lumps that are nearly impossible to eliminate, so patience here pays dividends later.
In a medium bowl, I combine 8 ounces of softened cream cheese with 1/4 cup of granulated sugar. Using an electric mixer on medium speed, I beat them together until the mixture is completely smooth and fluffy, about 2-3 minutes. The transformation is remarkable – what starts as a dense, thick mixture becomes light and airy.
Next, I add one large egg, beating until fully incorporated. The egg serves as a binder and helps create structure in the filling. I follow this with 1 teaspoon of pure vanilla extract and a pinch of salt. The vanilla adds depth and warmth, while the salt enhances all the other flavors.
Working with Puff Pastry
Working with puff pastry requires a gentle touch and understanding of temperature. I always work with pastry that’s been thawed but is still cold to the touch. If it becomes too warm, the butter layers will melt, and you’ll lose those beautiful flaky layers.
I roll out the thawed puff pastry on a lightly floured surface, being careful not to apply too much pressure. The goal is to create an even thickness without compressing the delicate layers. I aim for about 1/8-inch thickness, which provides enough structure while still allowing for proper puffing.
Using a sharp knife or pizza cutter, I cut the pastry into squares or rectangles, depending on my desired final shape. For individual pastries, I typically cut 4-inch squares, which create perfect single-serving portions.
Assembly Techniques
The assembly process is where creativity meets technique. I place about 2 tablespoons of the cream cheese filling in the center of each pastry square, leaving enough border to create a proper seal.
For traditional turnovers, I fold the pastry diagonally, creating a triangle shape. I press the edges together firmly, then use a fork to create a decorative seal that also helps prevent the filling from leaking during baking.
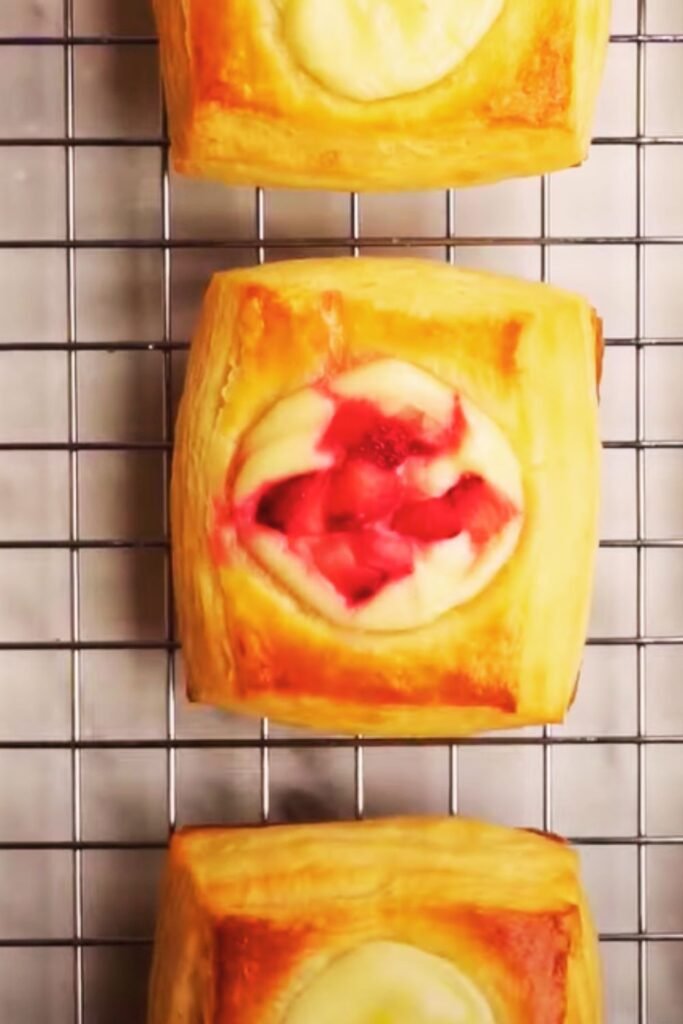
For Danish-style pastries, I make cuts from each corner toward the center, stopping about an inch from the middle. I then fold alternating points toward the center, creating a pinwheel effect that showcases the filling beautifully.
Baking Techniques and Temperature Control
| Baking Stage | Temperature | Time | Visual Cues |
|---|---|---|---|
| Initial Puff | 425°F (220°C) | 10-12 minutes | Pastry begins to rise |
| Golden Development | 375°F (190°C) | 8-10 minutes | Light golden color appears |
| Final Browning | 350°F (175°C) | 5-8 minutes | Deep golden brown |
| Cooling | Room temperature | 15-20 minutes | Filling sets, pastry crisps |
The baking process requires attention to detail and willingness to adjust based on what you observe. I always start with a hot oven to encourage rapid puffing, then reduce the temperature to ensure even cooking without burning.
Before baking, I brush each pastry with beaten egg wash, which creates that beautiful golden color and adds an extra layer of richness. I’m careful not to let the egg wash drip onto the baking sheet, as this can cause sticking.
Flavor Variations and Creative Combinations
One of the aspects I love most about cream cheese puff pastry is its versatility. The basic recipe serves as a foundation for countless variations, each offering its own unique character and appeal.
Sweet Variations
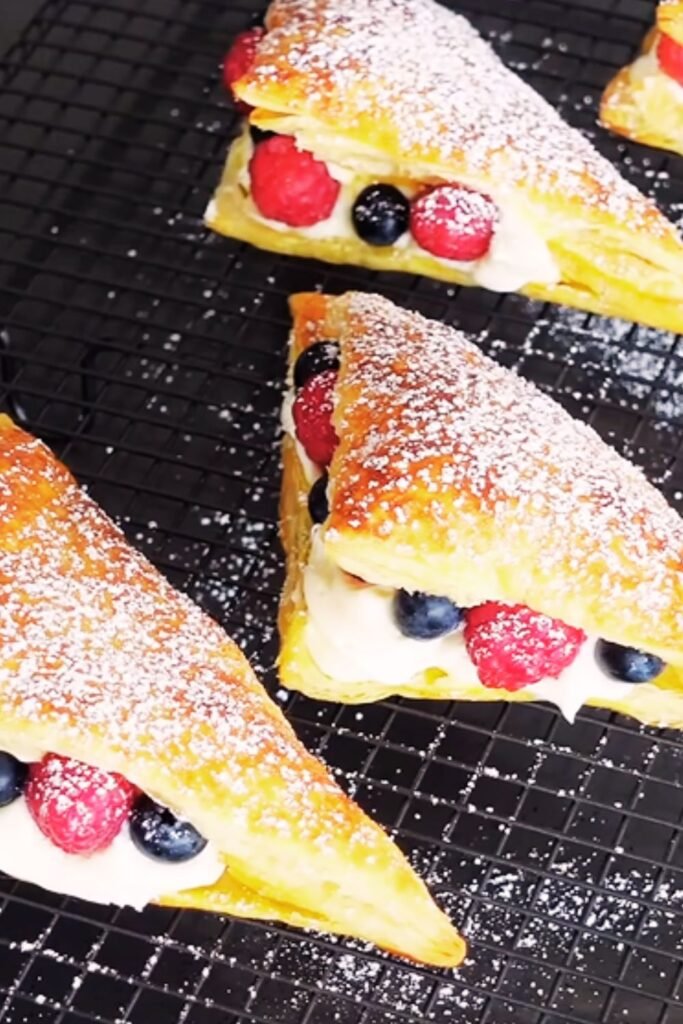
Berry Cream Cheese Pastries: I fold fresh or frozen berries into the cream cheese filling. Blueberries, raspberries, and strawberries all work beautifully. The berries add natural sweetness and create beautiful color contrast.
Chocolate Chip Delight: Adding mini chocolate chips to the filling creates a dessert that appeals to all ages. I use about 1/3 cup of mini chips for every 8 ounces of cream cheese.
Cinnamon Sugar Enhancement: I mix ground cinnamon into the cream cheese filling and sprinkle cinnamon sugar on top before baking. This creates a pastry reminiscent of cinnamon rolls but with a more sophisticated flavor profile.
Lemon Zest Brightness: Fresh lemon zest transforms the filling into something bright and refreshing. I add the zest of one lemon to the basic recipe, and sometimes include a tablespoon of fresh lemon juice for extra tang.
Savory Applications
Herb and Garlic: For savory applications, I omit the sugar and vanilla, instead adding minced garlic, fresh herbs like chives or dill, and a generous amount of black pepper.
Smoked Salmon Elegance: Combining cream cheese with pieces of smoked salmon, capers, and fresh dill creates an elegant appetizer perfect for brunch or special occasions.
Spinach and Feta: Wilted spinach and crumbled feta cheese create a Mediterranean-inspired filling that’s both nutritious and delicious.
Troubleshooting Common Issues
Through my years of making cream cheese puff pastry, I’ve encountered virtually every problem that can arise. Here’s my guide to identifying and solving the most common issues.
Soggy Bottom Syndrome
This is perhaps the most frustrating problem for home bakers. When the bottom of your pastry remains soggy while the top is perfectly golden, it’s usually due to one of several factors.
Oven Temperature: An oven that’s not hot enough won’t create the steam necessary for proper puffing. I always verify my oven temperature with a separate thermometer, as many home ovens run cooler than their settings indicate.
Filling Moisture: Too much moisture in the filling can create steam that prevents the bottom from crisping. I always drain any fruits thoroughly and avoid adding too much liquid to the cream cheese mixture.
Baking Surface: Using a dark-colored baking sheet can help absorb heat and promote bottom browning. I sometimes place my baking sheet on the lowest oven rack for the first half of baking.
Filling Leakage
When filling leaks out during baking, it’s usually a sealing issue. I’ve learned to be more generous with my border and to press the edges firmly together. Using a fork to crimp the edges creates both a decorative look and a more secure seal.
Uneven Puffing
Uneven puffing typically results from inconsistent rolling or handling that compresses some areas more than others. I always roll from the center outward, applying even pressure, and I avoid overworking the dough.
Storage and Reheating Guidelines
| Storage Method | Duration | Quality Notes | Reheating Instructions |
|---|---|---|---|
| Room Temperature | 2-3 days | Best texture first day | 300°F oven, 5-7 minutes |
| Refrigerated | 5-7 days | Filling stays fresh | 325°F oven, 8-10 minutes |
| Frozen (baked) | 2-3 months | Texture changes slightly | Thaw overnight, then reheat |
| Frozen (unbaked) | 1 month | Excellent results | Bake from frozen, add 5-10 minutes |
Proper storage is crucial for maintaining the quality of your cream cheese puff pastries. I’ve experimented with various methods and found that the approach depends largely on when you plan to consume them.
For short-term storage, I keep baked pastries in an airtight container at room temperature. However, I always place a paper towel in the container to absorb any excess moisture that might make the pastries soggy.
When I need to store them longer, refrigeration is the way to go. The cream cheese filling actually improves in flavor after a day or two, as the flavors meld together. I wrap each pastry individually in plastic wrap before placing them in an airtight container.
Nutritional Considerations and Dietary Adaptations
Understanding the nutritional profile of cream cheese puff pastry helps in making informed decisions about portion sizes and frequency of consumption.
Basic Nutritional Profile
A typical cream cheese puff pastry contains approximately 280-320 calories, with about 18-22 grams of fat, 20-25 grams of carbohydrates, and 6-8 grams of protein. The high fat content comes primarily from the butter in the puff pastry and the cream cheese filling.
Dietary Modifications
Reduced Fat Options: While it’s challenging to make puff pastry truly low-fat, I’ve had success using reduced-fat cream cheese in the filling. The texture changes slightly, but the flavor remains delicious.
Gluten-Free Adaptations: Several brands now offer gluten-free puff pastry alternatives. While the texture isn’t identical to traditional puff pastry, they work well for those with gluten sensitivities.
Sugar Alternatives: For those watching their sugar intake, I’ve successfully used erythritol or stevia in place of granulated sugar. The key is adjusting the quantity since these alternatives have different sweetness levels.
Serving Suggestions and Presentation
The presentation of cream cheese puff pastry can elevate it from a simple treat to an elegant dessert or impressive appetizer. I’ve developed several approaches that work well for different occasions.
Breakfast and Brunch Service
For morning service, I like to dust the pastries with powdered sugar and serve them alongside fresh fruit. The contrast between the rich pastry and fresh fruit creates a balanced meal that feels indulgent yet not overly heavy.
I often arrange them on a tiered serving stand, which creates visual interest and makes them easy for guests to access. Fresh berries scattered around the base of the stand add color and freshness to the presentation.
Dessert Presentation
When serving as dessert, I sometimes drizzle the pastries with a simple glaze made from powdered sugar and milk or cream. A sprinkle of toasted nuts or a few fresh mint leaves can add sophistication to the presentation.
For special occasions, I’ve served them warm with a scoop of vanilla ice cream. The temperature contrast between the warm pastry and cold ice cream creates a memorable dessert experience.
Appetizer Applications
For savory versions served as appetizers, I cut the pastries into smaller portions and arrange them on a platter with complementary items like crackers, fresh vegetables, or additional spreads.
Advanced Techniques for the Experienced Baker
Once you’ve mastered the basic technique, there are several advanced approaches that can take your cream cheese puff pastry to the next level.
Lamination Improvements
While most home bakers use store-bought puff pastry, understanding the lamination process can help you work with it more effectively. I always ensure the pastry is properly thawed but still cold, and I work quickly to prevent the butter layers from melting.
Flavor Layering
Advanced bakers can create complex flavor profiles by layering different elements. For example, I might spread a thin layer of fruit jam under the cream cheese filling, or sprinkle spices between the pastry layers before folding.
Temperature Manipulation
Controlling temperature throughout the process allows for greater consistency and better results. I sometimes chill assembled pastries for 15-20 minutes before baking, which helps maintain shape and promotes even puffing.
Seasonal Adaptations and Holiday Variations
Throughout the year, I adapt my cream cheese puff pastry recipes to reflect seasonal ingredients and holiday themes. This keeps the basic technique fresh and exciting while celebrating the best each season has to offer.
Spring Inspirations
Spring brings fresh strawberries and rhubarb, both of which work beautifully in cream cheese pastries. I often add a touch of orange zest to complement these spring flavors, creating pastries that taste like sunshine.
Summer Abundance
Summer’s bounty of berries and stone fruits provides endless inspiration. Peach and cream cheese pastries are particularly popular, especially when I add a hint of ginger to the filling.
Fall Comfort
Autumn calls for warming spices and heartier flavors. I love adding pumpkin puree to the cream cheese filling, along with cinnamon, nutmeg, and a touch of maple syrup.
Winter Celebrations
Winter holidays inspire richer, more decadent variations. I might add eggnog flavoring to the cream cheese, or create pastries filled with cream cheese and dried cranberries.
Professional Tips for Consistent Results
After years of making cream cheese puff pastry, I’ve developed a set of professional techniques that ensure consistent results every time.
Mise en Place
Professional bakers understand the importance of having everything prepared before beginning. I measure all ingredients, prepare my workspace, and preheat my oven before touching the pastry dough.
Temperature Control
I use an instant-read thermometer to check the internal temperature of baked pastries. They’re done when the internal temperature reaches 190°F (88°C), which ensures the filling is properly set without overbaking the pastry.
Quality Ingredients
The quality of ingredients makes a significant difference in the final product. I always use European-style butter when possible, as its higher fat content and lower water content create superior results.
Timing Considerations
I’ve learned that timing is crucial in pastry making. I plan my baking so that the pastries come out of the oven just before serving, as they’re at their absolute best when still slightly warm.
Q&A Section
Q: Can I make cream cheese puff pastry ahead of time? Yes, you can prepare them in several ways. You can assemble the pastries and freeze them unbaked for up to a month, then bake directly from frozen. Alternatively, you can bake them completely and store them in the refrigerator for up to a week, reheating before serving.
Q: Why did my puff pastry not puff properly? The most common reasons are: using pastry that’s too warm, not having a hot enough oven, or overworking the dough. Make sure your pastry is cold but pliable, your oven is fully preheated, and handle the dough gently to preserve the butter layers.
Q: Can I use low-fat cream cheese? While you can use reduced-fat cream cheese, the texture and flavor will be different. Low-fat versions contain more water and less fat, which can affect both the taste and the way the filling sets during baking. For best results, I recommend using full-fat cream cheese.
Q: How do I prevent the filling from leaking out? Ensure you’re not overfilling the pastries, leave adequate borders for sealing, and press the edges firmly together. Using a fork to crimp the edges creates a more secure seal. Also, avoid making the filling too thin or watery.
Q: What’s the best way to reheat leftover pastries? I recommend reheating in a 325°F oven for 8-10 minutes rather than using a microwave. The oven helps restore some of the crispness to the pastry, while the microwave tends to make it soggy.
Q: Can I make savory versions of cream cheese puff pastry? Absolutely! Simply omit the sugar and vanilla from the basic recipe and add savory ingredients like herbs, garlic, or vegetables. Popular combinations include spinach and feta, herbs and garlic, or smoked salmon and dill.
Q: How do I know when the pastries are done baking? Look for a deep golden brown color and listen for a hollow sound when you tap the bottom. The internal temperature should reach 190°F (88°C), and the pastry should feel crisp when gently pressed.
Q: Why is my cream cheese filling grainy? Grainy filling usually results from using cream cheese that’s too cold or from overmixing. Make sure your cream cheese is at room temperature before beginning, and mix just until smooth. If it becomes grainy, try warming it slightly and mixing again.
Q: Can I freeze the cream cheese filling separately? Yes, you can freeze the prepared filling for up to three months. Thaw it overnight in the refrigerator and give it a good stir before using. You may need to add a small amount of cream or milk to restore the proper consistency.
Q: What other fruits work well in cream cheese pastries? Most fruits work well, but those with lower water content are easier to work with. Apples, pears, berries, and stone fruits like peaches or apricots are excellent choices. Always drain juicy fruits thoroughly before adding to the filling.
The world of cream cheese puff pastry offers endless possibilities for creativity and delicious results. Whether you’re creating simple sweet treats for family breakfast or elegant appetizers for special occasions, mastering this technique opens doors to countless culinary adventures. Remember that practice makes perfect, and each batch teaches you something new about working with these wonderful ingredients.
With patience, quality ingredients, and attention to detail, you’ll soon be creating cream cheese puff pastries that rival those from the finest bakeries. The satisfaction of watching your family and friends enjoy something you’ve created from scratch is truly one of life’s great pleasures.