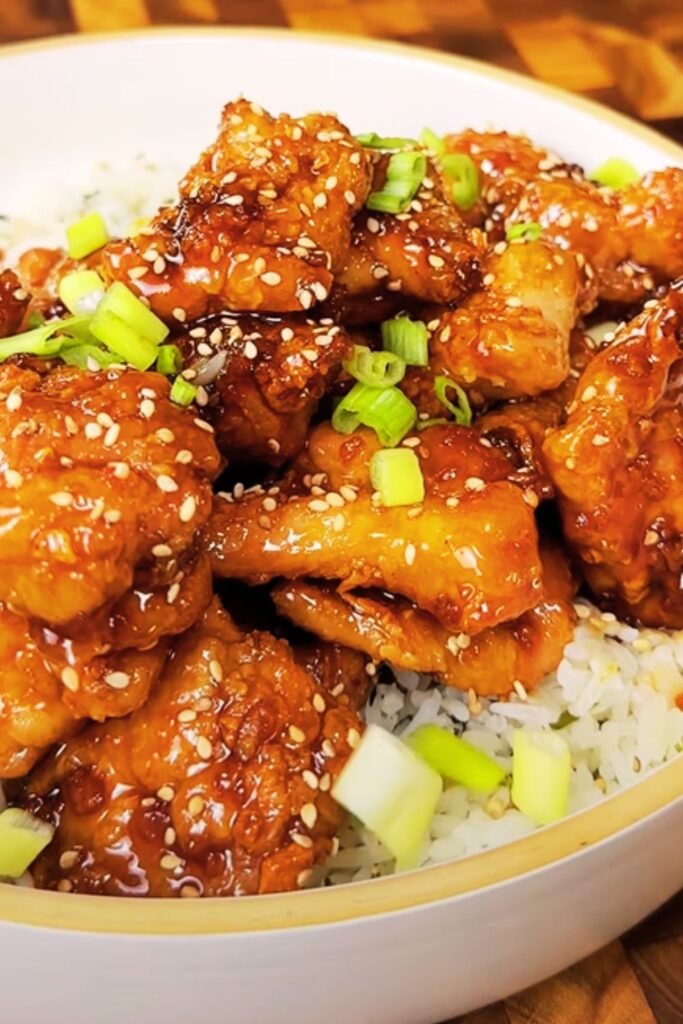
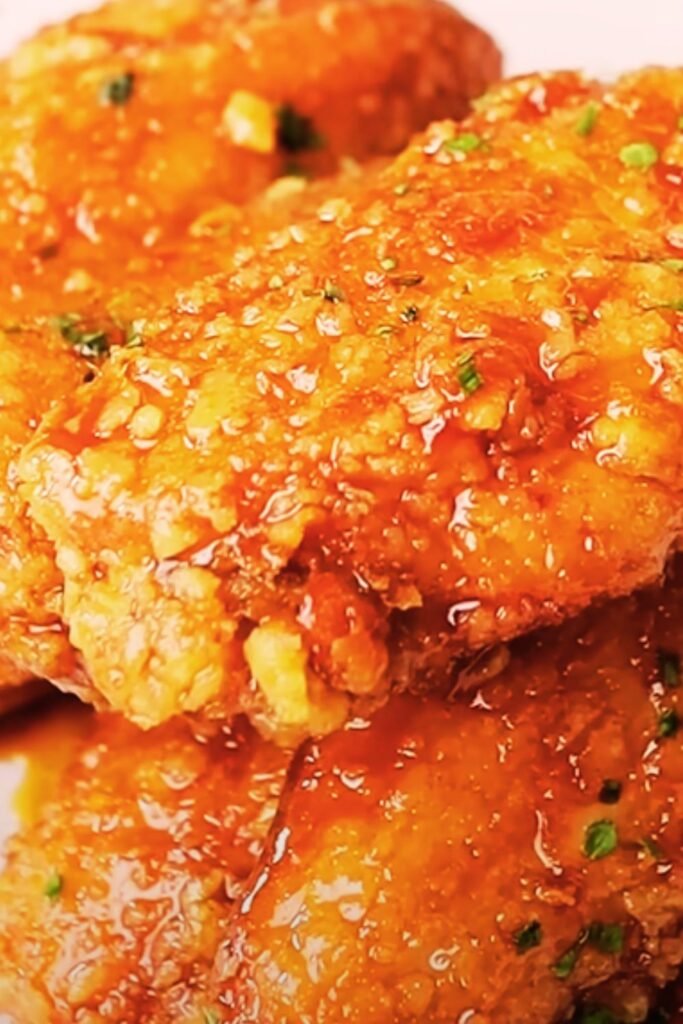
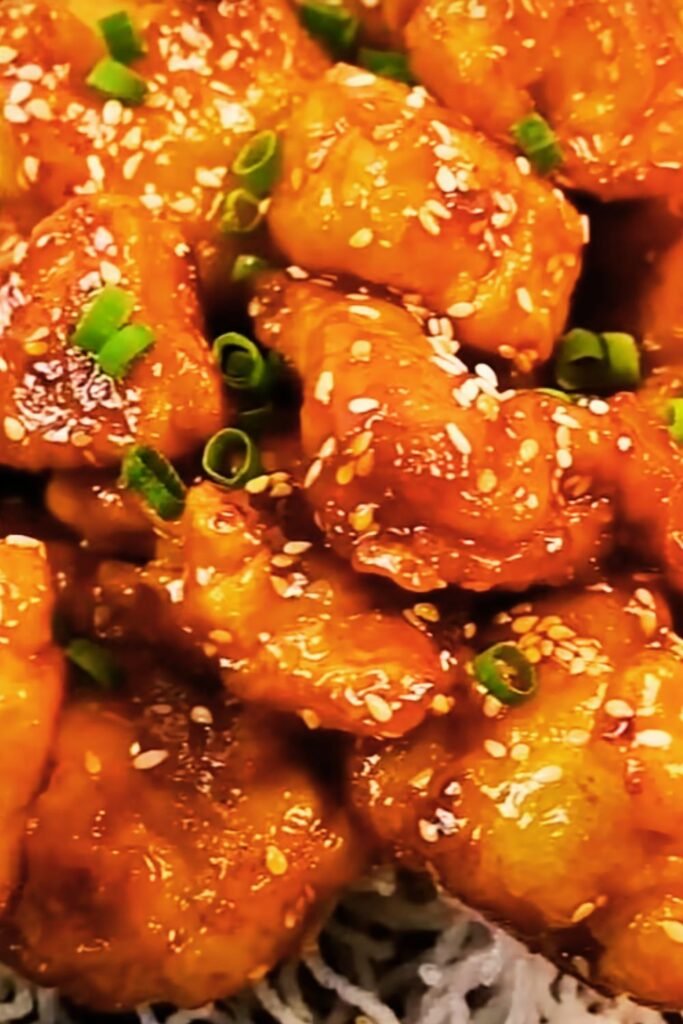
When I first tasted authentic Chinese honey garlic chicken at a bustling restaurant in Beijing, I knew I had discovered something extraordinary. The perfect harmony of crispy, golden coating giving way to tender, juicy chicken, all enveloped in a glossy, sweet-savory sauce that clings beautifully to every piece – it was culinary perfection. That experience ignited my passion to recreate this beloved dish in my own kitchen, and after countless experiments and refinements, I’m thrilled to share my foolproof method with you.
This isn’t just another chicken recipe; it’s a masterclass in achieving that coveted restaurant-quality crispiness while maintaining incredible flavor depth. The secret lies in understanding the delicate balance between temperature control, ingredient proportions, and timing. Through years of perfecting this technique, I’ve discovered the exact methods that transform ordinary ingredients into an extraordinary meal that rivals any professional kitchen.
Understanding the Foundation: What Makes This Dish Special
Honey Garlic Sauce: A glossy, amber-colored coating that combines the floral sweetness of honey with the pungent bite of fresh garlic, balanced by soy sauce’s umami depth and rice vinegar’s bright acidity.
Double-Frying Technique: The professional method of frying chicken twice at different temperatures to achieve maximum crispiness while ensuring complete cooking through to the center.
Cornstarch Coating: A light, crispy shell created by cornstarch that provides superior texture compared to traditional flour coatings, remaining crispy even when sauced.
Wok Hei: The distinctive “breath of the wok” flavor achieved through high-heat cooking that imparts a subtle smokiness to the final dish.
Essential Ingredients and Their Roles
For the Chicken Preparation
| Ingredient | Quantity | Purpose | Quality Tips |
|---|---|---|---|
| Boneless chicken thighs | 2 lbs | Main protein, stays juicier than breast meat | Choose organic, free-range for best flavor |
| Cornstarch | 1 cup | Creates crispy exterior coating | Use fine-ground cornstarch for smoothest texture |
| All-purpose flour | 1/4 cup | Helps coating adhere and adds structure | Sift before use to prevent lumps |
| Egg whites | 2 large | Binding agent for coating | Room temperature whites coat better |
| Shaoxing wine | 2 tbsp | Tenderizes meat and adds depth | Substitute with dry sherry if unavailable |
| White pepper | 1 tsp | Subtle heat without overpowering | Freshly ground provides best flavor |
| Salt | 1 tsp | Enhances all flavors | Use fine sea salt for even distribution |
For the Honey Garlic Sauce
| Ingredient | Quantity | Purpose | Selection Guidelines |
|---|---|---|---|
| Raw honey | 1/3 cup | Primary sweetener and glossy finish | Choose clover or wildflower honey |
| Fresh garlic | 8 cloves | Aromatic foundation | Use firm, unblemished bulbs |
| Soy sauce (light) | 3 tbsp | Umami and color | Premium brands offer superior flavor |
| Rice vinegar | 2 tbsp | Balances sweetness with acidity | Avoid seasoned varieties |
| Chicken stock | 1/4 cup | Thins sauce and adds depth | Low-sodium preferred |
| Fresh ginger | 1 tbsp minced | Warmth and complexity | Young ginger is less fibrous |
| Sesame oil | 1 tsp | Nutty finish | Use toasted sesame oil |
| Red pepper flakes | 1/2 tsp | Subtle heat (optional) | Korean gochugaru preferred |
| Cornstarch slurry | 1 tbsp + 2 tbsp water | Thickening agent | Mix just before using |
Step-by-Step Preparation Method
Phase 1: Chicken Preparation and Marination
My approach to preparing the chicken is methodical and purposeful. I begin by cutting the chicken thighs into uniform, bite-sized pieces – approximately 1.5-inch chunks. This size ensures even cooking while maintaining that satisfying, substantial bite that makes this dish so appealing. The uniformity is crucial because uneven pieces will cook at different rates, resulting in some pieces being overcooked while others remain underdone.
In a large mixing bowl, I combine the chicken pieces with Shaoxing wine, salt, and white pepper. The wine serves multiple purposes: it tenderizes the meat through its alcohol content, adds complexity to the flavor profile, and helps the seasonings penetrate deeper into the meat. I massage these ingredients into the chicken with clean hands, ensuring every piece is thoroughly coated. This mixture needs to marinate for exactly 30 minutes – long enough for the flavors to penetrate but not so long that the wine begins to break down the meat’s texture.
While the chicken marinates, I prepare my coating mixture. In a separate bowl, I whisk together the cornstarch and flour until completely combined. The ratio here is critical: too much flour and the coating becomes heavy and doughy; too little and it won’t provide enough structure. I then beat the egg whites until they’re frothy but not stiff – they should flow like thick cream when lifted with the whisk.
Phase 2: Creating the Perfect Coating
After marination, I add the beaten egg whites to the chicken and mix thoroughly. Each piece should be completely coated in the egg mixture. Next comes the crucial step of adding the cornstarch-flour blend. I sprinkle it gradually while tossing the chicken pieces, ensuring each one gets an even, light coating. The mixture should look slightly wet but hold together when squeezed gently.
The coated chicken needs to rest for 15 minutes before frying. This resting period allows the coating to set and adhere properly, preventing it from falling off during the frying process. During this time, the coating forms a slight skin that will become incredibly crispy when it hits the hot oil.
Phase 3: The Double-Frying Technique
My double-frying method is what separates this recipe from ordinary fried chicken. I use a heavy-bottomed pot or wok with at least 3 inches of neutral oil heated to exactly 325°F for the first fry. Temperature accuracy is non-negotiable here – too low and the coating becomes greasy, too high and it burns before the chicken cooks through.
For the first fry, I carefully lower the chicken pieces into the oil in small batches, never overcrowding the pot. Overcrowding drops the oil temperature dramatically and results in soggy coating. I fry each batch for exactly 4 minutes, then remove them to a wire rack set over a baking sheet. At this stage, the chicken is cooked through but the coating is pale and not yet crispy.
After all pieces have completed their first fry, I increase the oil temperature to 375°F for the second frying. This higher temperature is what creates the golden, incredibly crispy exterior. Each batch gets another 2-3 minutes in the hot oil until they achieve that perfect golden color and audible crispiness when tapped with tongs.
Phase 4: Sauce Preparation and Final Assembly
While the chicken undergoes its second frying, I prepare the honey garlic sauce. In a large wok or skillet over medium-high heat, I add a small amount of oil and immediately add the minced garlic and ginger. The key is to control the heat carefully – the garlic should sizzle and become fragrant without browning, which would make it bitter.
I then add the honey, soy sauce, rice vinegar, and chicken stock, stirring constantly to combine. The mixture will bubble vigorously as the liquids hit the hot pan. I let this mixture cook for 2-3 minutes, allowing the alcohol in the vinegar to cook off and the flavors to meld. Finally, I add the cornstarch slurry while stirring continuously to prevent lumps from forming.
The sauce should coat the back of a spoon when ready – glossy, thick enough to cling to the chicken but not so thick that it becomes gummy. I remove it from heat and immediately add the hot, freshly fried chicken pieces, tossing them gently but thoroughly to ensure every piece is completely coated.
Nutritional Analysis and Health Considerations
| Nutrient | Per Serving (4 servings) | Daily Value % | Health Notes |
|---|---|---|---|
| Calories | 485 | 24% | Moderate calorie dish |
| Protein | 35g | 70% | Excellent protein source |
| Carbohydrates | 28g | 9% | Primarily from coating and sauce |
| Fat | 25g | 32% | Mostly from healthy cooking oil |
| Sodium | 890mg | 39% | Can be reduced by using low-sodium soy sauce |
| Sugar | 18g | 20% | Natural sugars from honey |
| Fiber | 1g | 4% | Low fiber content |
| Iron | 2.1mg | 12% | Good source from chicken |
Understanding the nutritional profile helps you make informed decisions about portion sizes and frequency of preparation. While this dish is higher in calories and sodium than everyday meals, it provides excellent protein content and can be part of a balanced diet when enjoyed in moderation.
Troubleshooting Common Issues
Problem: Coating Falls Off During Frying
Solution: This usually occurs when the chicken wasn’t properly dried before coating or when the oil temperature is incorrect. Always pat chicken completely dry with paper towels before marinating, and use a reliable thermometer to monitor oil temperature.
Problem: Chicken is Greasy Instead of Crispy
Solution: Oil temperature is too low, or you’re overcrowding the pan. Maintain proper temperature and fry in smaller batches, allowing oil temperature to recover between batches.
Problem: Sauce is Too Thin or Too Thick
Solution: For thin sauce, cook longer to reduce, or add more cornstarch slurry gradually. For thick sauce, add warm chicken stock one tablespoon at a time until desired consistency is reached.
Problem: Garlic Tastes Bitter
Solution: Garlic was cooked at too high heat or for too long. Use medium heat and cook just until fragrant, about 30 seconds.
Serving Suggestions and Pairings
I love serving this crispy honey garlic chicken as the centerpiece of a complete Chinese-inspired meal. My favorite accompaniments include perfectly steamed jasmine rice, which soaks up the extra sauce beautifully, and simple stir-fried vegetables like bok choy or Chinese broccoli that provide a fresh, green contrast to the rich chicken.
For a more substantial meal, I often prepare fried rice with scrambled eggs and green onions, or serve it alongside hand-pulled noodles tossed with sesame oil and scallions. The key is balancing the richness of the chicken with lighter, cleaner flavors that don’t compete for attention.
Fresh garnishes make a significant difference in both presentation and flavor. I always finish the dish with thinly sliced green onions, toasted sesame seeds, and sometimes thin strips of fresh red chili for color and a tiny bit of heat. A wedge of lime on the side allows diners to add brightness if desired.
Storage and Reheating Guidelines
Proper Storage Methods
| Storage Method | Duration | Quality Retention | Best Practices |
|---|---|---|---|
| Refrigerator | 3-4 days | Good texture and flavor | Store in airtight container, separate sauce if possible |
| Freezer | 2-3 months | Fair, some texture loss | Double-wrap to prevent freezer burn |
| Room Temperature | 2 hours maximum | Not recommended | Food safety risk beyond 2 hours |
Reheating Techniques
Oven Method (Recommended): Preheat oven to 375°F, place chicken on wire rack over baking sheet, heat 8-10 minutes until crispy and hot throughout.
Air Fryer Method: Heat at 350°F for 3-4 minutes, shaking basket once halfway through.
Stovetop Method: Heat small amount of oil in skillet over medium-high heat, add chicken and toss frequently for 3-4 minutes.
Avoid Microwave: Microwaving makes the coating soggy and doesn’t heat evenly.
Cultural Context and Recipe Variations
This style of honey garlic chicken represents the beautiful fusion that occurs when traditional Chinese cooking techniques meet Western palates. While not authentically traditional, it embodies the spirit of Chinese cuisine’s emphasis on balancing sweet, salty, sour, and umami flavors within a single dish.
In different regions, I’ve encountered fascinating variations of this concept. Some Cantonese versions incorporate pineapple chunks and bell peppers, creating a more colorful, sweet-and-sour profile. Szechuan interpretations add dried chilies and Szechuan peppercorns for numbing heat. Korean-Chinese restaurants often include gochujang in their sauce for fermented spice complexity.
My personal favorite variation involves adding fresh orange zest to the sauce and garnishing with toasted cashews, which provides textural contrast and a subtle citrus note that brightens the entire dish. For those following gluten-free diets, the recipe works beautifully with gluten-free tamari instead of soy sauce and pure cornstarch coating without flour.
Advanced Techniques for Professional Results
Temperature Control Mastery
Professional kitchens maintain strict temperature control, and home cooks should do the same. I invested in a good digital thermometer with a probe, which allows me to monitor oil temperature continuously. The ideal temperature range for the first fry is 320-330°F, while the second fry should maintain 370-380°F. These temperatures ensure food safety while achieving optimal texture.
Sauce Consistency Perfection
The hallmark of restaurant-quality honey garlic sauce is its glossy, clingy consistency. I achieve this through careful attention to the cornstarch slurry ratio and cooking time. The sauce should coat chicken pieces evenly without being gloppy or running off immediately. If you can draw a line through the sauce on the back of a spoon with your finger, and it holds for 2-3 seconds before flowing back together, you’ve achieved the perfect consistency.
Timing and Organization
Professional execution requires careful timing. I prepare all ingredients completely before starting any cooking process – a practice called “mise en place.” This includes having the sauce ingredients measured and ready, oil preheated, and chicken properly coated and rested. The entire cooking process, from first fry to final plating, takes less than 15 minutes, so preparation is crucial.
Q&A Section
Q: Can I use chicken breast instead of thighs for this recipe? I strongly recommend sticking with chicken thighs for the best results. Thighs remain much more tender and juicy throughout the double-frying process, while breasts tend to become dry and tough. If you must use breasts, reduce the cooking time slightly and consider brining them first for 30 minutes in salted water.
Q: What’s the best oil for frying, and how much do I need? I prefer peanut oil for its high smoke point and neutral flavor, though vegetable or canola oil work well too. You’ll need about 6-8 cups of oil for proper frying depth in a standard pot. The oil should be deep enough that chicken pieces float freely without touching the bottom.
Q: Can I make the sauce ahead of time? Absolutely! The sauce actually improves in flavor when made a day ahead. Store it refrigerated in an airtight container for up to a week. Reheat gently before using and whisk in a tablespoon of warm water if it’s thickened too much during storage.
Q: My coating isn’t staying crispy after adding the sauce. What am I doing wrong? This usually happens when the sauce is too thin or when you’re not working quickly enough. Make sure your sauce has the proper consistency before adding the chicken, and serve immediately after tossing. The residual heat from the chicken will thin the sauce slightly, so it should be slightly thicker than your final desired consistency.
Q: Can I bake this instead of frying for a healthier version? While baking won’t achieve the same level of crispiness, you can get good results by baking at 425°F for 20-25 minutes on a wire rack, flipping once halfway through. Spray the coating lightly with cooking oil before baking for better browning.
Q: How do I prevent the oil from splattering during frying? Pat the chicken completely dry before coating, and lower pieces into oil slowly using tongs or a slotted spoon. Never drop them from a height. Having a splatter screen helps, and make sure your oil isn’t too hot – overheating causes more violent splattering.
Q: What should I do if my sauce crystallizes or becomes grainy? This typically occurs when the honey is heated too quickly or too hot. Remove from heat immediately and whisk in a tablespoon of warm water. If it doesn’t smooth out, strain the sauce through a fine-mesh sieve to remove any crystallized bits.
Q: Can I double or triple this recipe for a crowd? Yes, but you’ll need to fry in more batches to avoid overcrowding. The sauce recipe scales perfectly. I recommend having multiple wire racks ready for draining, and keep completed batches warm in a 200°F oven while finishing the rest.
This crispy Chinese honey garlic chicken represents everything I love about cooking – the transformation of simple ingredients into something extraordinary through proper technique and attention to detail. Every bite delivers that perfect combination of textures and flavors that makes this dish so irresistible. Whether you’re cooking for family dinner or entertaining guests, this recipe will deliver professional-quality results that will have everyone asking for seconds.
The journey from that first memorable bite in Beijing to perfecting this home version has taught me that great cooking isn’t about complicated techniques or exotic ingredients – it’s about understanding how different elements work together and executing each step with care and precision. I hope this detailed guide empowers you to create your own memorable meals and perhaps start your own culinary adventure with Chinese-inspired cooking.