Introduction
I’ve spent years perfecting my naan bread recipe, and I’m thrilled to finally share it with you today. If you’ve ever enjoyed this pillowy, slightly charred flatbread at your favorite Indian restaurant and wondered if you could recreate that magic at home, I’m here to tell you that yes, you absolutely can! And the best part? It’s much simpler than you might think.
Naan bread is a staple in Indian cuisine, traditionally baked in a tandoor (clay oven) at extremely high temperatures. But don’t worry if you don’t have a tandoor at home (most of us don’t!). I’ve developed this recipe to give you those same delicious results using just your stovetop and a good cast iron skillet or non-stick pan.
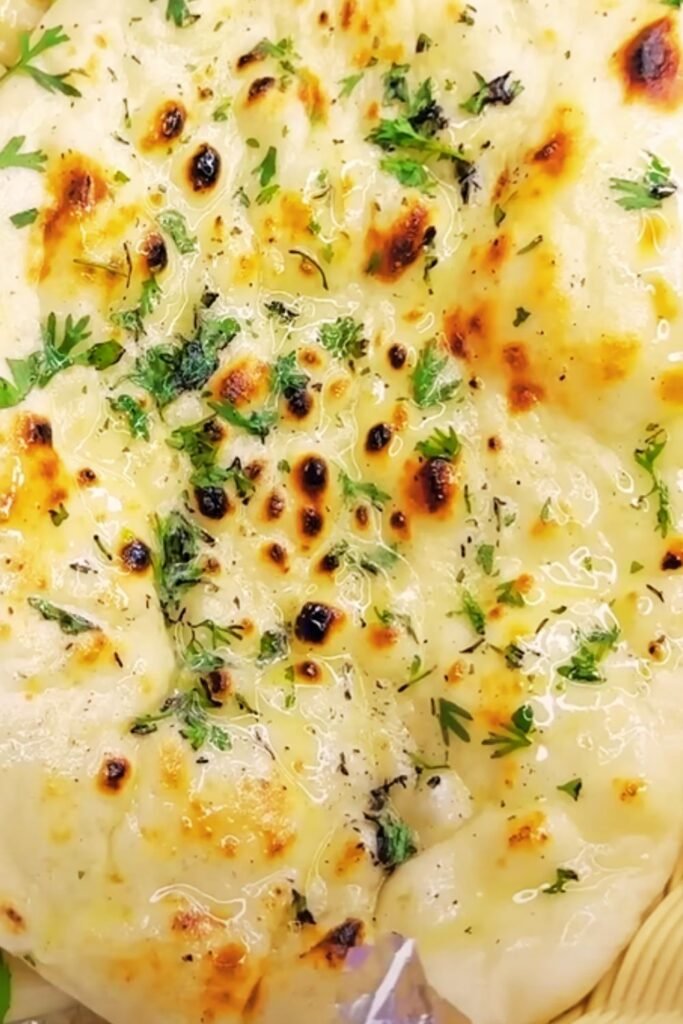
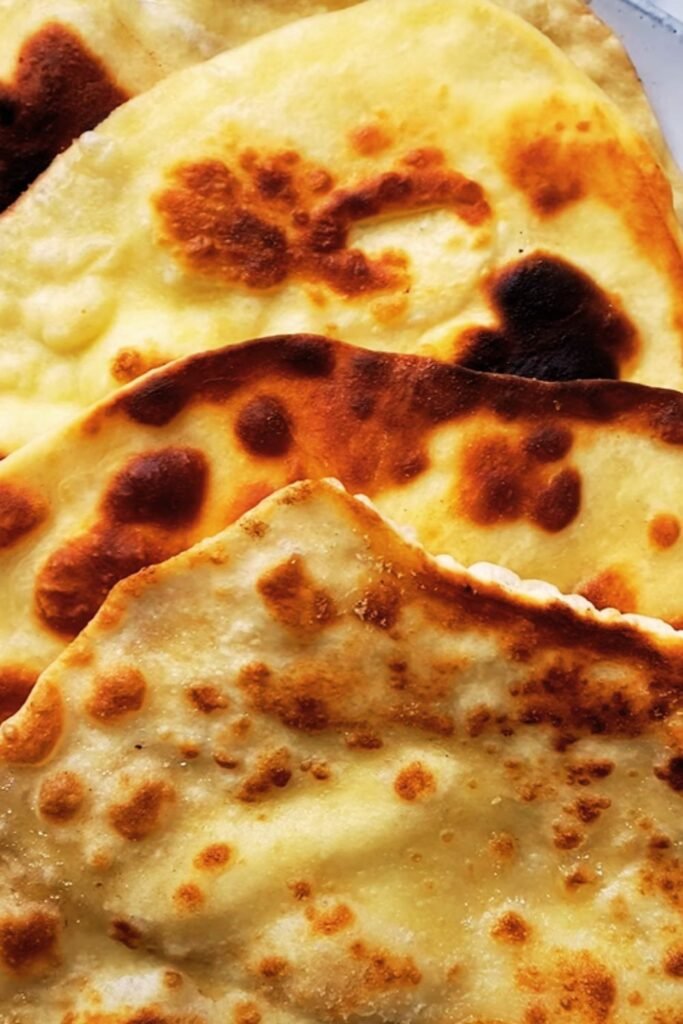
The perfect naan should be soft and fluffy on the inside with a slightly crisp exterior and those beautiful brown spots that add flavor and visual appeal. It should have just the right amount of chew and a subtle tanginess from yogurt in the dough.
What makes this particular recipe special is the attention to detail – from the specific ingredients to the techniques used to shape and cook the bread. I’ll walk you through each step and share all my tips for getting restaurant-quality naan right in your own kitchen.
So let’s dive in and discover the joy of fresh, homemade naan bread – a treat that will elevate your next curry night or even make a simple meal something extraordinary.
Ingredients
For this recipe, quality ingredients make all the difference. Here’s what you’ll need to make approximately 8 medium-sized naan breads:
- 3½ cups all-purpose flour (plus extra for dusting)
- 1 tablespoon granulated sugar
- 1 teaspoon salt
- 1 teaspoon baking powder
- ¼ teaspoon baking soda
- 2 teaspoons active dry yeast
- ¼ cup warm water (about 110°F/45°C)
- 1 cup plain whole milk yogurt (at room temperature)
- 3 tablespoons ghee or unsalted butter, melted (plus extra for brushing)
- ¼ cup whole milk (warm)
- 1 large egg
- 3 cloves garlic, finely minced (optional, for garlic naan)
- 2 tablespoons fresh cilantro, finely chopped (optional, for garlic-cilantro naan)
- Nigella seeds or sesame seeds for topping (optional)
Equipment Needed
Having the right tools on hand will make the process much smoother:
- Large mixing bowl
- Measuring cups and spoons
- Kitchen towel
- Rolling pin
- Cast iron skillet or heavy-bottomed non-stick pan
- Spatula
- Cooling rack
- Small bowl for melted butter/ghee
The Science Behind Perfect Naan
Before we get to the method, I think it’s helpful to understand what makes naan bread so special. This knowledge will help you troubleshoot if needed and appreciate the process more.
| Component | Function | Impact on Final Result |
|---|---|---|
| Yogurt | Provides tanginess and fat content | Creates tenderness and flavor depth |
| Yeast | Leavening agent | Produces air pockets and fluffiness |
| Baking powder & soda | Additional leavening | Quick rise and extra lift during cooking |
| Ghee/Butter | Fat component | Enriches flavor and creates softness |
| High heat cooking | Quick temperature shock | Creates char spots while maintaining soft interior |
| Gluten development | Structure formation | Provides the characteristic chew and bubbles |
| Rest time | Gluten relaxation | Allows for easier shaping and better texture |
Step-by-Step Method
1. Prepare the Yeast Mixture
I always start with activating the yeast, which ensures my naan will have that perfect rise:
- In a small bowl, combine the warm water (make sure it’s not too hot or it will kill the yeast) with the sugar and active dry yeast.
- Stir gently and let sit for about 5-10 minutes until frothy and bubbly.
- If your mixture doesn’t foam up, your yeast might be old or the water was too hot/cold. Start again with fresh yeast.
2. Mix the Dough
Now for the main dough:
- In a large mixing bowl, combine the flour, salt, baking powder, and baking soda. Whisk together to distribute everything evenly.
- Make a well in the center of the dry ingredients.
- Add the activated yeast mixture, yogurt, melted ghee (or butter), warm milk, and egg to the well.
- Mix everything together until it forms a shaggy dough. I like to start with a wooden spoon and then switch to using my hands.
- Once the dough comes together, transfer it to a lightly floured surface.
3. Knead the Dough
This is where magic happens:
- Knead the dough for about 5-7 minutes until smooth and elastic. The dough should be soft but not sticky. If it’s too sticky, add a little more flour, a tablespoon at a time.
- To test if your dough is ready, press it gently with your finger – it should slowly spring back.
- The perfect naan dough will feel silky and slightly tacky but shouldn’t stick to your hands.
4. First Rise
Patience pays off here:
- Shape the dough into a ball and place it in a lightly oiled bowl.
- Cover with a damp kitchen towel or plastic wrap.
- Let it rise in a warm, draft-free spot for about 1-1.5 hours, or until doubled in size.
- The ideal temperature for rising is around 75-80°F (24-27°C). If your kitchen is cold, you can place the bowl in an oven with just the light turned on.

5. Divide and Shape
After the first rise:
- Gently punch down the dough to release air bubbles.
- Transfer to a lightly floured surface and divide into 8 equal portions. I use a kitchen scale for precision, but you can eyeball it.
- Shape each portion into a ball by pulling the edges toward the center and pinching them together, then rolling between your palms to smooth.
- Cover the dough balls with a kitchen towel and let them rest for 15-20 minutes. This relaxes the gluten and makes rolling easier.
6. Roll Out the Naan
Here’s where technique matters:
- Take one dough ball (keep others covered) and flatten it with your palm.
- Roll it out to an oval or teardrop shape, about 8-9 inches long and ¼ inch thick.
- Don’t aim for perfect symmetry – irregular shapes give naan its rustic character.
- If making garlic naan, spread a little minced garlic and cilantro on top and lightly press it in with the rolling pin.
7. Cook the Naan
The most satisfying part:
- Heat your cast iron skillet or heavy-bottomed pan over high heat until very hot.
- Lightly dampen your hands and flip the rolled naan between your palms (this helps it stick to the pan).
- Place the naan, wet-side down, onto the hot pan.
- Cook for about 1-2 minutes until bubbles form on the surface and the bottom develops brown spots.
- Flip and cook the other side for about 1 minute until brown spots appear.
- If you have a gas stove, you can hold the cooked side directly over the flame using tongs for a few seconds to get char marks (be careful!).
8. Finish and Serve
The final touches:
- Brush the hot naan with melted ghee or butter.
- Sprinkle with nigella seeds or sesame seeds if desired.
- Stack the naan and cover with a clean kitchen towel to keep them warm and soft until serving.
Troubleshooting Guide
Even experienced bakers encounter issues sometimes. Here’s how to solve common naan problems:
| Problem | Possible Cause | Solution |
|---|---|---|
| Dough too sticky | Too much liquid or not enough flour | Add more flour, a tablespoon at a time |
| Dough too dry | Too much flour or not enough liquid | Add more yogurt or milk, a teaspoon at a time |
| Naan not bubbling | Pan not hot enough | Ensure pan is properly preheated |
| Naan too thick | Not rolled thin enough | Roll to ¼ inch thickness |
| Naan too thin | Rolled too thin | Aim for even ¼ inch thickness |
| Burning before cooking inside | Heat too high | Lower heat slightly |
| Not browning properly | Heat too low | Increase heat |
| Tough texture | Overworked dough | Knead more gently, just until smooth |
| Dough not rising | Inactive yeast or too cold environment | Check yeast freshness; find warmer spot |
Variations to Try
One of the things I love about naan is how versatile it is. Here are some of my favorite variations:
Garlic Butter Naan
- Add 3-4 cloves of minced garlic to the melted butter for brushing
- Sprinkle with finely chopped cilantro after cooking
Cheese Naan
- Stuff the dough with grated paneer or mozzarella before rolling
- Seal edges well to prevent cheese from leaking during cooking
Peshwari/Kashmiri Naan
- Create a filling with finely chopped nuts, raisins, coconut, and a touch of sugar
- Stuff the dough, seal, and roll gently
Herb Naan
- Add 2 tablespoons of mixed fresh herbs (mint, cilantro, fenugreek leaves) to the dough
- Alternatively, sprinkle herbs on top after brushing with butter
Whole Wheat Naan
- Replace half the all-purpose flour with whole wheat flour
- You may need to adjust liquid slightly as whole wheat absorbs more moisture
Storing and Reheating
Fresh is always best with naan, but here’s how to store and reheat any leftovers:
Storing:
- Let naan cool completely.
- Stack with parchment paper between each piece to prevent sticking.
- Wrap tightly in aluminum foil, then place in a zip-top bag.
- Store at room temperature for up to 2 days or freeze for up to 3 months.
Reheating:
- From room temperature: Sprinkle lightly with water and heat in a 350°F (175°C) oven for 3-4 minutes.
- From frozen: Thaw at room temperature, then sprinkle with water and heat in a 350°F oven for 5-6 minutes.
- Alternatively, warm briefly in a dry skillet over medium heat.
- After reheating, brush with a little melted butter to refresh.
Serving Suggestions
Now that you have your delicious homemade naan, here are perfect pairings to serve with it:
- Classic Companions: Butter chicken, chana masala, dal, or any curry with a rich gravy for sopping up.
- Dips and Spreads: Serve with hummus, baba ganoush, or yogurt-based raita for a light meal.
- Breakfast Option: Use as a wrap for scrambled eggs with vegetables and cheese.
- Street Food Style: Top with spiced chickpeas, diced tomatoes, yogurt, and tamarind chutney for a chaat-inspired treat.
- Fusion Twist: Use as a base for personal pizzas with a blend of Indian and Italian flavors.
- Accompaniments: Fresh salad, pickled vegetables, or cooling cucumber yogurt make perfect side dishes.
- Non-Alcoholic Pairings: Lassi (sweet or savory yogurt drink), masala chai, or fresh lime soda complement the flavors wonderfully.
Nutritional Information
For those tracking their intake, here’s an approximate nutritional breakdown per naan (without additional toppings or fillings):
| Nutrient | Amount per Naan |
|---|---|
| Calories | 220-250 |
| Carbohydrates | 35-40g |
| Protein | 6-7g |
| Fat | 6-8g |
| Fiber | 1-2g |
| Sodium | 300-350mg |
| Calcium | 8% DV |
| Iron | 10% DV |
Values are approximate and may vary based on specific ingredients used.
Historical and Cultural Context
I find that understanding the cultural significance of foods enhances the cooking experience:
Naan has a rich history that dates back to the 1300s when it was a royal bread in the courts of the Mughal Empire. Unlike many Indian breads which are unleavened, naan uses yeast, which was likely introduced through trade routes from the Middle East.
Traditionally, naan is baked by slapping the dough onto the inside walls of a tandoor oven, where temperatures can reach 900°F (480°C). The intense heat creates the characteristic bubbles and char marks in just 60-90 seconds.
The word “naan” itself comes from Persian, meaning “bread,” highlighting its origins outside the Indian subcontinent. Today, variations of naan can be found throughout South Asia, Central Asia, and the Middle East, each region adding its own twist to this versatile bread.
In many South Asian cultures, bread is considered sacred, and sharing naan is a symbol of community and hospitality. Breaking bread together is a universal language of friendship that transcends cultural boundaries.
Environmental Considerations
For the environmentally conscious cook:
- Consider buying ingredients in bulk to reduce packaging waste.
- Choose yogurt in glass containers rather than plastic when possible.
- Use locally milled flour if available in your area.
- If you have leftover naan that’s too stale to enjoy, transform it into croutons or breadcrumbs rather than discarding.
- Cooking multiple naan breads in one session saves energy compared to heating your pan multiple times.
Questions and Answers
Q: Can I make naan without yeast?
A: Yes, you can make a quicker version using just baking powder and baking soda as leavening agents. The texture won’t be quite the same – less chewy and with fewer bubbles – but it’s still delicious. Increase the baking powder to 2 teaspoons and baking soda to 1 teaspoon if omitting yeast.
Q: Is it possible to make naan dairy-free?
A: Absolutely! Replace the yogurt with coconut yogurt or another plant-based yogurt, use plant-based milk, and substitute vegan butter or olive oil for the ghee. The flavor will be slightly different but still delicious.
Q: My naan isn’t bubbling up like it should. What am I doing wrong?
A: There are a few possible issues: your pan might not be hot enough, the dough might be too thick, or it might need more moisture. Make sure your pan is very hot before adding the dough, roll the naan to about ¼ inch thickness, and try lightly spritzing the dough with water before placing it in the pan.
Q: Can I make the dough ahead of time?
A: Yes! You can make the dough up to 24 hours in advance and keep it refrigerated. The slow, cold fermentation actually improves the flavor. Just bring it to room temperature for about 30 minutes before dividing and shaping.
Q: How can I get those beautiful char marks without a tandoor?
A: If you have a gas stove, you can carefully hold the cooked naan with tongs directly over the flame for a few seconds. For electric stoves, try using a very hot cast iron pan and leaving the naan slightly longer to develop darker spots. A kitchen torch can also work if you have one.
Q: My naan turns hard quickly after cooking. How can I keep it soft?
A: Stack the freshly cooked naan and immediately cover with a clean kitchen towel. The steam trapped between the breads will keep them soft. Also, be sure to brush them generously with butter or ghee while hot.
Q: Can I freeze the dough instead of the cooked naan?
A: Yes, after the first rise, divide the dough into portions, wrap each portion tightly in plastic wrap, and freeze for up to 3 months. Thaw in the refrigerator overnight, then bring to room temperature before rolling and cooking.
Q: What’s the difference between naan and other flatbreads like roti or paratha?
A: The main differences are ingredients and cooking methods. Naan contains yeast and dairy products like yogurt, making it richer and fluffier. Roti is typically unleavened and made with whole wheat flour. Paratha is a layered flatbread that’s often stuffed and contains more fat, giving it a flaky texture.
Final Tips for Naan Success
After years of making naan at home, I’ve gathered these essential tips:
- Don’t rush the process: The longer, slower rise develops better flavor and texture.
- Keep your workspace and hands well-floured: This prevents sticking when shaping and rolling.
- Roll with a light touch: Heavy pressure can push out all the gas bubbles from the fermentation.
- Get your pan screaming hot: High heat is crucial for proper bubbling and browning.
- Work quickly once you start cooking: Have all your tools and toppings ready, as each naan cooks very fast.
- Practice makes perfect: Your first few naan might not be picture-perfect, but they’ll still be delicious.
- Trust your instincts: Cooking times vary based on heat source and pan type, so watch for visual cues rather than strictly following times.
- Enjoy immediately: Nothing beats fresh naan straight from the pan!
There you have it – everything you need to know to make incredible naan bread at home. Once you master this basic recipe, you’ll find yourself making it regularly and experimenting with your own creative variations. The satisfaction of pulling a perfectly bubbly, aromatic naan from the pan is a culinary joy that never gets old.
Give this recipe a try, and I’d love to hear how it turns out for you. Happy baking!