There’s something magical about the scent of apples and cinnamon wafting through the house on a cool afternoon. I’ve been baking apple desserts for years, but my easy apple cobbler recipe remains the crown jewel of my collection. This isn’t just any cobbler—it’s the perfect balance of tender, juicy apples nestled under a blanket of buttery, golden crust that’s somehow both crisp and tender.
What makes this cobbler so special? It’s incredibly forgiving, requires minimal effort, and delivers maximum flavor. Whether you’re a seasoned baker or someone who rarely ventures into the kitchen, this recipe promises success and countless compliments from anyone lucky enough to taste it.
What Makes a Cobbler Different from Other Apple Desserts?
Before diving into our recipe, let’s clarify what makes a cobbler unique in the world of fruit desserts:
Apple Crisp : Features a crumbly topping made with oats, flour, butter, and sugar
Apple Crumble : Similar to a crisp but without oats in the topping
Apple Pie : Enclosed in pastry crust on bottom and top
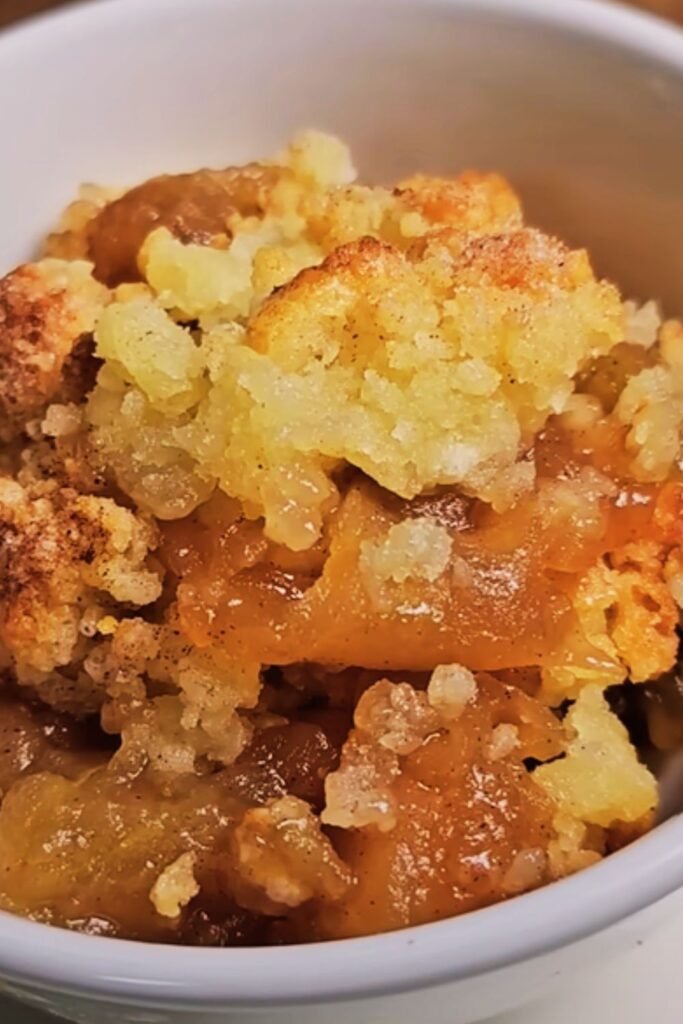
Apple Cobbler : Fruit base topped with a biscuit-like or cake-like batter that creates a “cobbled” appearance when baked
Apple Brown Betty : Layered dessert with buttered breadcrumbs between layers of apples
What I love about cobblers is their rustic charm—they’re meant to look homemade and imperfect, which makes them perfect for bakers of all skill levels.
The Best Apples for Cobbler
I’ve experimented with countless apple varieties over the years, and I’ve found that the best cobblers come from using a mix of apple types. Each variety brings something special to the dessert:
- Granny Smith: Provides tartness and holds shape well during baking
- Honeycrisp: Offers sweetness and a pleasant crunch
- Braeburn: Delivers balanced flavor and doesn’t get too mushy
- Pink Lady: Contributes sweetness with slight tartness
- Golden Delicious: Breaks down more, creating a sauce-like texture
My personal favorite combination is Granny Smith with Honeycrisp—the perfect marriage of tart and sweet that creates complexity in every bite.
Some apples to avoid for cobbler include Red Delicious (too mealy when cooked) and McIntosh (breaks down too much). Whatever varieties you choose, make sure they’re fresh and firm for the best results.
Essential Ingredients for Perfect Apple Cobbler
The beauty of this cobbler lies in its simplicity. You’ll need:
For the Apple Filling:
- 6-7 medium apples (about 2.5 pounds or 8 cups when sliced)
- 3/4 cup granulated sugar
- 2 tablespoons all-purpose flour
- 1 1/2 teaspoons ground cinnamon
- 1/4 teaspoon ground nutmeg
- 1/4 teaspoon salt
- 2 tablespoons fresh lemon juice
- 1 teaspoon vanilla extract
For the Cobbler Topping:
- 1 cup all-purpose flour
- 1/2 cup granulated sugar
- 1/4 cup brown sugar, packed
- 1 teaspoon baking powder
- 1/2 teaspoon salt
- 1 teaspoon ground cinnamon
- 6 tablespoons cold unsalted butter, cubed
- 1/4 cup boiling water
For the Finishing Touch:
- 1 tablespoon granulated sugar mixed with 1/4 teaspoon cinnamon
Kitchen Tools You’ll Need
I’ve found that having the right tools makes this process even more enjoyable:
- 9×13 inch baking dish or 10-inch cast iron skillet
- Large mixing bowl for apple filling
- Medium mixing bowl for cobbler topping
- Apple peeler/corer/slicer (optional but makes prep much faster)
- Pastry cutter or fork for working butter into flour
- Measuring cups and spoons
- Sharp knife and cutting board
Step-by-Step Apple Cobbler Instructions
Preparing the Apples
- Preheat your oven to 350°F (175°C).
- Lightly grease your baking dish with butter.
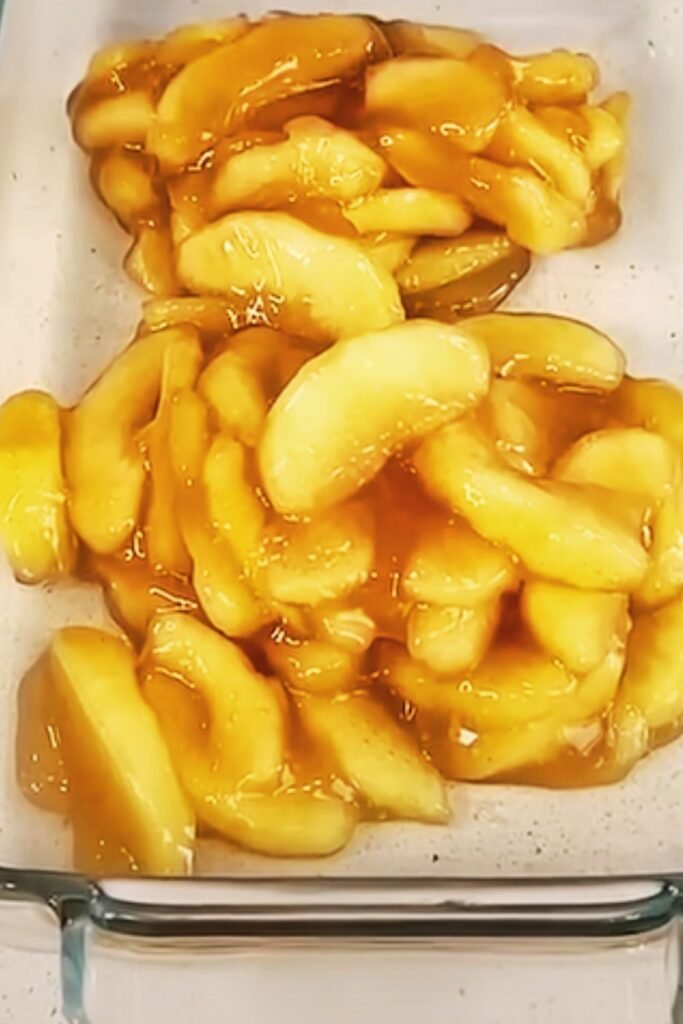
- Peel, core, and slice the apples into approximately 1/4-inch slices. I find that slicing them uniformly helps them cook evenly.
- In a large bowl, combine sliced apples with sugar, flour, cinnamon, nutmeg, salt, lemon juice, and vanilla.
- Toss until apples are evenly coated and transfer to your prepared baking dish.
Creating the Perfect Cobbler Topping
- In a medium bowl, whisk together flour, granulated sugar, brown sugar, baking powder, salt, and cinnamon.
- Add the cold butter cubes and use a pastry cutter or your fingertips to work it into the dry ingredients until the mixture resembles coarse crumbs.
- Pour in the boiling water and stir just until combined. The batter will be thick and somewhat lumpy—this is exactly what you want!
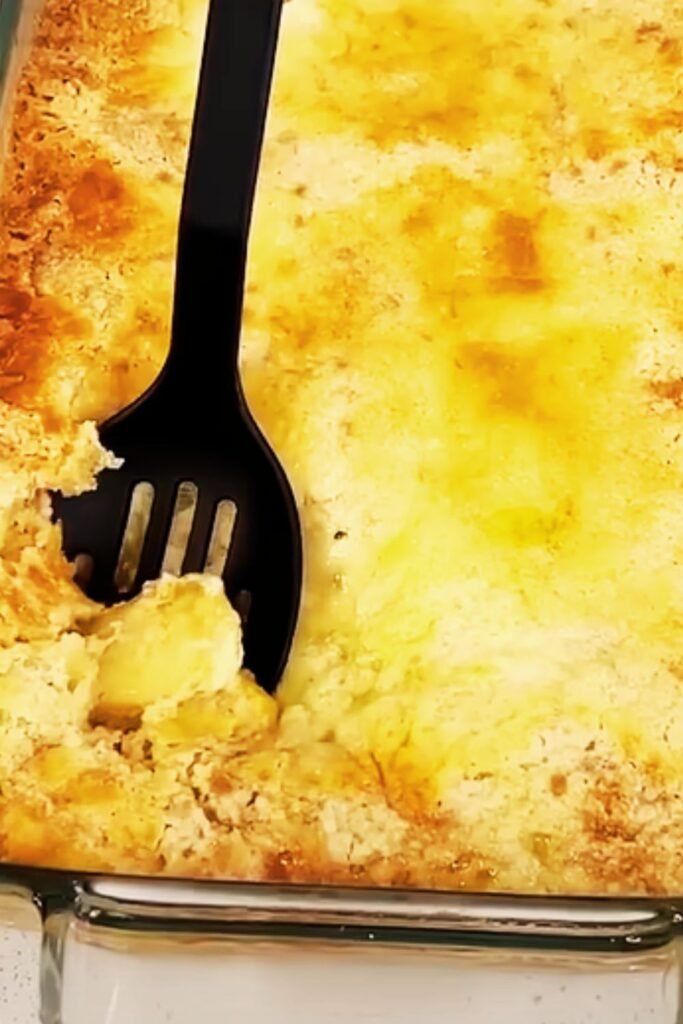
- Drop spoonfuls of the batter over the apples, leaving some gaps where the fruit can peek through. The gaps allow steam to escape and create that classic cobbled appearance.
- Sprinkle the cinnamon-sugar mixture over the top.
Baking to Golden Perfection
- Bake for 40-45 minutes, until the topping is golden brown and the apple filling is bubbling around the edges.
- Allow to cool for at least 15 minutes before serving (though I know it’s tempting to dig in right away!).
The Science Behind a Perfect Cobbler
What makes this cobbler recipe work so well comes down to a few key factors:
Apple Chemistry
Apples contain pectin, a natural thickener that helps create that perfect jammy texture when they cook. The addition of lemon juice not only prevents browning but also helps break down the pectin for the ideal consistency.
The Secret to a Tender Topping
The boiling water in the topping recipe might seem unusual, but it serves an important purpose—it partially cooks the flour proteins before baking, resulting in a tender rather than tough crust. This technique is similar to what’s used in making choux pastry.
Temperature Matters
Starting with cold butter creates pockets of steam during baking, which results in a light, flaky texture rather than a dense one. This is why I never use melted butter in my cobbler topping.
Troubleshooting Common Cobbler Problems
| Problem | Likely Cause | Solution |
|---|---|---|
| Soggy topping | Too much liquid in filling | Add 1-2 extra tablespoons of flour to apple mixture |
| Topping too dense | Overworking the batter | Mix just until combined; lumps are good! |
| Apples too firm | Not sliced thin enough | Slice apples 1/4-inch thick or less |
| Too sweet | Apple variety or added sugar | Use tarter apples or reduce sugar by 1/4 cup |
| Not enough flavor | Under-spiced | Increase cinnamon to 2 teaspoons or add 1/8 tsp cloves |
| Filling too watery | High-moisture apples | Let sliced apples sit with sugar for 30 minutes, drain excess liquid |
| Uneven baking | Oven hot spots | Rotate pan halfway through baking time |
| Burned edges | Oven too hot | Reduce temperature by 25°F or cover edges with foil |
Creative Variations on Classic Apple Cobbler
One of the things I love most about this recipe is how adaptable it is. Here are some of my favorite ways to put a unique spin on it:
Flavor Enhancements
- Caramel Apple Cobbler: Drizzle 1/3 cup of caramel sauce over the apples before adding the topping
- Apple-Cranberry: Add 1 cup fresh or frozen cranberries to the apple mixture for a tart contrast
- Spiced Apple: Add 1/2 teaspoon of cardamom and a pinch of cloves to the apple mixture
- Apple-Walnut: Sprinkle 1/2 cup chopped walnuts over the apples before adding the topping
- Maple-Apple: Replace half the granulated sugar with pure maple syrup in the filling
Topping Variations
- Streusel-Topped: Add 1/2 cup rolled oats and 1/4 cup chopped nuts to the topping mixture
- Biscuit-Style: Pat the topping mixture into a 1/2-inch thick rectangle, cut into biscuits, and arrange on top
- Cornmeal Cobbler: Replace 1/4 cup of the flour with fine cornmeal for added texture and flavor
- Gingerbread Cobbler: Add 1 tablespoon molasses and 1/2 teaspoon ground ginger to the topping mixture
Make-Ahead and Storage Tips
Preparing in Advance
I often prepare components ahead of time when expecting guests:
- Apple filling: Can be prepared up to 24 hours in advance and refrigerated. The lemon juice will prevent browning.
- Dry topping ingredients: Can be mixed together and stored at room temperature for up to 3 days. Add the butter and water just before baking.
- Assembled but unbaked: The entire cobbler can be assembled and refrigerated for up to 4 hours before baking. Add an extra 5-10 minutes to the baking time if baking straight from the refrigerator.
Proper Storage
- Room temperature: Will keep well, covered with a clean kitchen towel, for up to 24 hours.
- Refrigerator: Store covered for up to 5 days. The topping will soften but still taste delicious.
- Freezer: Baked cobbler can be frozen for up to 3 months. Thaw overnight in the refrigerator and reheat in a 300°F oven until warmed through.
Reheating for Best Results
For that fresh-from-the-oven experience, reheat individual portions in the microwave for 30-45 seconds or place the entire cobbler (if in an oven-safe dish) in a 300°F oven for 15-20 minutes.
Serving Suggestions
While apple cobbler is magnificent on its own, I love to elevate it with the perfect accompaniments:
- Vanilla ice cream (the classic choice that never disappoints)
- Fresh whipped cream with a touch of cinnamon
- Warm custard sauce
- A drizzle of caramel sauce
- A sprinkle of toasted pecans or walnuts
- A dollop of Greek yogurt (for a tangy contrast)
For a special breakfast treat, I sometimes enjoy leftover cobbler warmed up with a spoonful of plain yogurt—the contrast between the sweet cobbler and tangy yogurt is divine.
Seasonal Adaptations
One of the reasons I return to this recipe throughout the year is its adaptability to seasonal ingredients:
- Fall: Add 1 small diced pear to the apple mixture and increase cinnamon
- Winter: Add 1/4 teaspoon of ground cloves and serve with spiced whipped cream
- Spring: Mix in 1 cup of sliced strawberries with the apples
- Summer: Add 1 cup of fresh blueberries or blackberries to the apple mixture
Making Your Cobbler Healthier
While desserts are an occasional indulgence, I’ve found several ways to make this cobbler a bit lighter without sacrificing flavor:
- Reduce sugar in the filling by up to 1/3
- Use whole wheat pastry flour for half of the all-purpose flour
- Replace half the butter with applesauce in the topping
- Add 2 tablespoons of ground flaxseed to the topping for extra fiber
- Use coconut sugar in place of brown sugar for a lower glycemic option
These modifications may slightly alter the texture and flavor but still produce a delicious result that satisfies the sweet tooth.
The History Behind Apple Cobbler
Apple cobbler has humble beginnings as a pioneer dessert in early American history. When British colonists couldn’t make traditional puddings due to limited resources, they created the cobbler as an adaptation of steamed puddings. The name “cobbler” likely comes from the cobbled appearance of the topping.
During the Great Depression, cobblers became even more popular as an economical way to stretch ingredients and provide comfort during difficult times. It’s this heritage of simplicity and resourcefulness that makes cobbler such an enduring favorite.
Nutritional Information
| Nutrient | Amount per Serving (1/8 of recipe) |
|---|---|
| Calories | Approximately 320 |
| Total Fat | 9g |
| Saturated Fat | 5g |
| Cholesterol | 23mg |
| Sodium | 240mg |
| Total Carbohydrates | 58g |
| Dietary Fiber | 3g |
| Sugars | 42g |
| Protein | 2g |
Questions & Answers About Apple Cobbler
Q: Can I make this recipe gluten-free? Yes! I’ve had great success substituting a 1:1 gluten-free flour blend for the all-purpose flour. Just make sure your blend contains xanthan gum for the right texture in the topping.
Q: Can I use frozen apples? Absolutely. I recommend thawing them first and draining any excess liquid to prevent your cobbler from becoming too watery. You may need to add an extra tablespoon of flour to the filling.
Q: How do I know when my cobbler is done? The topping should be golden brown, and you should see the filling bubbling around the edges. If you insert a knife into an apple slice, it should meet little resistance.
Q: Can I reduce the sugar? Yes, especially if you’re using sweeter apple varieties. You can reduce the sugar in the filling by up to half depending on your taste preferences and the sweetness of your apples.
Q: Why did my topping sink into the filling? This usually happens if the topping is too thin or if the filling is extremely juicy. Make sure your topping has a thick, almost dough-like consistency before spooning it over the apples.
Q: Can I make individual servings? Definitely! Divide the filling and topping among ramekins or small oven-safe dishes. Reduce the baking time to about 25-30 minutes.
Q: Is it necessary to peel the apples? It’s a matter of preference. I peel mine for a smoother texture, but the peels contain fiber and nutrients. If using unpeeled apples, make sure they’re well washed and opt for organic if possible.
Q: My cobbler was too watery. What went wrong? Some apple varieties release more juice than others. You can toss the sliced apples with an extra tablespoon of flour, or let them sit with the sugar for 30 minutes and drain off excess liquid before assembling.
Final Thoughts
There’s something deeply comforting about making a recipe that connects us to generations past. As I pull a bubbling apple cobbler from the oven, I’m reminded of countless family gatherings and the simple joy that homemade desserts bring.
This easy apple cobbler isn’t just a dessert—it’s an invitation to slow down, gather around the table, and create memories. Whether you’re making it for a special occasion or simply because it’s Tuesday, I hope this recipe brings as much joy to your kitchen as it has to mine.
Remember that the best cobblers embrace imperfection. Let the filling bubble over a bit. Allow the topping to be rustic. These “imperfections” are what make your cobbler uniquely yours and irresistibly delicious.
Happy baking!