There’s something truly magical about the aroma of apples and cinnamon filling your kitchen. As someone who’s been baking apple desserts for over a decade, I can honestly say that few treats bring as much comfort and satisfaction as a warm apple cobbler fresh from the oven. The beauty of this particular recipe lies in its simplicity – you don’t need to be a seasoned baker to create something absolutely delicious that will have everyone asking for seconds.
I’ve spent years perfecting this easy apple cobbler recipe, tweaking ingredients and methods until I found the perfect balance of flavors and textures. Today, I’m sharing my tried-and-true approach that delivers consistently amazing results with minimal effort. Whether you’re a novice in the kitchen or simply looking for a quick dessert solution, this recipe promises to deliver that homemade taste without the fuss.
What Makes This Apple Cobbler Special
Before diving into the recipe, let me explain what sets this cobbler apart. Unlike many complicated desserts, this one celebrates simplicity while maximizing flavor. The filling features tender, spiced apples bathed in their own juices, while the topping strikes that perfect balance between cake and biscuit – soft in the middle with a slightly crisp, golden exterior.
I’ve designed this recipe to be:
- Quick to prepare (under 15 minutes of hands-on time)
- Made with pantry staples you likely already have
- Adaptable to different apple varieties
- Perfect for both everyday treats and special occasions
- Beginner-friendly with foolproof instructions
Essential Ingredients
For the Apple Filling:
- 6 medium apples (about 2½ pounds)
- ¾ cup granulated sugar
- 2 tablespoons all-purpose flour
- 1½ teaspoons ground cinnamon
- ¼ teaspoon ground nutmeg
- ¼ teaspoon salt
- 2 tablespoons lemon juice
- 1 teaspoon vanilla extract
For the Cobbler Topping:
- 1 cup all-purpose flour
- ½ cup granulated sugar
- ¼ cup brown sugar, packed
- 1 teaspoon baking powder
- ½ teaspoon salt
- ½ cup cold unsalted butter, cubed
- ¼ cup boiling water
The Best Apples for Cobbler
Not all apples are created equal when it comes to baking! Through numerous tests, I’ve found that these varieties work exceptionally well in cobbler:
| Apple Variety | Flavor Profile | Texture When Baked | Best Used For |
|---|---|---|---|
| Granny Smith | Tart, bright | Holds shape well | Adding acidity and structure |
| Honeycrisp | Sweet-tart balance | Maintains texture | All-purpose baking |
| Braeburn | Sweet with hint of spice | Stays firm | Flavor complexity |
| Jonagold | Honey-sweet | Softens nicely | Sweeter cobblers |
| Pink Lady | Sweet-tart | Holds shape | Balanced flavor |
| Golden Delicious | Mellow sweetness | Becomes tender | Smooth texture |
I personally prefer using a mix of Granny Smith and Honeycrisp apples for the perfect balance of tartness and sweetness. The contrast in flavors creates depth that a single variety often can’t achieve.
Step-by-Step Instructions
Preparing the Apples
- Preheat your oven to 350°F (175°C) and lightly grease a 9×13-inch baking dish.
- Peel, core, and slice the apples into ¼-inch thick slices. I find this thickness perfect – thin enough to cook through but thick enough to maintain some texture.
- In a large bowl, combine the sliced apples, sugar, flour, cinnamon, nutmeg, salt, lemon juice, and vanilla extract.
- Toss everything together until the apples are evenly coated with the sugar-spice mixture. Make sure to get into all the nooks and crannies!
- Transfer the apple mixture to your prepared baking dish, spreading it into an even layer.
Creating the Perfect Cobbler Topping
- In a medium bowl, whisk together the flour, granulated sugar, brown sugar, baking powder, and salt.
- Add the cold cubed butter to the flour mixture. Using a pastry cutter, two forks, or your fingertips, work the butter into the dry ingredients until the mixture resembles coarse crumbs with pea-sized bits of butter still visible.
- Pour the boiling water over the mixture and stir just until combined. The dough will seem a bit loose – that’s exactly what we want!
- Using a spoon, drop dollops of the topping mixture evenly over the apples. Don’t worry about covering every inch – the topping will spread as it bakes.
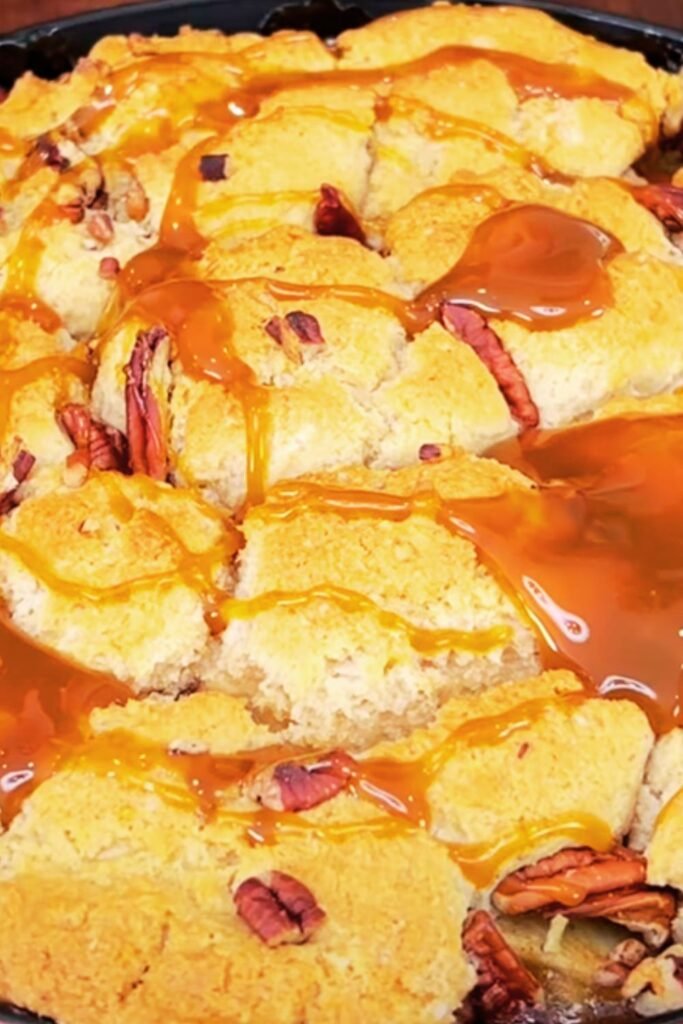
- If desired, sprinkle an additional tablespoon of granulated sugar over the top for a beautiful sparkle and extra crunch.
Baking to Golden Perfection
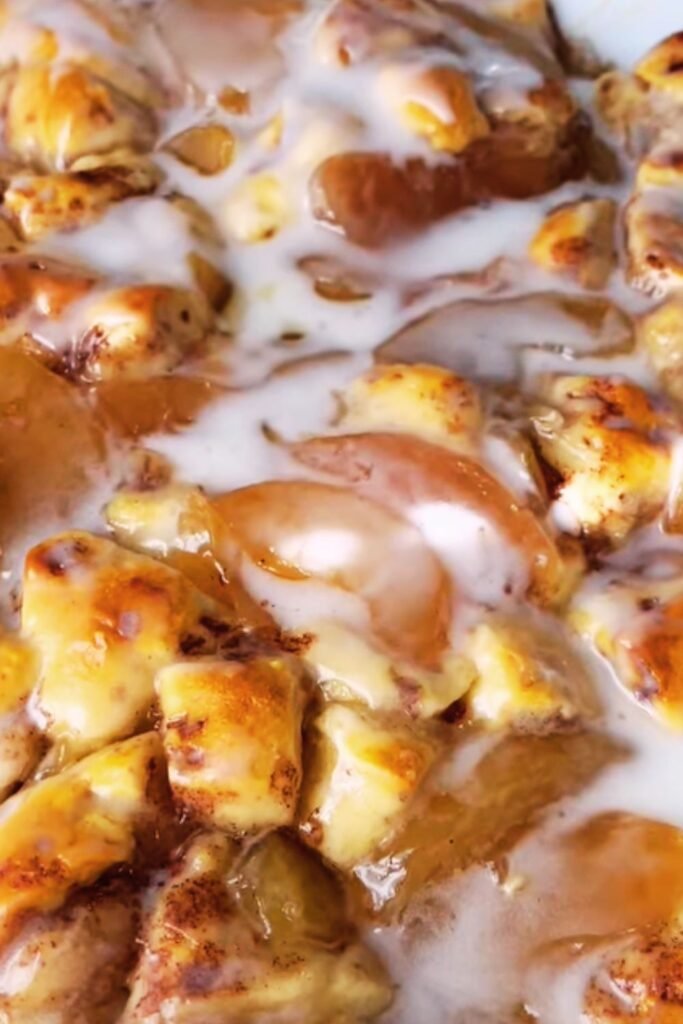
- Place the cobbler in the preheated oven and bake for 45-50 minutes, until the topping is golden brown and the apple filling is bubbling around the edges.
- I recommend placing a baking sheet on the rack below your cobbler to catch any potential overflow. Nothing worse than cleaning caramelized apple juice from the bottom of your oven!
- Once done, remove from the oven and allow the cobbler to cool for at least 15-20 minutes before serving. This cooling period is crucial as it allows the filling to thicken slightly and the flavors to settle.
Why This Method Works
What makes this recipe foolproof is the balance of techniques. The filling is prepared with just enough flour to thicken the juices without becoming gummy. The lemon juice brightens the flavor while also preventing the apples from browning too quickly.
The topping’s secret lies in using cold butter that creates those lovely pockets of steam as it melts in the oven, resulting in a tender, biscuit-like crust. The addition of boiling water might seem unusual, but it partially activates the flour’s gluten, giving the topping structure while keeping it delicate.
Serving Suggestions
A warm apple cobbler is delicious on its own, but these accompaniments can take it to the next level:
Classic Pairings:
- Vanilla ice cream (my absolute favorite!)
- Freshly whipped cream
- Warm custard sauce
- Caramel sauce drizzle
- A sprinkle of powdered sugar
Seasonal Twists:
- In fall, try serving with spiced whipped cream (just add a pinch of cinnamon and nutmeg)
- During winter holidays, garnish with sugared cranberries for a festive touch
- In summer, pair with a scoop of cinnamon ice cream for a refreshing contrast

Make-Ahead and Storage Tips
One of the reasons I love this cobbler is how well it works for both spontaneous cravings and planned events. Here’s how to make it work for any occasion:
Make-Ahead Options:
- Prep the components separately: The apple filling can be prepared up to 24 hours in advance and refrigerated in an airtight container. Just bring it to room temperature before baking.
- Assemble and refrigerate: The entire cobbler can be assembled and refrigerated for up to 2 hours before baking. You may need to add 5-10 minutes to the baking time if placing it in the oven cold.
- Freeze unbaked: Assemble the cobbler in a freezer-safe dish, cover tightly, and freeze for up to 3 months. Thaw overnight in the refrigerator before baking as directed.
Storage and Reheating:
| Storage Method | Duration | Notes |
|---|---|---|
| Room Temperature | Up to 2 days | Cover loosely with foil |
| Refrigerated | Up to 5 days | Cover tightly |
| Frozen (baked) | Up to 3 months | Wrap well in plastic wrap and foil |
To reheat refrigerated cobbler, warm individual portions in the microwave for 30-45 seconds or place the entire cobbler (in an oven-safe dish) in a 325°F oven for 15-20 minutes until heated through.
For frozen leftovers, thaw overnight in the refrigerator before reheating using either method above.
Troubleshooting Common Issues
Even with a foolproof recipe, sometimes things don’t go exactly as planned. Here’s how to address common cobbler conundrums:
Soupy Filling:
- Cause: Using very juicy apples or not enough thickener
- Solution: Add an extra tablespoon of flour to the filling if using particularly juicy apples
Doughy Topping:
- Cause: Undertaking or making the topping too thick
- Solution: Ensure you’re dropping the topping in smaller portions rather than one large mass
Burnt Top Before Filling Cooks:
- Cause: Oven temperature too high or topping spread too thin
- Solution: Cover loosely with foil after 30 minutes of baking if the top is browning too quickly
Seasonal Variations
While this classic apple cobbler is perfect year-round, I love adapting it to showcase the best of each season:
Fall Harvest Cobbler
Add 1 cup fresh cranberries and 1 teaspoon orange zest to the apple filling for a festive autumn twist.
Winter Warmth Cobbler
Mix in 2 tablespoons of bourbon to the apple filling and add ½ teaspoon of ground ginger for a warming winter treat.
Spring Renewal Cobbler
Include 1 cup of fresh strawberries and reduce the sugar slightly for a bright spring variation.
Summer Abundance Cobbler
Add 1 cup of fresh blueberries and a tablespoon of lemon zest for a summer berry-apple hybrid.
Health-Conscious Adaptations
I believe everyone should be able to enjoy a good cobbler, regardless of dietary preferences. Here are some tested modifications:
Reduced Sugar Option:
- Decrease sugar in the filling to ½ cup
- Use ⅓ cup each of granulated and brown sugar in the topping
- Add ¼ teaspoon more cinnamon to enhance natural sweetness
Gluten-Free Version:
- Substitute all-purpose flour with a 1:1 gluten-free baking blend
- Add ¼ teaspoon xanthan gum if your blend doesn’t include it
Lower Fat Alternative:
- Replace half the butter with unsweetened applesauce in the topping
- The texture will be slightly different but still delicious
The Science Behind a Perfect Cobbler
Understanding the science helps you master the art! Here’s what’s happening in your cobbler:
- The Filling Chemistry: The acid in the lemon juice breaks down pectin in the apples, helping them soften. Meanwhile, the flour’s starch molecules absorb water and expand when heated, thickening the juices.
- The Topping Magic: The cold butter creates pockets of steam during baking, resulting in a flaky texture. The boiling water partially gelatinizes some of the starch in the flour, giving the topping a unique texture that’s not quite cake and not quite biscuit.
- The Maillard Reaction: This chemical reaction between amino acids and reducing sugars creates the beautiful golden-brown color and complex flavors in the topping.
Frequently Asked Questions
Q: Can I use different fruits in this cobbler recipe?
A: Absolutely! This cobbler base works wonderfully with berries, peaches, pears, or a mixture of fruits. Just keep the total amount of fruit around 6-7 cups and adjust the sugar based on the sweetness of your fruit.
Q: My apples turned mushy. What went wrong?
A: Some apple varieties break down more than others when cooked. For firmer texture, stick with Granny Smith, Honeycrisp, or Pink Lady apples, and make sure your slices aren’t too thin.
Q: Can I make this cobbler in advance for a dinner party?
A: Yes! You can prepare the entire cobbler up to 2 hours before baking and refrigerate it. Alternatively, bake it earlier in the day and warm it in a 300°F oven for about 15 minutes before serving.
Q: Is there a way to make this recipe dairy-free?
A: Certainly. You can substitute the butter with solid coconut oil or a plant-based butter alternative. The texture may be slightly different, but it will still be delicious.
Q: My topping sank into the filling. How can I prevent this?
A: Make sure your topping mixture isn’t too wet. If it seems very loose, add an additional tablespoon of flour. Also, dropping the topping in dollops rather than spreading it helps maintain separation between layers.
Q: Can I reduce the sugar without affecting the texture?
A: You can reduce the sugar in the filling by up to half without major texture issues. For the topping, I wouldn’t recommend reducing it by more than ¼ cup total, as sugar contributes to the structure and browning.
Why You’ll Love This Recipe
After years of baking and countless apple desserts, this cobbler remains one of my favorites because it strikes the perfect balance between effort and reward. In under an hour of total work, you’ll create a dessert that tastes like you spent all day in the kitchen.
The contrast between the tender, spiced apples and the buttery, golden topping creates a textural experience that’s simply irresistible. Unlike pies with their sometimes-finicky crusts, this cobbler is forgiving and adaptable.
I love that this recipe doesn’t demand perfection – the rustic, homestyle appearance is part of its charm. It’s the kind of dessert that feels like a warm hug on a plate, bringing comfort with every bite.
Whether you’re baking for a special occasion or simply craving something sweet on a weeknight, this easy apple cobbler delivers that homemade goodness without the stress. It’s the recipe I turn to again and again, and I’m confident it will become a favorite in your household too.
Give it a try, and I’d love to hear how it turns out for you. There’s nothing quite like sharing the joy of a successful baking adventure!