When I first encountered Medovik at a friend’s house in Moscow, I had no idea I was about to taste one of Russia’s most beloved desserts. The delicate layers of honey-infused cake paired with rich sour cream frosting created a symphony of flavors that transported me straight into the heart of Russian culinary tradition. This isn’t just any cake – it’s a masterpiece that has graced Russian tables for over a century, bringing families together and creating memories that last a lifetime.
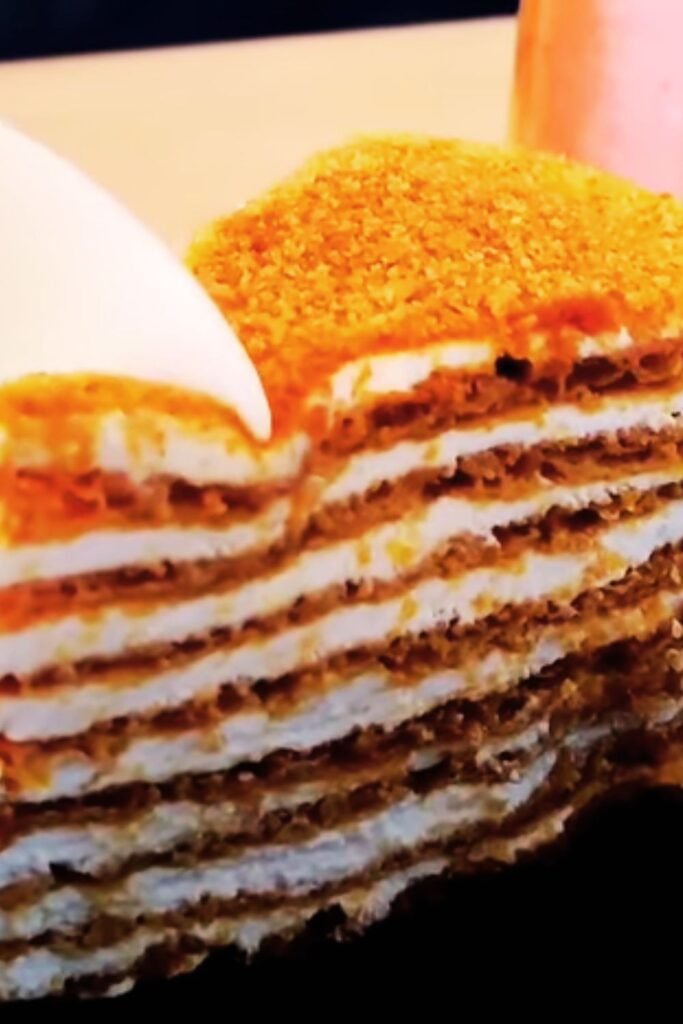
Medovik, pronounced “meh-doh-VEEK,” literally translates to “honey cake” in Russian. This multi-layered dessert represents the pinnacle of Russian baking artistry, combining simple ingredients to create something truly extraordinary. The cake’s signature characteristic lies in its numerous thin layers – typically eight to twelve – each one delicately flavored with honey and separated by luscious cream filling.
What makes Medovik truly special isn’t just its taste, but the patience and love required to create it. Each layer must be rolled paper-thin, baked to golden perfection, and then assembled with care. The magic happens during the resting period when the cream softens the crispy layers, transforming them into tender, moist cake that melts in your mouth.
The Rich History Behind Russia’s Beloved Honey Cake
The origins of Medovik trace back to the early 19th century, during the reign of Tsar Alexander I. Legend tells us that the imperial chef created this cake to win over Empress Elizabeth Alexeievna, who supposedly disliked honey. The clever baker managed to incorporate honey so skillfully that the empress fell in love with the dessert, not realizing its secret ingredient until after she’d praised its exceptional taste.
While this romantic tale adds charm to Medovik’s history, the cake’s true popularity grew during the Soviet era when home baking became a cherished tradition. Russian babushkas (grandmothers) passed down their closely guarded recipes through generations, each adding their own special touch to this beloved dessert.
During times when exotic ingredients were scarce, Medovik represented luxury and celebration. The cake became synonymous with special occasions – birthdays, anniversaries, New Year celebrations, and family gatherings. Its preparation became a ritual, often involving multiple family members working together to roll the delicate layers and prepare the cream.
Essential Ingredients: Building Blocks of Perfection
Creating an authentic Medovik requires specific ingredients that work in harmony to achieve the perfect balance of flavors and textures. Let me break down each component and explain why it’s crucial to the cake’s success.
Honey: The Heart of Medovik
Natural Honey: The star ingredient that gives Medovik its distinctive flavor and beautiful golden color. I recommend using light-colored honey such as acacia, clover, or wildflower honey. Darker honeys like buckwheat can overpower the delicate taste.
Heating Process: The honey undergoes a transformation when heated with butter and sugar, creating a caramelized flavor that permeates every layer.
Flour and Structure
All-Purpose Flour: Provides the foundation for our layers. The gluten content helps create the necessary elasticity for rolling thin sheets.
Baking Soda: Acts as both a leavening agent and helps create the characteristic texture when combined with honey’s acidity.
Dairy Components
Unsalted Butter: Adds richness and helps create tender layers. Room temperature butter incorporates more easily.
Eggs: Bind the dough together and contribute to the cake’s structure.
Sour Cream: The traditional choice for filling, providing tangy contrast to the sweet honey layers.
Heavy Cream: Often whipped with sour cream for a lighter, more luxurious filling.
Detailed Medovik Recipe: Step-by-Step Mastery
For the Honey Layers:
| Ingredient | Amount | Notes |
|---|---|---|
| All-purpose flour | 3½ cups (420g) | Sift before measuring |
| Honey | ½ cup (120ml) | Light-colored preferred |
| Granulated sugar | ½ cup (100g) | Fine granulated works best |
| Unsalted butter | 6 tablespoons (85g) | Room temperature |
| Large eggs | 2 whole | Room temperature |
| Baking soda | 1 teaspoon | Fresh, not expired |
| Salt | ¼ teaspoon | Fine sea salt |
For the Cream Filling:
| Ingredient | Amount | Purpose |
|---|---|---|
| Sour cream | 2 cups (480ml) | Full-fat preferred |
| Heavy cream | 1 cup (240ml) | 35% fat content |
| Powdered sugar | 1 cup (120g) | Sifted |
| Vanilla extract | 1 teaspoon | Pure vanilla |
Preparation Method
Creating the Honey Dough
I start by combining honey, sugar, and butter in a medium saucepan. This mixture needs gentle heating over medium-low heat, stirring constantly until the sugar completely dissolves and the butter melts. The aroma at this stage is absolutely divine – sweet, caramelized, and promising.
Once the mixture reaches a light simmer, I remove it from heat and quickly whisk in the baking soda. Watch for the dramatic foaming action – this reaction creates air pockets that contribute to the layers’ texture. The mixture will bubble up significantly, so use a larger pan than you think you need.
After the foaming subsides, I let the mixture cool for about five minutes before whisking in the eggs one at a time. The temperature is crucial here – too hot, and you’ll scramble the eggs; too cool, and the mixture won’t incorporate properly.
Gradually, I add the sifted flour and salt, mixing until a soft dough forms. The dough should be slightly sticky but manageable. I divide it into 8-10 equal portions, wrap each in plastic wrap, and refrigerate for at least two hours or overnight.
Rolling and Baking the Layers
Working with chilled dough is essential for achieving paper-thin layers. I remove one portion at a time, keeping the rest refrigerated. On a lightly floured surface, I roll each portion into a circle roughly 9-10 inches in diameter. The goal is translucent thinness – you should almost be able to see through the dough.
I use a 9-inch cake pan as a template, placing it over the rolled dough and trimming around the edges with a sharp knife. These trimmings aren’t waste – I save them for making delicious honey crumbs to decorate the finished cake.
Each layer bakes at 350°F (175°C) for 3-4 minutes until golden brown and slightly crispy. The timing is critical – underbaked layers will be chewy, while overbaked ones become too hard. I bake the trimmed scraps alongside the layers, then crush them into fine crumbs once cooled.
Preparing the Perfect Cream
The cream filling requires patience for the best results. I start by whipping the heavy cream to soft peaks, then gradually add the powdered sugar and vanilla. In a separate bowl, I whisk the sour cream until smooth, then gently fold it into the whipped cream mixture.
The consistency should be spreadable but not too loose. If the cream seems thin, I refrigerate it for 30 minutes to firm up slightly.
Assembly: The Art of Layering

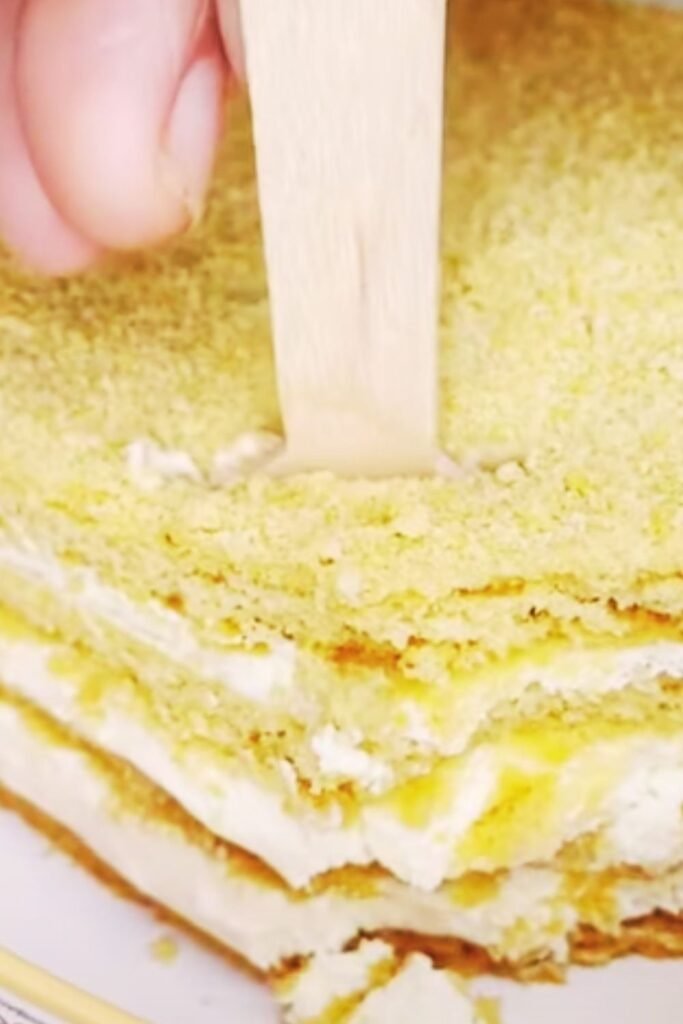
Assembly day is when Medovik truly comes to life. I place the first layer on my serving plate and spread approximately 3-4 tablespoons of cream evenly across the surface, leaving a small border around the edges. The key is consistency – each layer should have roughly the same amount of filling.
I continue this process, gently pressing each layer to ensure good contact with the cream below. The stack grows impressively tall, creating anticipation for the final result. After placing the final layer, I spread a thin coat of cream over the entire cake – top and sides.
The reserved honey crumbs get their moment to shine as I press them gently into the cream coating, covering the entire cake. This not only looks beautiful but adds a delightful textual contrast.
The Waiting Game: Patience Rewarded
Here’s where patience becomes virtue. Medovik needs at least 8 hours, preferably overnight, in the refrigerator to achieve its signature texture. During this time, the cream gradually softens the crispy layers, transforming them into tender, moist cake.
I cover the assembled cake loosely with plastic wrap, ensuring it doesn’t touch the surface. The anticipation during this waiting period is almost unbearable, but the result is worth every minute.
Nutritional Information and Serving Details
| Nutritional Aspect | Per Slice (1/12 cake) | Daily Value % |
|---|---|---|
| Calories | 385 | 19% |
| Total Fat | 18g | 28% |
| Saturated Fat | 11g | 55% |
| Cholesterol | 95mg | 32% |
| Sodium | 185mg | 8% |
| Total Carbs | 52g | 17% |
| Sugars | 35g | – |
| Protein | 6g | 12% |
| Calcium | 85mg | 8% |
| Iron | 1.2mg | 7% |
Serving Suggestions and Presentation
Medovik deserves presentation that matches its elegance. I prefer serving it on a beautiful cake stand, allowing its impressive height to command attention. Each slice should be cut with a sharp, clean knife, wiped between cuts to maintain clean edges.
The cake pairs beautifully with Russian tea served in traditional glasses with jam, creating an authentic cultural experience. For special occasions, I sometimes garnish individual slices with fresh berries or a light dusting of powdered sugar.
Consider serving alongside other Russian desserts for a themed celebration, or let Medovik stand alone as the centerpiece of your dessert table. The cake’s rich nature means smaller portions are perfectly satisfying.
Storage and Make-Ahead Tips
Proper storage ensures your Medovik maintains its perfect texture. The assembled cake keeps beautifully in the refrigerator for up to five days, actually improving in flavor and texture over time. I wrap it loosely in plastic wrap or store it in a cake keeper.
For make-ahead convenience, the honey layers can be baked up to a week in advance and stored in airtight containers at room temperature. The cream can be prepared a day ahead and refrigerated. This staged approach makes Medovik perfect for entertaining.
Freezing the completed cake isn’t recommended, as the cream filling doesn’t thaw well and the texture suffers significantly.
Troubleshooting Common Issues
| Problem | Cause | Solution |
|---|---|---|
| Layers too thick | Insufficient rolling | Roll until nearly translucent |
| Layers breaking | Dough too cold | Let warm slightly before rolling |
| Cream too runny | Over-whipping or warm ingredients | Chill and re-whip gently |
| Cake too dry | Insufficient cream or over-baking | Use more filling, reduce bake time |
| Uneven layers | Inconsistent rolling | Use cake pan as template |
| Bitter taste | Honey overheated | Keep honey mixture below simmer |
Variations and Creative Adaptations
While traditional Medovik is perfection in itself, several variations have emerged over the years. Some bakers add a layer of dulce de leche between every few layers for extra richness. Others incorporate chopped nuts into the cream filling for added texture.
I’ve experimented with adding a touch of cinnamon to the honey mixture, which complements the honey beautifully without overwhelming the traditional flavor. Some modern interpretations include fresh fruit layers, though purists might argue this strays too far from authenticity.
For those with dietary restrictions, successful adaptations using gluten-free flour blends are possible, though the texture will differ slightly from the traditional version.
Cultural Significance and Modern Relevance
In contemporary Russia, Medovik remains a symbol of hospitality and celebration. Offering homemade Medovik to guests represents the highest form of respect and welcome. The cake’s preparation often becomes a family activity, with different generations working together to create layers and share stories.
Modern Russian bakeries certainly sell Medovik, but most Russians still believe the homemade version surpasses any commercial offering. This sentiment speaks to the cake’s role as more than just dessert – it’s a connection to cultural heritage and family tradition.
The cake has gained international recognition in recent years, appearing in high-end restaurants and specialty bakeries worldwide. However, its heart remains firmly planted in Russian soil, representing the warmth and richness of Russian hospitality.
Questions and Answers
Q: How many layers should a traditional Medovik have? Traditional recipes call for 8-12 layers, though I find 10 layers provide the perfect balance of honey flavor and cream richness. More layers create a more impressive presentation but require additional time and patience.
Q: Can I substitute the sour cream with other ingredients? While sour cream is traditional, some bakers use mascarpone or cream cheese mixed with heavy cream. However, the tangy contrast that sour cream provides is essential to balancing the sweet honey layers, so I recommend sticking with the original.
Q: Why does my dough crack when rolling? Cracking usually occurs when the dough is too cold or hasn’t rested long enough. Let the dough sit at room temperature for 10-15 minutes before rolling, and ensure it’s been properly chilled initially.
Q: How thin should the layers be? Aim for layers thin enough that you can almost see through them – roughly 1/8 inch thick. Thinner layers create better texture contrast with the cream filling and allow for proper moisture absorption.
Q: Can I make Medovik without honey? Honey is absolutely essential to authentic Medovik – it provides both flavor and the chemical reaction with baking soda that creates the characteristic texture. Substituting corn syrup or other sweeteners will create a different cake entirely.
Q: How do I know when the layers are properly baked? Perfect layers should be golden brown and slightly crispy when hot, but not dark brown. They’ll firm up as they cool. Under-baked layers remain chewy, while over-baked ones become too hard.
Q: What’s the best way to cut clean slices? Use a long, sharp knife and wipe it clean between each cut. A gentle sawing motion works better than pressing straight down, which can compress the layers.
Q: Can I prepare components in advance? Absolutely! Bake the layers up to a week ahead and store them in airtight containers. The cream can be made a day in advance. However, once assembled, the cake should be served within 5 days for optimal texture.
Creating authentic Medovik connects us to centuries of Russian culinary tradition while providing an opportunity to slow down and appreciate the art of patient baking. Each layer tells a story, each dollop of cream adds character, and the final result represents something truly special – a cake that transforms simple ingredients into an extraordinary experience that brings people together around the table, just as it has for generations of Russian families.
The beauty of Medovik lies not just in its complex flavors and impressive appearance, but in the love and patience required to create it. When you serve this magnificent cake to your family and friends, you’re sharing more than dessert – you’re offering a piece of cultural heritage that spans generations and continues to create new memories with every bite.